![]()

Update Feb 26th, 2022: A software engineer from the Qt company reached out to me after reading this article to acknowledge some of the iOS issues. Saying that they have been know but weren't tackled yet due to time constraints. Links to tickets were sent to me and I'll be provided them at the end of of the "Tart Apples" section. I thank them for informing me.
Recently I started a new job, where I was working on an Android & iOS app that's written in Qt/C++. While I have loads of experience with Desktop Qt (the classical Widgets API), I'd never really made anything practical for Android and iOS (QML/Quick API). In order to get some better practice with trying to make "fully cross platform mobile and desktop" software, I thought it might be worth my while to make a small app that achieves this in Qt. And it could act as a starting point for others showing how to structure such a project. Qt makes the bold claim of "Code once deploy everywhere." I really wanted to test that claim. I did and I feel it's accurate.
I want to note that this blog entry is not meant to be a complaint about Qt (okay, maybe a little). I really do love the framework. I Wouldn't have tried to make a career out of my knowledge of it if I did not. But I do want to note that there are parts of it where it can get frustrating. I hope that this lengthy post can help someone else in the future who's thinking about using it. Or even the issues described here will be resolved and these words become horribly out of date ramblings of an era long gone.
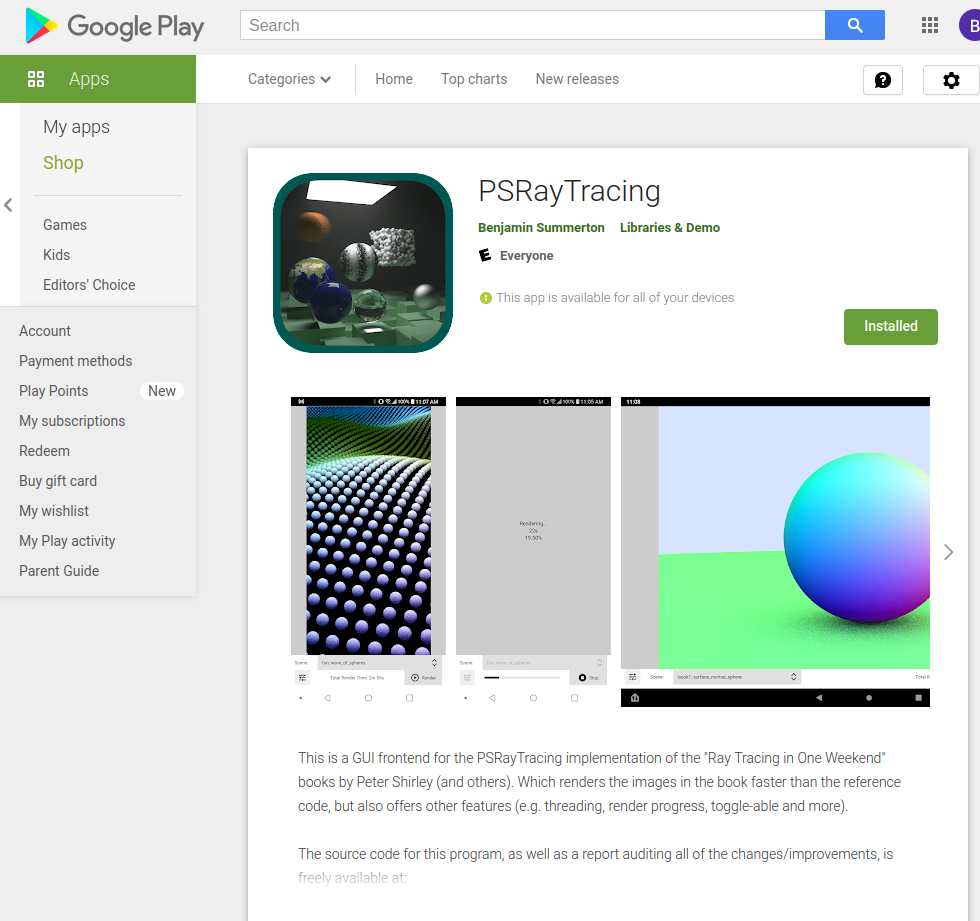
If you want to simply play with the app, It's up on Google Play over here. It does run on iOS, but there is no page in the Apple App store; details as to why are far below. This is fully open source, so if you want to peek at the code, you can find it here
A Friendly UI for a Past Project
Yet again, I find myself not able to escape working on the PSRayTracing project I first released about a year and a half ago. While I'm very satisfied with how the code performs on desktop devices, I was really interested in seeing how well it would work on mobile and tablet platforms. I have a Kindle Fire from 2020, an LG Q7+, and recently had to purchase an iPad Pro (M1) for work purposes. PSRayTracing, being very vanilla standard C++ (except for third party source) I know this should compile and be able to run on Android and iOS with no problem. Moreso, the issue rests in providing a good way for someone to use this when a terminal window isn't really available. Writing a Qt based, Cross Platform GUI front end to PSRayTracing is something that I thought would serve my purposes well.
I've been dabbling with the Qt framework for about 8-ish years so far. It first started with me trying to make animation software back in university. It became something I could slap on my resume when looking for required internships. After graduating, I still spent a considerable amount of time on the framework. Beginning with my second full time job, I became a "Professional Qt Developer". I still fiddle with it all the time for my hobby projects.
I remember the jump from Qt 4 to 5 was pretty big. I also remember when Qt 6 was formally released only a little more than a year ago. At that time, Qt 6 wasn't on feature parity with the 5.x series. IMO, it was missing some critical stuff. Then later on 6.1 came along. It was more put together, but missing other components I wanted (e.g. Charts). But in the recent past, 6.2 came out. We were promised that it is now fully on the level with the latest from 5.15. And, it's an LTS version too! So I thought this would be a great opportunity to take out 6.2 for a real test drive.
My goals were this:
- GUI frontend that works on Windows, Mac OS, Linux desktop, along with Android and iOS. With a seamless experience between everything
- Write as little platform specific code; or none at all
- Be able to profile performance of the mobile devices for PSRayTracing
- Try not to break existing things
I will say that I was able to achieve all of this. But like with any project, there were some bumps along the way. I'm still going to be using Qt after this; this blog post is not meant to knock it down, but to catalogue the hiccups I went through and you may have to yourself if you go down the Qt path.
If you ever played with PSRayTracing prior to this point, it was something that you had to download, compile, and use in the command line. I didn't want to break this way of using the program as it is very nice to have a headless mode, especially for testing, so some refactoring was in order:
- Pull out all of the rendering logic into separate component; aptly named the "Render Library"
- Take all of the leftover
main()code (argument parsing, text UI progress bars, etc) and put it into a separate sub-project. The "CLI Runner", which uses the Render Library - Make a new project called "Qt UI" that is the fancy pants graphical way to interact with the Render Library. It would serve all of the functions of the CLI Runner (e.g. scene selection, thread count, resolution, etc,) but provide a "more safe" interface. For example, it would stop you from entering in a resolution of
-41xPopKorn. It is to also have its own image viewing component. That way you don't have to open the generated image in another program. Qt provided me all of the building blocks to make this
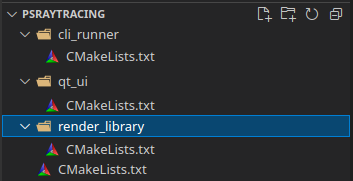
The existing CMake project structure that I had at the beginning of this was easy to leverage. I first made a top-level CMakeLists.txt file. From there, created a render_library/, cli_runner/, and qt_ui/ folders, all with their own individual CMakeLists.txt
One of the other important things was to make sure that people didn't have to build the Qt UI if they didn't want to. Since this should be able to run in a headless mode, you shouldn't have to need the (quite hefty) Qt framework installed on your system to get going. Luckily, this was easily achieved by adding a CMake build option, simply called BUILD_QT_UI. By default, it would be set to OFF. Then at the CMake configuration step, you could flip this on.
"But wait! In the Qt creator, if I specify I'm building for Android or iOS, I still need to manually flip this flag!!" I'm a fan of automating away intentions and reducing as much work as possible for others. I needed to wipe out my build folders a lot during this process, so any configuration flags I had would go bye-bye. So if I was building for Android or iOS, I wanted it to build the Qt UI by default. When configuring the builds for these environments, it's pretty simple to detect. Android is easier, iOS is a bit more involved, but here is the snippet I added to check for a mobile environment:
I gave a thought to trying out meson, since it seems to be the latest hotness in the C++ community for the past few years. But seeing as I already had a CMake setup going and I wasn't too sure of the Qt (6) support for meson, I thought it would be best to not change a horse mid stream. I'll keep it in mind for a future project.
It's also possible that I could have done this Qt only portion in qmake (Qt's own home grown build system), but part of me feels that this tool is on the way out. For Qt 6 they moved their build system over to CMake and have added much better support for Kitware's tools. Though at times, I do feel that the CMake support is not fully there. CMake also did require a lot more "manual specificity" with options for iOS, which was a real pain (and should just be set by default). More on this later.
Others in the Qt community have the strong desire to use CMake for their projects, but can be a pain when trying to couple it with Qt. A good example of this is QtIosCMake. I was tempted to use this for my own project, but I wanted to see how far I could get without bringing in third party CMake scripts. I'm glad to report that I was able to do everything with "Vanilla CMake", sans the stuff provided by Qt officially.
One other thing to note is the render library portion is built as a static library. This was done because it makes distributing easier. In a perfect world, I would love to have it as a DLL/dynlib/.so but knowing how much of a pain it can be to deal with dynamic libraries in C++ land, especially when it goes to multiple platforms, I opted for the static library route instead.
Now that my CMake structure was all good, it was onto the next step: code refactoring
Refactoring out to "Render Library" and "CLI Runner"
Since I planned well last time, the existing structure of PSRayTracing made this fairly easy to do. When I made the first version of the project, The main() function was only about 150 LoC long. It had a mix of instantiating render logic objects such as the RenderThreadPool and RenderContext, but also the user interface components like util::ProgressBar and an argument parser. It also handled the "save render to PNG" logic. These two parts needed to be split into their own sections:
- Render Library: Should contain all of the classes & functions required to queue up a render, retrieve it as a block of bytes, and probe the status (e.g. "54% complete")
- CLI Runner: Should use said render library. Provide the same exact (text) interface that existed; as not to break anything. The responsibility of saving the render to an image format (e.g. PNG) lives here.
This was actually much easier than I expected it to be, since most of the rendering logic was separated well (already) from the "TUI logic". Chopping up the old main() routine went quickly. An interface to use the render logic was put into a file render.h, which looked like this:
Some extra functions that didn't exist before were stop_active_render(), render_in_progress(), and num_cocurrent_threads_supported(). From an API standpoint, it's not nice to have to wait for a long computation to finish without some way to kill it prematurely. For the CLI Runner, a user could simply halt a render by doing Ctrl-C. But for the GUI portion, there needed to be a way to end a render via a button; without ending the whole program.
num_concurrent_threads_supported() is more of a "nice to have". In the GUI, I wanted to give my users a button they could press to max out the core/thread count. Having them guess this isn't really acceptable. C++ actually has a built-in function to retrieve this. It would be silly not to add this in, even if it was just a wrapper around some standard library call.
After finishing the splitting up, it was now onto the real important part: The Qt GUI.
Qt Time
At the time I started out, version 6.2.1 was what was available. Midway through 6.2.2 also came out; not too much changed. About a week after I formally considered this "released" Qt 6.2.3 made its debut. Qt Creator also had a few updates. Noticeably with a focus on better CMake support. None of these caused any issues whatsoever. But it is kinda funny to see the project you started from a template become a little out of date a few weeks later.
One thing I've learned when trying to make cross platform apps: make sure you develop for multiple platforms at the same time. This might sound obvious and you might be confused that I need to stress this. Let me explain further with some examples:
Do: Write your application with a "unified experience" in mind. Develop on desktop & mobile at the same time. In fact, develop using at least two desktop platforms.
When I was working on a Qt Widgets program that had to support Windows, macOS and Linux. I did this thing where I would use one OS as my primary dev environment (e.g. Linux), and use a second one as my primary test/verification environment (e.g. Windows). Changes would only go in if they worked exactly on both. Then at the start of next week, I would rotate out which two OSes I was using (e.g. dev was now Windows, test became macOS). Then at the beginning of the following week, do another rotation (dev=macOS, test=Linux). And so on and so forth. This allowed me to catch platform inconsistencies quickly.
For example, I found specifying the native colour picker widget wasn't working correctly on Linux/Gtk. And the Qt provided fallback was considered undesirable. So I got to make my own. Which turned out to be something our customers really loved in the end!
Don't: Completely write the app on desktop (only one OS), call it done, then claim "it should run on every environment perfectly fine" without verifying. If you do this, you're going to find out things will not work as you expect them to. There are actually parts of the Qt API that aren't 100% cross platform. For example: Qt Bluetooth. With iOS, you cannot use the Bluetooth classic API. And with Windows, you're not able to make your device act as if it is a Bluetooth Low Energy peripheral. In Qt's defence, the Bluetooth situation isn't their fault.
Another place that I worked, the deployment platform for the Qt application was an embedded linux tablet, but what did the other developer build the application on: Windows... This thing was to run in fullscreen mode. It looked completely inconsistent between development machines (e.g. different laptops), and when running on the actual box itself (which had a smaller screen). Inside of the code, I found all sorts of Windows specific #ifdefs, fonts (e.g. Tahoma), sizings and whatnot. IIRC, I was told Qt was picked for this project since it ran on the developers' machines (Windows), but also compiled on the desired target device at the time (the embedded Linux tablet). Though they didn't always verify their changes worked on the target device before merging the code...
Avoid: Writing anything that's platform specific. You might need to do this sometimes. If so, keep it as minimal as possible and wrap it in an abstraction layer. I was hoping not to do this for this project, but alas, I actually had to.
Now back to actually developing this GUI: I took a Desktop Linux & Android Tablet first approach, verified the work on macOS & Windows at the same time. Included the iPad into the mix once I had a solid base. And finished with it on my Android Smartphone. I did find my share of platform inconsistencies with Qt, issues with supporting multiple DPIs, and small vs. large screens.
Making the UI, and Making it Work
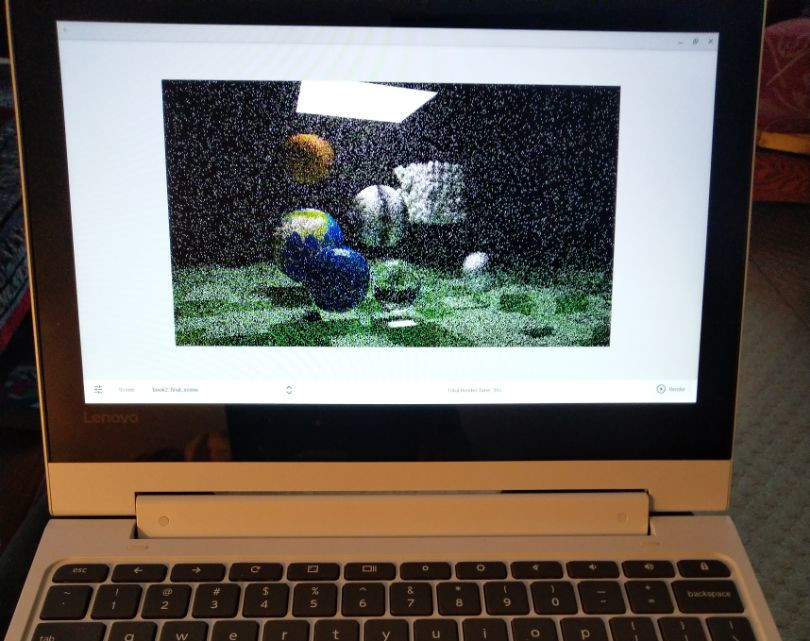
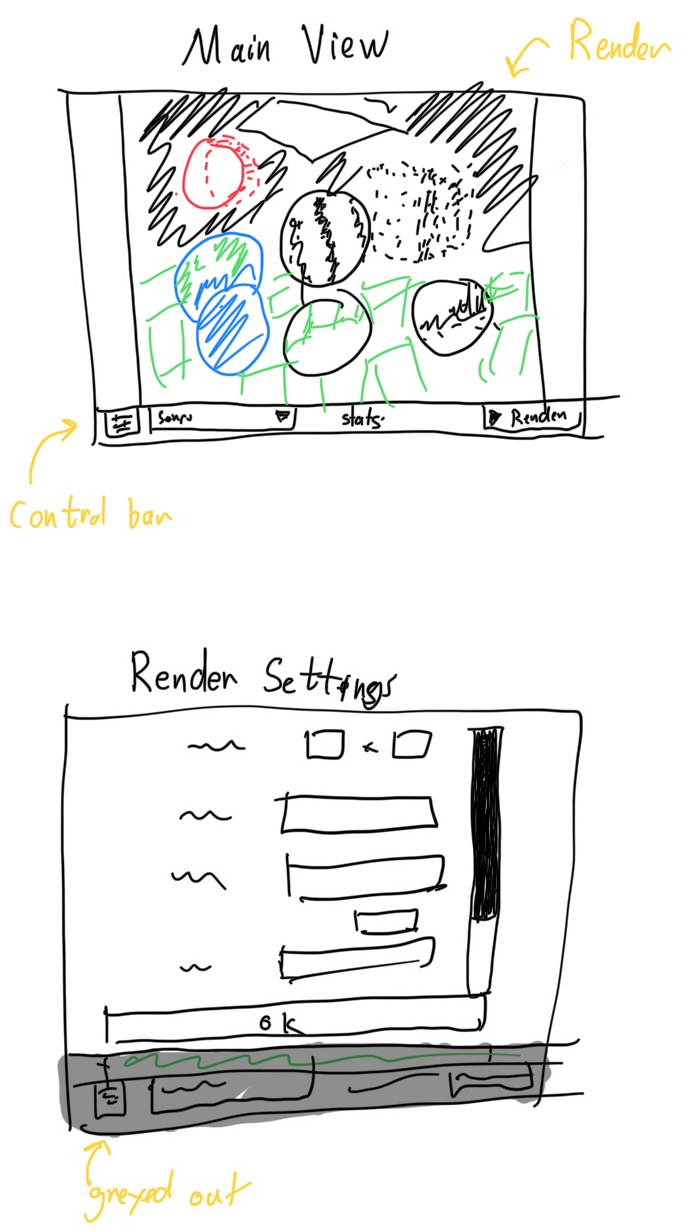
Starting out, I wanted to make sure that the UI was focused on viewing the render. There would be buttons at the bottom and some status info. You could select which scene to render from a drop down. To change the render settings, those options would be available in a pop-over menu.
So I first set out to implement this using QML on the Desktop. This was mostly built out of simple controls such as Buttons, TextFields, ComboBox etc. Laying out the controls was mostly done with anchors . In a few small cases I used the Row/Column layouts. One of the more complex inputs that needed to be handled was size entry. I've seen it done where you have two side-by-side integer fields split with an "x" (or they're stacked on top of eachother). Others where you have one field but need to type in that "x" as if it were text. I opted for the former.
One of the safe-guards I added was that the user could not close the "Render Settings" popover unless all fields were filled with correct input. QML with it's "validators" feature made this easy. This was to make sure input could be more "safe" compared to using the CLI Runner.
Unfortunately, at the time of writing, I noticed there is a way to close this popover if you leave some invalid input. And then if you try to render: segfault. Time to go bug fixing...
Androidization
Everything looked fine on the Desktop, so next was to verify it was good on the Android Tablet. Setting up the Android SDK in Qt Creator was a breeze; nothing more than a point and click adventure. Once that's up, you should be fine to build and deploy to Android by simply plugging in a device (set to developer mode) and pressing the Run button in the lower left.

Very quickly, I saw what I had running on the desktop was mirrored on my tablet.
When running for the first time, you might notice that the app has an ugly default icon, or the name displayed doesn't look quite right. (e.g. my CMake project was called PSRayTracing_QtUI, and Android chose that). This might be okay for initial development purposes, but for distribution (i.e. in the Google Play store) this is going to get flat out rejected. To fix this, you'll need an AndroidManifest.xml file. Qt Creator actually has some nice simple support for the file. Though, getting one was a little confusing. I thought this would be done from the File menu. But it's actually tucked away in Projects -> Android builds... -> Build Steps -> Build Android APK -> Application -> Create Templates. Finding and clicking that button will add the manifest; IMO, it should not be this complicated for something so vital.
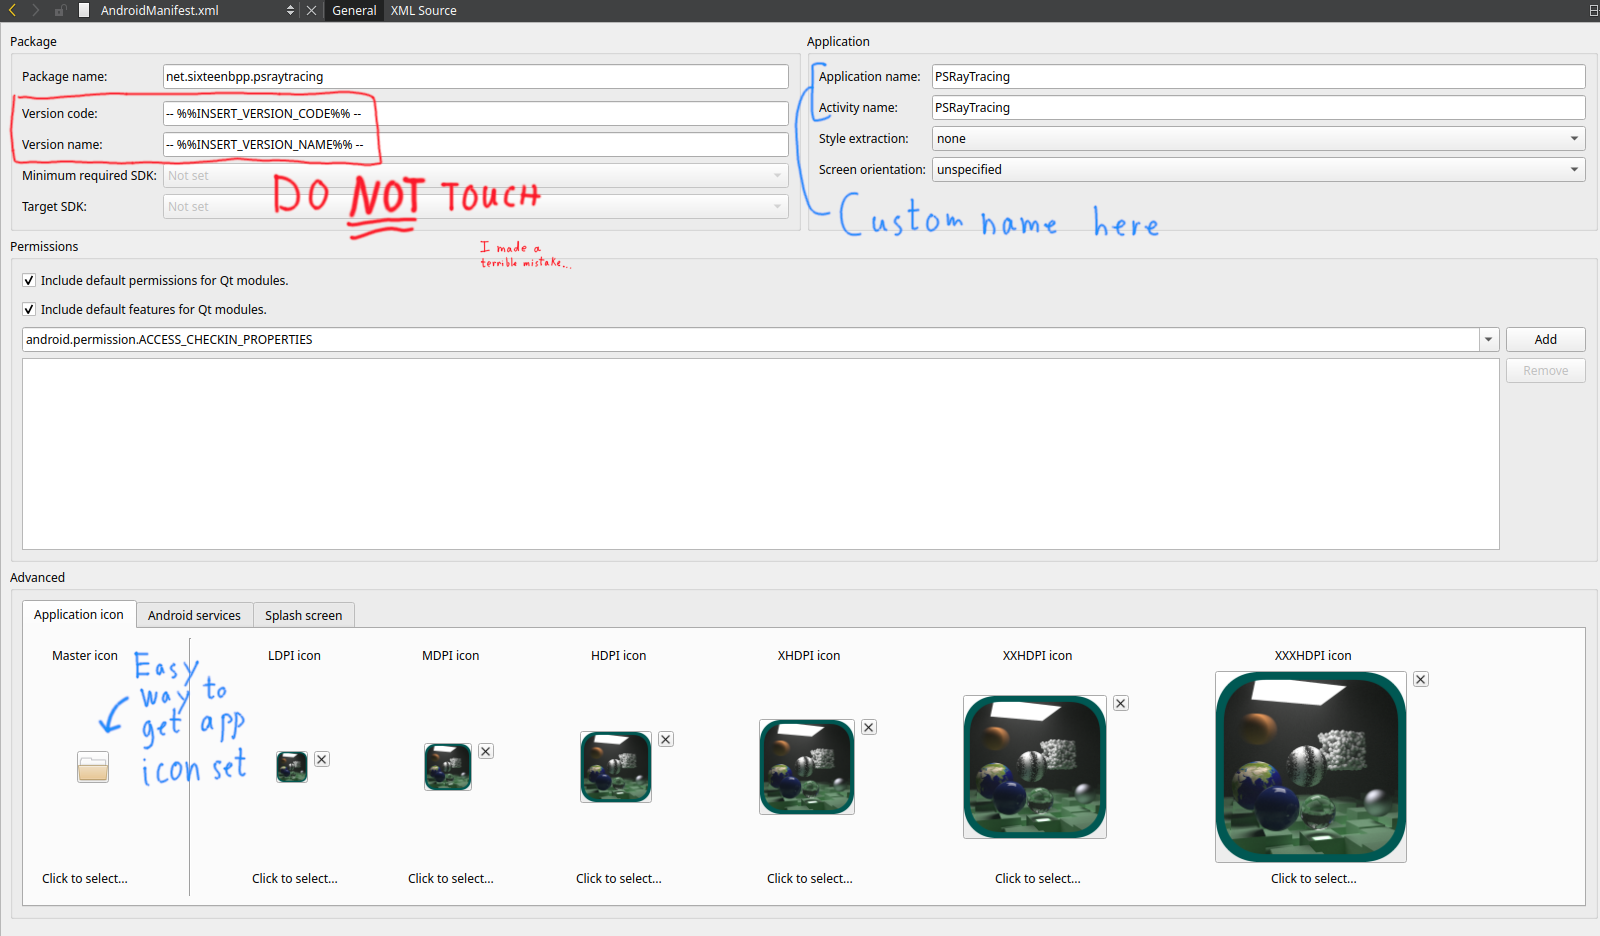
I really do like that Qt Creator has a built-in GUI editor for this (even if it is a little bit hidden). Setting and name and icon are easy. You can also add entries for permissions (e.g. Location). Please make sure to heed my warning about not touching the stuff in the upper left. I will elaborate on that further down the line. When I was first starting out, I put the value of 1.0 in there. Oh boy was that a mistake...
But now, the name of the app and the icon were showing up properly. I thought it would be good to test this out on my Android phone which has a much smaller (physical) screen than my Kindle tablet. Loading up the app looked fine in landscape mode. The popover for render settings didn't show as many elements in the scroll, but that's fine. When I turned my phone to run the app in portrait mode, something bad happened: the UI broke.
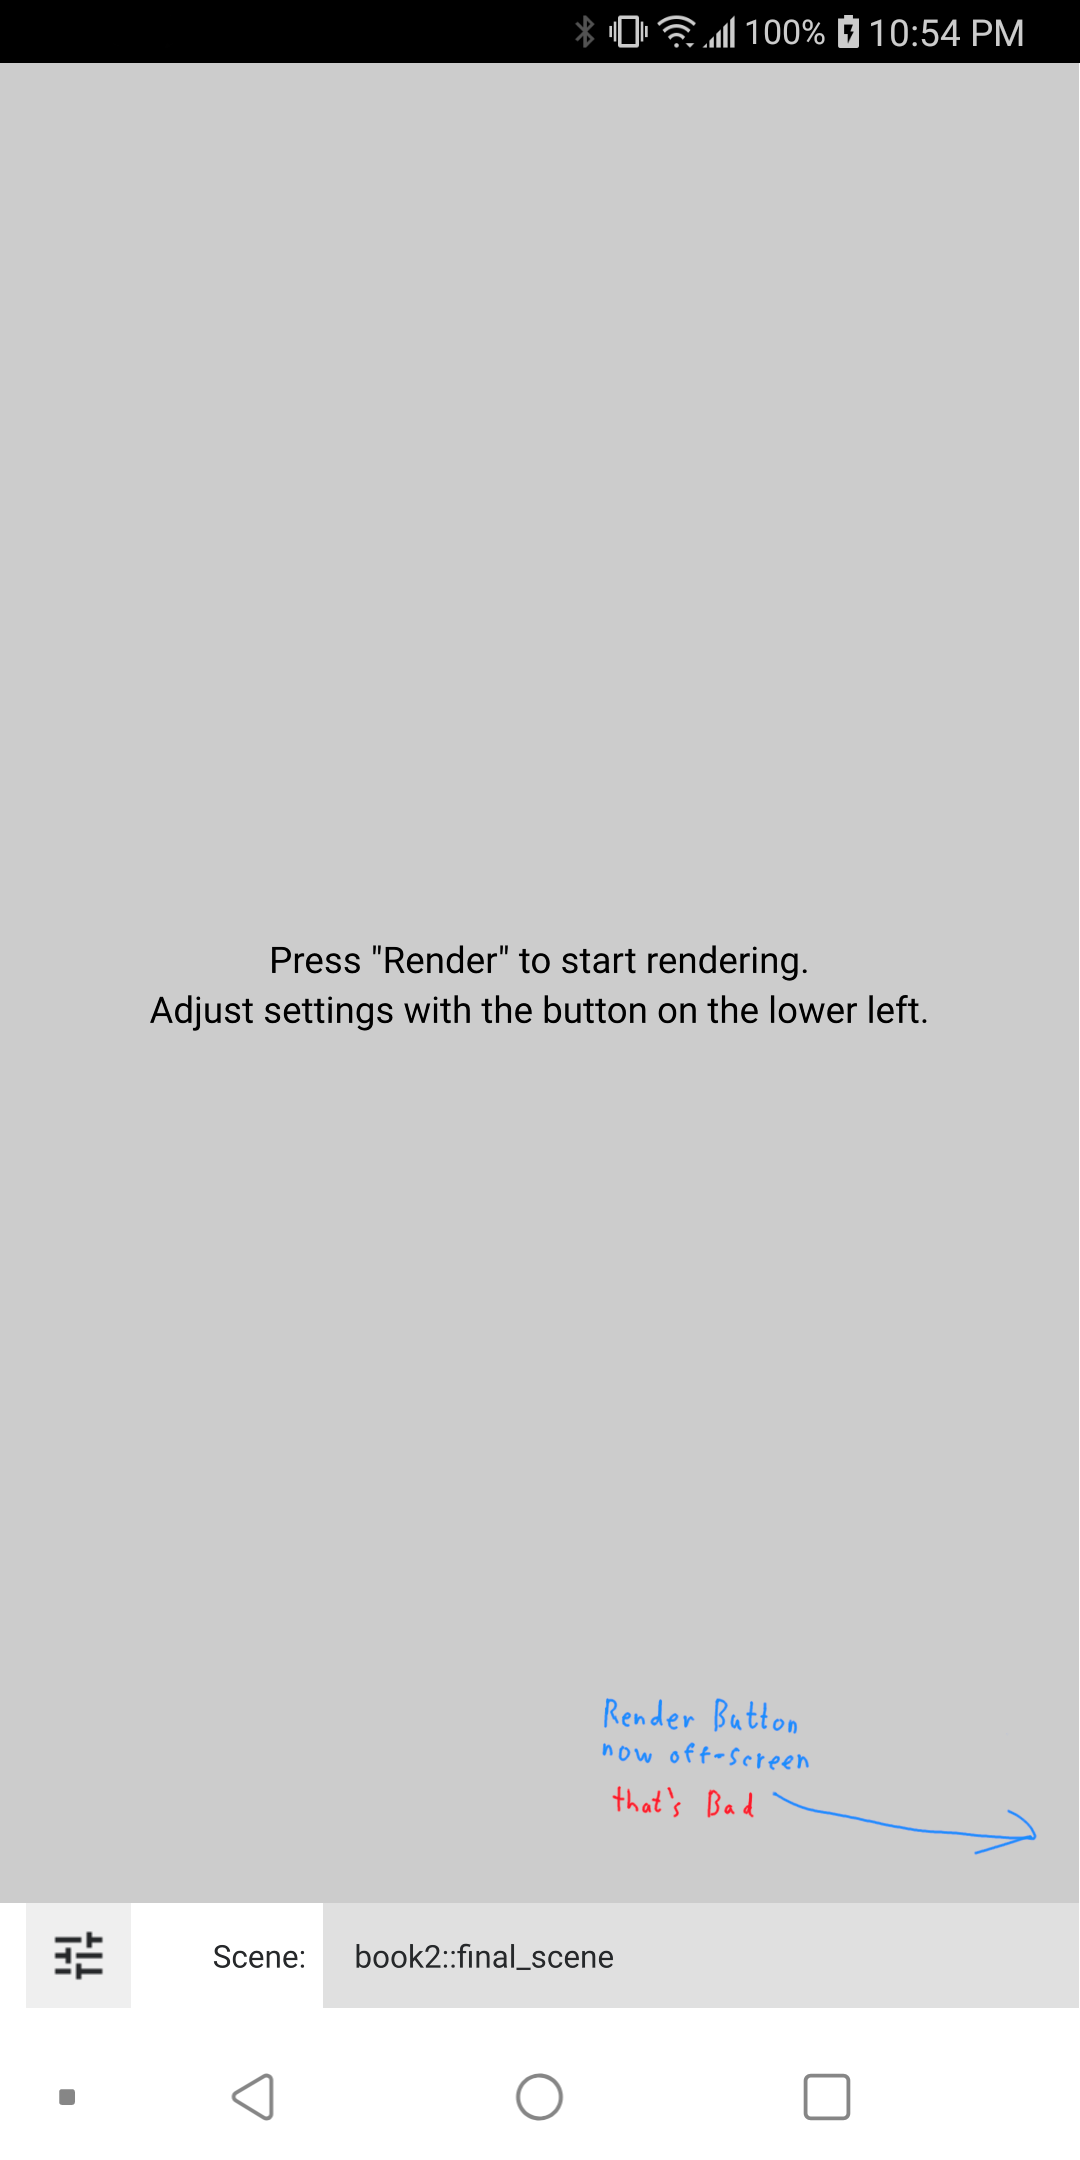
When developing initially on the desktop, I hadn't accounted for when my application is taller than it is wider. The scene select dropdown was way too wide, but it needed to be like that because scenes with very long names could get cut off. This would push the "render status" message off of the screen as well as the button to start/stop rendering. On top of that, I originally designed the Render Settings popover to be centred, with some fixed size padding on the left and right sides. This was no good as well now because all of the labels and text entries became super squished. Taking a short time to redesign, I came up with this scheme for the "Controls Bar":
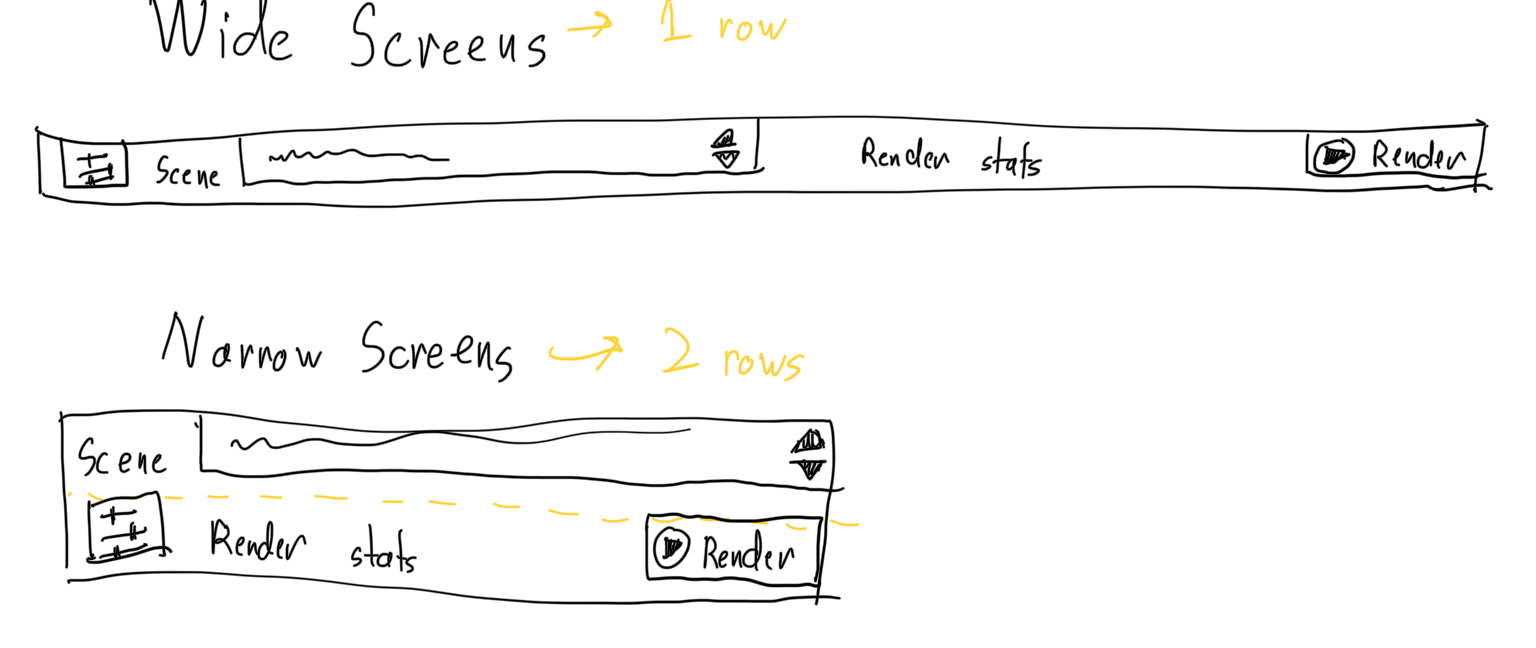
There would be two rows now. A single row tall when everything could fit. Two rows for narrow screens. Figuring what exactly was a sweet spot for this was a bit tricky. It was some trial and error. I decided that using anything less than 700 pixels would be considered "small" (in terms of width).
It worked well on Desktop; and then on Android as well!
This was achieved using using States along with AnchorChanges and PropertyChanges. I was hoping to instead define multiple layouts in separate files and use a Loader to swap out which one would be active. I had trouble understanding exactly how loaders worked, and was really concerned with signals/slots. So I opted instead for this solution where I shift around anchor points, padding, and sizing. It was a tad bit tedious. I do wish Qt had some better built in way to handle supporting multiple screens with adaptive UIs.
The Felgo framework has already solved this issue I believe, but I want to avoid pulling in more code which would break the "vanilla Qt as possible" rule I set out for myself.
Now with the app working well on Desktop computers, Android phone & tablet, it was time to make sure everything would work on iOS. I only had an iPad with me so I was going to focus on that display format. Since I had the app's UI working well on "small screen Android", I was going to assume that things would be fine on iPhone.
During development I never ran the app in the iPhone simulator because it was super-duper slow on my hardware. I then later purchased an M1 Mac Mini (way faster) and well, found out that iPhone portrait mode was busted. This was all after I considered the initial release ready. As I laid out earlier, don't make assumptions when dealing with cross platform development.
Tart Apples
Dusting off a Mac Mini from 2014, I updated the macOS version, put on Xcode and the latest edition of Qt. I got to work making the app running on my iPad. I was a little worried that things wouldn't go well, due to my hardware being nearly 8 years out of date (and knowing how quickly Apple likes to deprecate tech), but alas. I was able to build! But then I had a linking error...
This was odd since it was building and linking perfectly fine for Linux, Windows, macOS, and Android. Looking at the errors, it turned out the Render Library wasn't being found. Inspecting the build folders I found the static library was being built. Though, when the iOS app was linking everything it needed, it was looking in the wrong directory. E.g. the library was placed in Debug-iphoneos/ but it was expecting to find it in Debug/
(╯°□°)╯︵ ┻━┻
Why this was the case for iOS, and only iOS, I have zero idea. Someone is to blame. I'm not sure who though (I'm looking at you CMake). But to remedy this, it was simple: add a symbolic link to "fix" the problem. In CMake it's possible to add a pre-build custom target to run an action before some other step. Here's what was added:
This is inside of an if (APPLE) ... block. It's absolutely disgusting. I hate it. I want to get rid of it. It makes me feel bad. But I need it... Yuck.
A note: When building your app for iOS, I'd recommend only using Qt Creator to configure the Qt/CMake project (for iOS), but do the actual building of the project and pushing to the iDevice in Xcode. This ended up being the path of least resistance for me.
After setting up all of the developer profiles and signing junk, I pressed "Run" in XCode, and was treated to the app running on the iPad:
Wat? That doesn't look right. It's. So. Tiny.
This had me truly confused. "But it worked fine on Android tablets... What the heck is going on here?" I thought. This was the first iOS app I had ever made. I spent hours scouring google searches, Stack Overflow questions, and Qt Forum posts to find out what the issue was: I didn't mark the app to be deployed on iPad as well. This is something you need to select in Xcode.
After that, voila, I had my app sizing as intended:
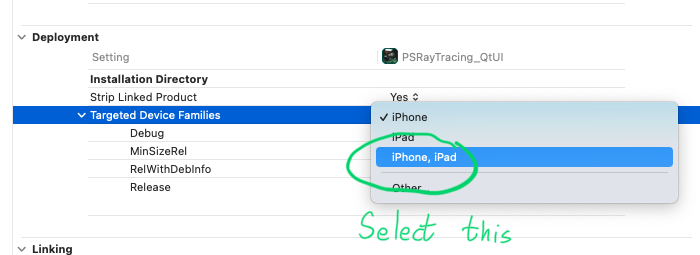
While it was good, there was another underlying issue: The "Targeted Device Families" option is a setting that lives in .xcodeproj. And for my case using CMake, this is actually a generated file that goes in the build/ folder. I'm not a fan of committing generated files, especially any build artifacts. I could always put a note in the REAMDE that says "If you're building for iOS, you'll also need to change this one setting to..." But this is detestable. It also doesn't work great when you want to get any sort of CI/CD involved. After some more googling, I did find a solution. I could set a target property in the CMakeLists.txt:
Magic numbers ahoy!, 1=iPhone, 2=iPad, 1,2=iPhone & iPad. Yeah, this is a little disgusting too, but it's what needs to be done. In fact, it would be nice if Qt's CMake stuffs did this automatically or provided a simple "build for iPhone/iPad/all" option.
For this pothole, I really don't know who to pin the blame on. All three Qt, Apple, and CMake didn't have the clearest documentation for this. It does seem like a common problem other developers might face since people tend to want to target as many types of devices as possible. I would have appreciated a " Common issues developers new to <X> face " section somewhere. But maybe the problem rests with me not knowing all the ins and outs of Apple/iOS development. I just want my app to work, and work well.
The app seemed to be functioning correct now. But likewise with Android, the display name of the app and icon weren't right and needed a custom one; without these a rejection from the Apple App Store would be certain. Getting this to work was another pain point for iOS.
Qt does have some adequate documentation when it comes to explaining some of the specifics for iOS They talk about how to set a custom app name, icons, launch images etc. But there's one major problem with that page; It does not have a single mention of how to do these things with a CMake build system. It only explains how to do this stuff via qmake. One could argue that "how to do this in CMake is out of the scope" but these are vital to get an iOS app to be considered finished by Apple's standards. It leads the developer to go and have to hunt for this information themselves. What I found out that I needed to add to the project was:
- An
Info.plistfile. Or the.invariant I used to generate one- This gives you the ability to set a custom app name
- An "Asset Catalogue". a.k.a known as
Assests.xcassets- This lets you use an app icon, which is called an
AppIcon.appiconset
- This lets you use an app icon, which is called an
- Some more Apple specific configuration to be in the
CMakeLists.txt
I can't recall how many days this took, but it wasn't fun. While this is mentioned in the "Platform Notes - iOS" document, I need to reiterate a fact mentioned above: none of this is mentioned on how to do this in CMake. If you read the page a bit more, it mentions that qmake does some of this for you (e.g. the generation of an Info.plist file). One suggestion I have for Qt to make this process less painful is to have a button, similar to the one that generates an Android Manifest, but one for iOS deployment. Oh, and as for all of the things I needed to add to CMake, here they are:
This stuff should really come default or be handled by Qt's CMake scripts.
It seems like I'm not alone in my troubles here. The third-party project QtIosCMake mentioned above tries to make this easier. While it's nice that others are willing to share the work that they've done, I don't think I'm alone in believing this should be provided by Qt.
Maybe the easiest part was generating all of the icons. I found this lovely site which does it for you. You'll need it since Apple requires your icon about 30 times over in different sizes.
Update Feb 26th, 2022: As mentioned at the top, some of these things I described here are actually known by the Qt Company and are actively being worked on:
- QTBUG-95838: Tracking ticket for "Improve experience of building iOS projects with CMake"
- QTBUG-93268: target_link_libraries does not work with a target name on iOS
- QTBUG-95837: Add default launch screen storyboards for CMake iOS projects. Looks like some code was merged and this ticket has been closed
- QTBUG-100833: Default iOS project to both iPhone and iPad deployment
But alas. After all this frustration, the GUI frontend was working great for the iPad! I had my fancy display name and fancy icon. Moving on, there were some extra features I wanted to add into the app to make the experience better for anyone to use:
- A button in the Render Settings screen that sets the resolution to render at, to the pixel dimensions of your screen
- The ability to zoom in and pan on a completed render, along with it being shown in a fullscreen mode
The second one was going to take a bit extra to make. Unfortunately, this isn't a control that comes by default in QML/QtQuick. I would need to build it myself. For the moment, I simply had the app displaying the render in the center of the app. I opted to work on the button first instead.
The Most Frustrating Button of my Entire Life
It's nice being able to view and generate renders at a native resolution. By default, the app renders at 960x540, which is reasonable IMO for simple testing. While a 1080p or 4K resolution screen is pretty standard these days for many desktop/laptop computers, there still are differences here and there; and it's more of a wild west for smartphones & tablets. If a user wanted to render an image at the same resolution as their device, I don't want to force them to have to know what their native pixel size is. I thought adding a button that reported the native pixel size, and pressing it would set the render size would be handy. I implemented it, but oh man, did it take a lot.
Going back to my Desktop -> Android -> iOS development process, I started again with Linux. QML has a built-in type called Screen that you can use to poll for display information. The width and height fields are what I wanted. Note what their documentation says:
This contains the [width|height] of the screen in pixels.
Using this I added the button into the Render Settings form and it worked. On my Lenovo X1 Yoga Carbon, The "Use Device Resolution" button said that I had an 1920x1080 screen. Pressing it sets the render size. Even better, the width and height properties of Screen support device rotations, and notifications in the event they change. So when I built & ran the same code on the Windows partition, put it into "tablet mode" and rotated the deivce 90 degrees. The button changed from saying my screen was 1920x1080 over to 1080x1920! Rotating it another 90 degrees made it go back. It was absolutely lovely.
Next, was to confirm that it was working on Android. When I put it on my phone (an LG Q7+), the button reported that I had a resolution of 311x823. What? That's not quite right... The specs of my phone say that I have a 1080x2160 pixel display. What could have been the matter? I then realized that all modern phones have really high DPI displays. The Screen object in QML has has a property called pixelDensity. Which on my desktop machines was reporting a value of 1.0. But on my Android phone, a value of 2.65 (IIRC). Now, multiplying these values:
823 * 2.65 = 2180.95
311 * 2.65 = 824.15
Wait... This still isn't correct. See, the Screen.width/height property returns something known as "logical pixels". They don't match the actual physical resolution. The Qt documentation doesn't say anything about this... The use of "logical pixels" is moreso meant to make sure apps scale properly across displays of different pixel densities. Okay, so I couldn't use the easier QML Screen object to get my desired "Use Device Resolution" button. Digging deeper in the Qt docs, there's also the original QScreen C++ class avaiable. In fact, look at the entry for size():
This property holds the pixel resolution of the screen
"Ah, I shall have my native screen resolution!" I thought. While it was a bit more work to get to the C++ API talking to QML, it wasn't too much. So I used QScreen::size(). And it reported 823x311... Once again, logical pixels... Not the real resolution.
Trying out the glut of properties available in QScreen, no single permutation, combination, or formula of them got me that native resolution I wanted. I tried everything I could think of. The next thing was something I didn't really want to do, but had to: Platform specific Java/Android native code. (dramatic music plays)
Adding in Java code and using it as part of the project wasn't that hard: 1. Create a new .java file. Note that it needs to follow the whole folder hierarchy to work properly (See: https://github.com/define-private-public/PSRayTracing/tree/6ce9f2d6a06b33a935d2d666b941d28b09a44473/qt_ui/android/src/net/sixteenbpp/psraytracing, notice how it's the only file in the tree of foldes). 2. Write your Java specific code in that file. Keep it short and sweet. 3. In the CMakeLists.txt file, add it as a project source. Make sure it's only added in when building for Android 4. On the C++ side, use a QJniObject to access the Java code you wrote
Here's how I did it:
What makes me a little extra sad is that the getRealSize() method is actually deprecated. And didn't see any alternatives. So now I'm being forced to write platform specific deprecated code just to figure out what the screen resolution is. And in C++, this was done to call the Java code:
Yeah, that does look a little clunky, but this is what you have to do if you want to call the Java/Android functions from C++. I defined another function QSize compute_true_screen_resolution() that will call the above block only when building for Android (via an #if defined(Q_OS_ANDRODI)...).
After all of this strife, I loaded up the app on my smartphone and as I had hoped, the button now said "Use Device Resolution (1080x2160)". I rotated the phone 90 degrees and it changed to match the orientation. It had worked! Loading it on the Kindle, it gave me the expected resolutionl. All was well, I just had to confirm this worked on the iPad and I would be good to go.
I loaded it up on the Apple tablet, which was using the QML Screen object. It said I had a resolution of 1024x768. What... no... The iPad I was using has a resolution of 2732x2048. And if I recall correctly, Screen.devicePixelRatio=2.0 on the iPad. That doesn't math right. Once again, I didn't feel trusting of the of the value reported by Screen, so I did some Google searching and I was pointed to using the nativeBounds from UIScreen
As a C++ developer, looking at Objective-C code absolutely scares me. But it's what we need to use to call these methods. But thanks to the compiler alchemists at Apple, they were able to put together a homunculus called "Objective-C++". Simply put, it allows the two languages to interoperate with ease. Here's the code I wrote get the screen resolution using native iOS calls:
At the beginning, the dim line is pure Obj-C. Then with native_size, I'm accessing the fields of an Obj-C object, though putting them into a C++ variable. Later on I'm using the clause of a check, from Obj-C, to then call a function on a C++ object. This is actually really nice. Way easier to work with than the Java-C++ interop.
What is a little concerning though is the future of Objective-C++. It seems like Apple has deleted their documentation for the language from their website. So if you want to read it, you need to find a third party source (such as archive.org). Some other cross platform frameworks like Dart/Flutter use Swift as their iOS native language (Kotlin for Android as well). This might be the future for Qt too, but it is not known yet.
For the integration into your project, it's even a bit easier than Android/Java: 1. The code needs to go into either .h or .mm files. These can be put in any folder. No complex hierarchy required like Java 2. Add the source files to the CMakeLists.txt like you would for any other .cpp or .h file. Make sure their only compiled in for iOS (if (APPLE) ...)
And from there, you only need to call the functions you made.
So now, I tried to run the above snippet to get the screen size. And... it also returned the value 1024x768...
I was really upset as to what the issue was here. After working on some other task to let my brain goo simmer for a little, I revisited this a few days later. This time around, instead of making a Qt app. I launched Xcode and made a 100% native iOS app. It was to use the snippet above (sans the Qt code) and report what the screen size was. Doing just that, I had it print the result nativeBounds to NSLog. It reported 2732x2048.
Success! But... Why was this only working in the test program? Well, after some more googling, I found my true answer. You see, my project, when building for iOS, was actually missing something vital: a "Launch Screen". The dummy app that I made in Xcode had one in by default. Whereas my Qt project did not. If you read the Apple docs, it mentions that this is vital:
... Every app must supply a launch screen.
I took the launch screen I made in the demo app, stuffed it into the Qt project (which needs to be specified in the Info.plist.in file), re-built and launched the app on the iPad. Boom. There it was. The button was now saying "Use Device Resolution (2732x2048)". Rotating it worked as expected.
In fact, I don't even need the iOS specific code anymore. Both the QML Screen object, and the C++ side QScreen no wreported the expected value of 2732x2048. I'm leaving it in though to serve as an example of how to do iOS native interop with a Qt app.
To be fair to Qt, if you go back to the Platform Notes - iOS document above, it does make mention of a Launch Screen/Image, it is purely in the context of working with qmake. Actually, not a single mention of CMake exists in that document at all. This makes it really hard for people who want to use this build system.
To think, the days of frustration that I went through to get this simple button working on iOS, was a missing configuration/deployment file. Which sole purpose is to trick the user into thinking apps load up fast. That is generated when using qmake, but is missing when using CMake.
(ノಠ益ಠ)ノ彡┻━┻
After this, the app was working as expected on the iPad. I didn't have an iPhone to test with, and the simulator was unusable on a low-end 2014 Mac mini. It was working well for Android phones, so I think it would be safe to assume it was fine for smaller iDevices (spoiler alert: it wasn't).
The Image Viewer
Above, I mentioned that I wanted to add in an extra picture viewer to the program. I don't think there's much to go on about here compared to that infernal button. It was mostly a lot of work in simple QML. All I wanted was a basic image viewer that let the user full screen the render, zoom in and out and move around the viewport. There would also be some extra buttons off to the side to reset the zoom values.
It did take me about two weeks to get something that was satisfactory; but there definitely is room for improvement IMO. I did have to sacrifice one of my "desirables" due to a bug in Qt. I know that this is a more complex built up control, but I am a little surprised that Qt didn't have something off the shelf, or a "cookbook" example that could be integrated. Since this does seem like a very common thing to have in apps.
There's a lot of gory details here that I don't want to go into. If you want to read the source code (or use it in your own project) it's available here It did take me a bit to figure what the correct hierarchy of controls needed to be. Because I also had some Buttons occupying the same area as a MouseArea, I needed to fiddle with the event propagation. Here's the basic outline:
One feature I had to strip out of this was the "make app go fullscreen" when an image was in "pinch-zoom-pan" mode. This was actually because of bugs that I found in both the Android and iOS versions of Qt. It's possible I could have put this in selectively for Desktop, but I really don't want to add platform specific QML code. The function call to do this was QWindow.showFullscreen(). Very easy. Toggling it on and off worked great for Desktop. But what was wrong? Let's go with Android first:
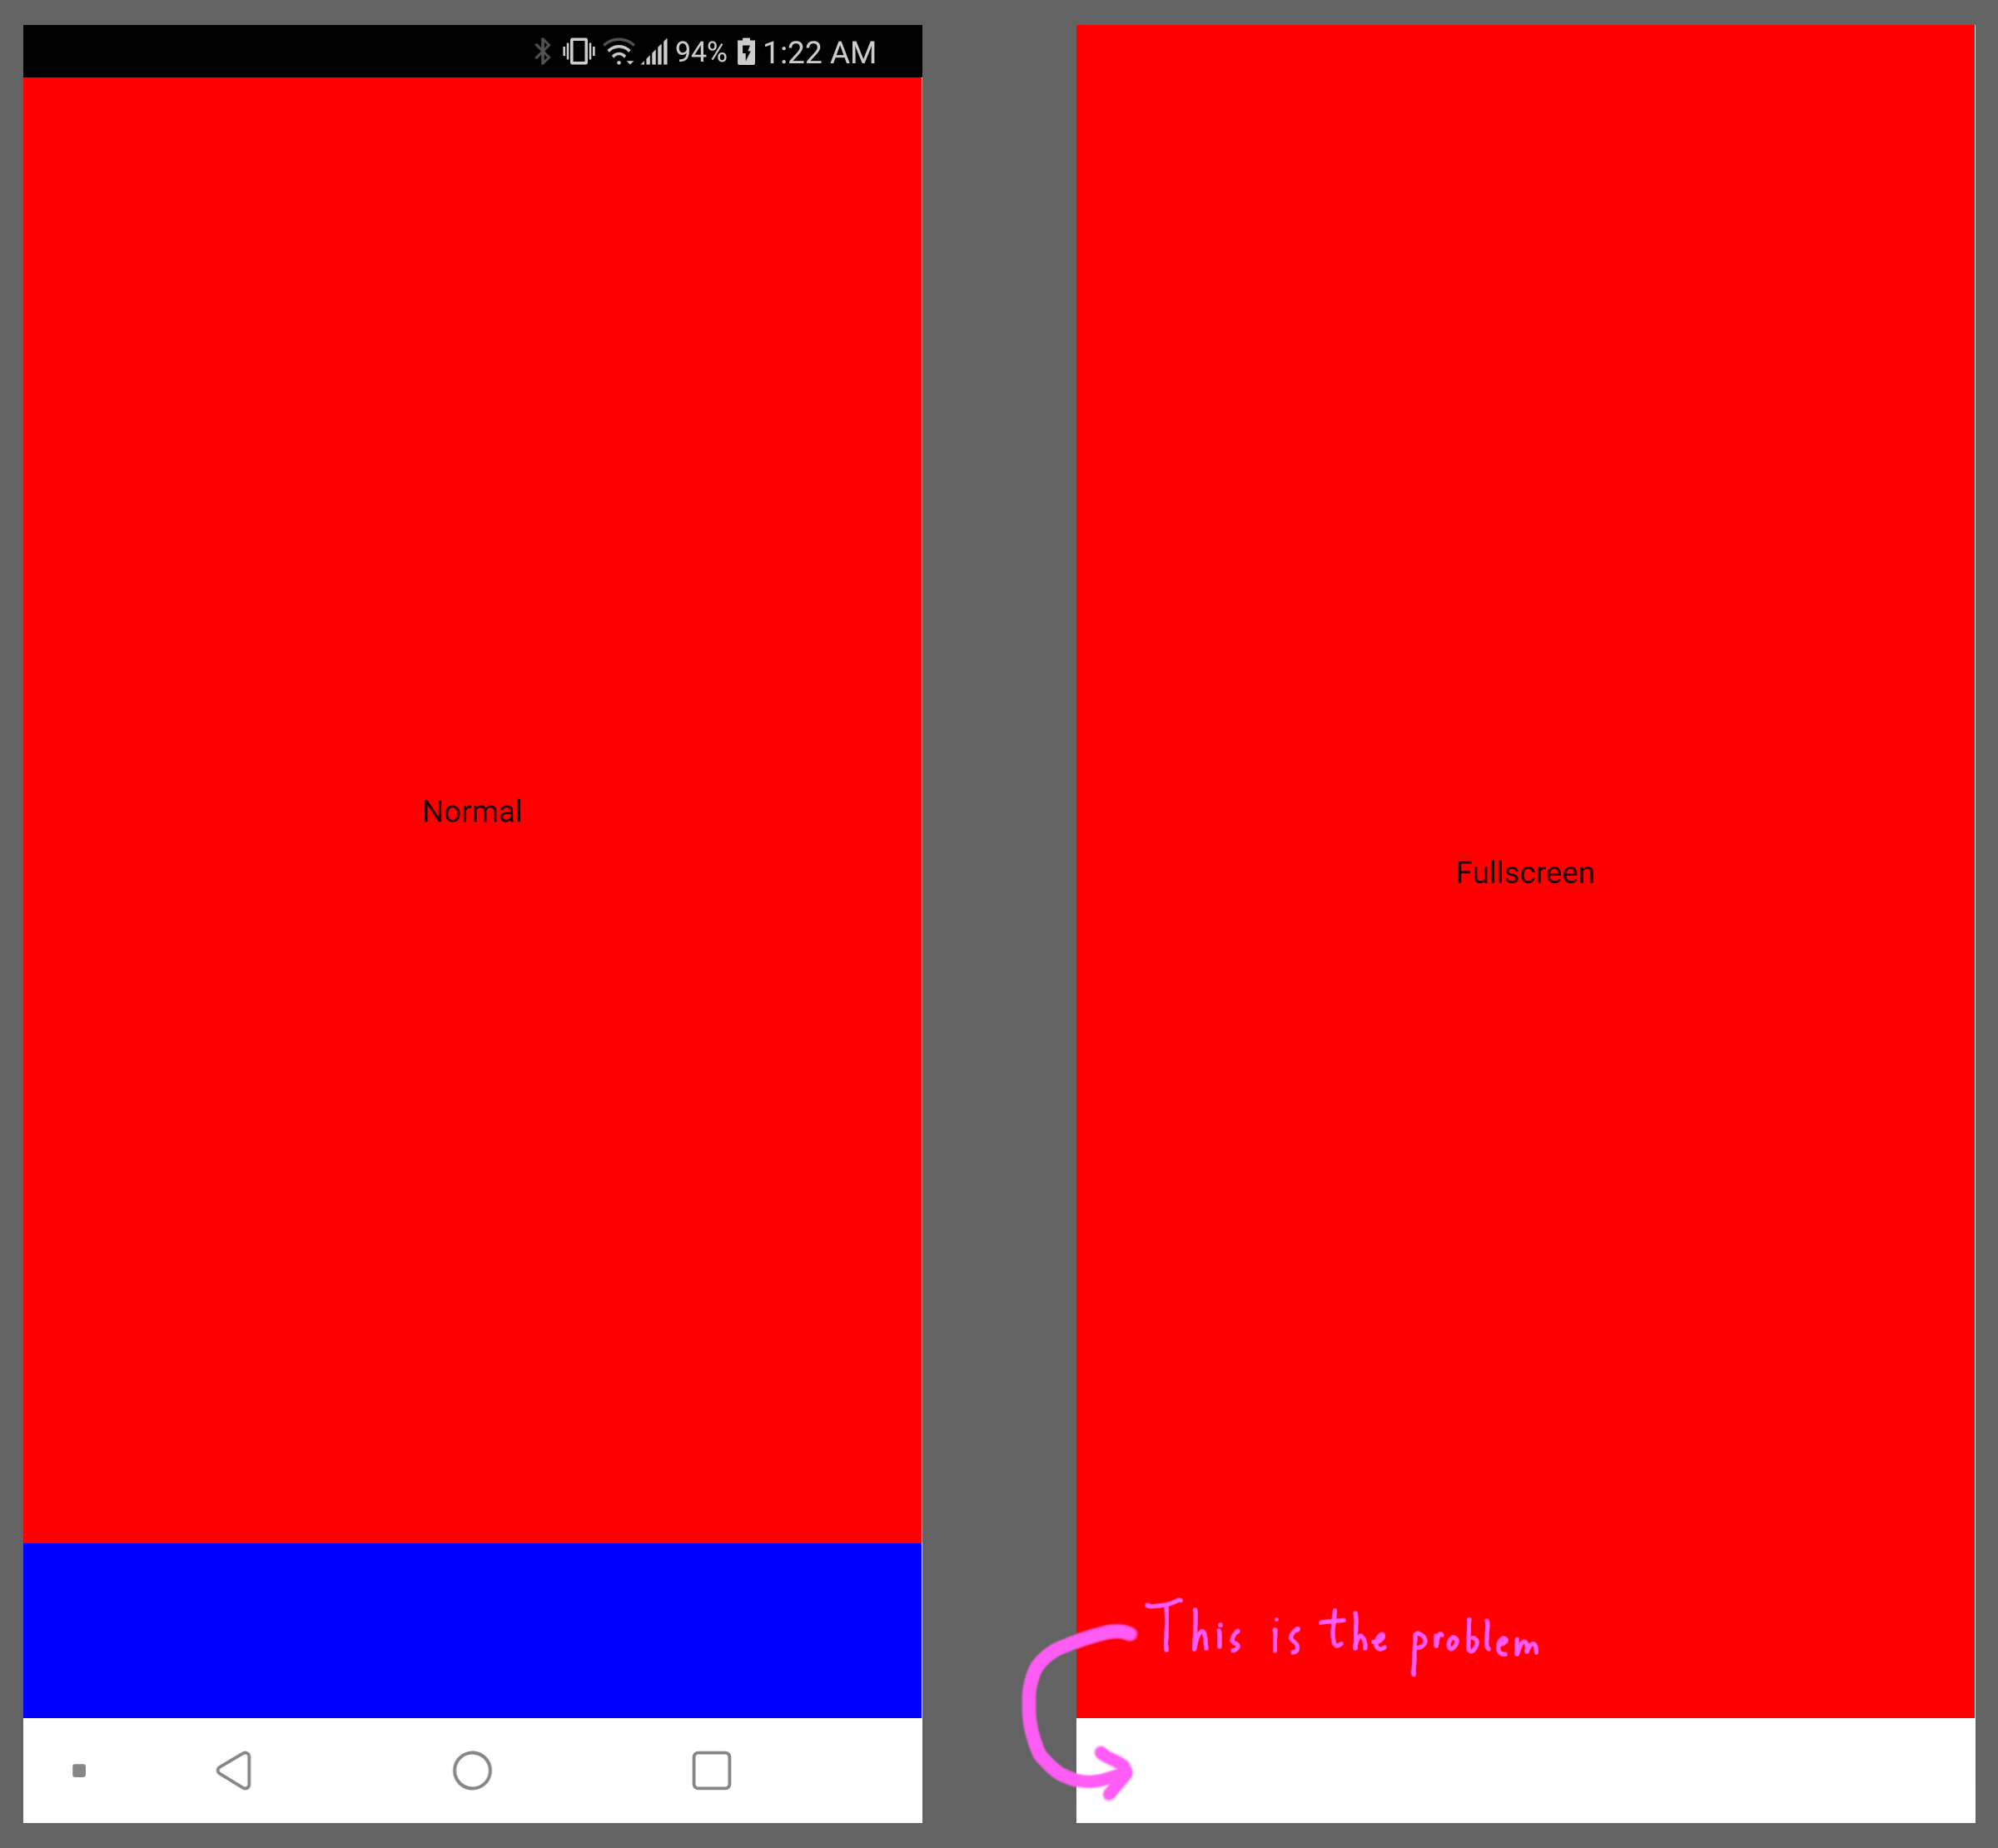
I made a little dummy app that would call the method above. The red zone was supposed to be where the image would show. The blue zone would be the control widgets/buttons. When full screening, the top bar (the notifications, time, battery, etc.) went away. The blue zone disappeared as expected. While the Android system buttons below disappeared (e.g. Back, Home, Show all apps), the white background behind them did not go away. So on my phone, I was left with a blank white bar at the bottom. This is ugly. I loaded the same code up on the Kindle to make sure there wasn't something wrong with only the phone, but the same issue was happening there.
I was still hoping that this would be working on iOS. Using the same sample app, going full screen worked as intended. I was full of glee. But then when I exited full screen, it was even worse. Take a look:
The layout went completely bust. This is unusable, so I had to completely scrap this feature.
Being a good little developer, I made to file some bug reports for this:
- Android's: https://bugreports.qt.io/browse/QTBUG-99046
- iOS's: https://bugreports.qt.io/browse/QTBUG-99047
As for things I'd' really like to improve in a 2nd version:
- When zooming in/out, it doesn't keep the viewport centered. It zooms based on the top-left coordinate, which doesn't feel too natural. E.g. If I were using the scroll wheel on a mouse, the user would expect to zoom on where the mouse is over; this doesn't happen. Or when pinching on a touch screen the device, the center point of the two fingers should be "zoom focus".
- The math for this should exist already in C++'s
QRect. It has a lot of useful functions. But if you look at the docs for QML'srecttype, it's nothing more than a data container. As much as I'd like to keep all of the logic for this widget in QML, if I want to make this easy on myself, I'd need to write the logic in C++.
- The math for this should exist already in C++'s
- When zooming out there, sometimes the image might go out of the viewport. This is really minor and fixed quickly by the user making any other zoom action.
- If the user starts to pinch-zoom-out on the image, it should put the image into pinch-zoom-pan mode. Right now they have to double-click or double-tap on the render
- Making it actually go fullscreen; but that isn't possible right now.
- Maybe add in a button to exit the pinch-zoom-pan mode. Sometimes the double-taps weren't always registering on my Kindle Fire (but they were fine on the Android Phone and iPad).
With both the "Use Device Resolution" button and this image viewer done, I thought the app was now good enough to be formally distributed on app stores. I'll get to that in a moment, but I did want to cover some other speed bumps that I came across.
Use of Apple Pencil is Busted
This is honestly kind of a bad one; pressing any control with the Apple Pencil will not work, and leave the control in a "pressed down and stuck" state. Though if you press the control with your finger the control will still start to work again like normal. E.g if you tap on a Button, it will look like it's been pressed down, but it will then be stuck in that visual state, without the button's action being executed. If you try to tap on a dropdown list it won't open up. It will be "stuck down" until you use your finger.
While the use of an Apple Pencil isn't required whatsoever for this app, you cannot use it with any Qt 6.2 app (or 6.0 and 6.1 AFAIK). If you own one of these pen inputs or have ever seen anyone else use one, you know people like to tap every single control with the pencil. They do not want to let the stylus go, as it would interrupt any flow they have going on.
As someone who would like to make art focused apps with Qt in the future, this is absolutely critical to be fixed. And too Qt's credit, they've marked it as such: https://bugreports.qt.io/browse/QTBUG-98936
Another component of the Qt tablet/wacom interface was broken for me when I was trying to port another app of mine from Qt 5.15 to 6.2. Qt did fix the issue promptly after I reported it, so my hats off to them for making it right. How input events work in Qt 6 did change, so it's not too much of a surprise that things got accidentally knocked out (e.g. tablet pen use).
SVG Icons (for Buttons) are Fuzzy
This is one you can file in the "no one is going to notice unless they look really closely at the pixels" category. But nonetheless makes the app feel less refined.
Remember the dawn of when the Retina display first happened? Everyone loved it so a lot of other devices and screens started to become very-very high resolution. This created a problem where all the icons every app was using looked really bad. This was due in part everyone was using bitmap files for their icons, which were being scaled up on these high DPI displays. Everything was ugly and fuzzy thanks to bilinear filtering algorithms being applied directly onto the pixels.
One solution was to provide the icon in multiple resolutions and then dynamically select one dependent upon the display detected. But we already had another solution ready and available to use: SVGs. Scalable Vector Graphic icons were (and still are) great since scaled up and down (hence the name) and look perfect on every screen type. That is, if the SVG renderer is working properly.
The icons I used for the app were grabbed from the famous Google Material Design Icon set. They are well known to look good and work great. Putting them into my Qt app they were rendering correctly on desktop. Where I had non-high DPI displays. When I put it onto the Android smartphone, Kindle Fire, and iPad, they all looked good at first glance. But when copying over a screenshot and inspecting it back on my desktop, I noticed some upscaling blur around the edges:
![]()
Checking with my eyeballs close to the screen, I could see some fuzz on these devices as well. If you can't see it well here, open the image in a new tab and zoom into 100%, or even 200%. Notice how the text "Render" is crisp, versus the icon to the left of it. The settings icon (off to the far left) should also be a bit crisper too.
When I found the issue I did report it, but then it was soon closed as a duplicate. With the fix for the other ticket being slated to be put into Qt 6.2.3 (I was using 6.2.2 when I found this issue).
Now at the time of writing this blog post, 6.2.3 was released. Verifying this fix was in the release notes, I was eager to get this fix working. I spent all of the time updating Qt, recompiling for Android. And.... It's still broken.

Once again, not a deal breaker for getting this app out the door, but this bug can make any app feel less professional. It might be that the SVG scaling is fixed for the Image control, but the fix isn't truly complete if it's not working for Button.icon. (I have refiled the bug)
Accidentally Implementing A limited ScrollView
For the "Render Settings" popover and the "About" page, there isn't enough room to display everything in the frame, so I created a custom QML control called VerticalScroll. If you have an area in QML (e.g. 200x900) that's larger than your screen/window provides (e.g. 300x500), you can wrap the VerticalScroll over it to create a viewport that you can scroll up and down. If you don't have enough room, a scrollbar will appear off to the side. If you do, then it will go away. If your window/screen resizes and you have enough or don't, it will update to make everything nice and flush. This took me about a week to make. This was because I thought that Qt's provided ScrollView wasn't working.
Turns out this was completely unnecessary and I was using ScrollView wrong. I only found this out after I started writing this document. When I initially used ScrollView, it was like this:
I could move the RenderSettingsForm in the viewport. But then after lifting my finger up, the contents would be stuck in place, even if it was out of bounds. It also didn't feel well when flicking on a touchscreen (e.g. no acceleration/deceleration). So I set out to make my own scroller based upon Flickable. A few days later, VerticalScroll was complete and integrated.
To get what I wanted, this was actually the correct thing I needed to do:
I do need to fault Qt's documentation here for not being clear and possibly a little misleading. Reading the "Detailed Description" section for ScrollView It says this:
ScrollView provides scrolling for user-defined content.
It can be used to either replace a Flickable, or to
decorate an existing one.
If you look at the first example right below that line, where there's only a Label element as a child, you'll get that undesirable "sticking" behavior I was getting. The code snippet right below the first one does use a Flickable, but it's actually derived control. The wording of this documentation is confusing. I think a better documentation string for this would be:
ScrollView provides scrolling for user-defined content.
The content should be placed inside of a Flickable,
which is then placed inside of a Scrollview.
I also think that the first example with the Label should be scrapped or updated, as it's misleading.
Another alternative to this would be to automatically include a Flickable under the hood for any of ScrollView's content, but that's a whole other political discussion that could break a bunch of existing code.
Text Scaling (and UITheme.qml)
This is a pretty brief thing to talk about but it's something worth discussion IMO. This is probably helpful even outside the realm of Qt/QML apps.
When I first moved this app over to my Android tablet, the text on screen looked really tiny. It was still readable, but not pleasant. I believe this was due to the fact that the Kindle Fire had a higher Screen.devicePixelRatio (1.5) compared to my desktop monitor (1.0). So I needed to bump up the font sizes a little if I was running on a high DPI display. The solution was really simple: multiply the font size by a certain scaling factor, if running on high DPI. It also wasn't too much in the code.
When I started out the app, I put all of my UI styling stuff into a QML singleton file called UITheme.qml . This includes colours, font sizing, spacing, padding, etc. I really recommend following this pattern instead of leaving this information only where it's used. This way you have a single source of truth for all of your styling needs. If later on you want to support multiple styles your life will be much easier.
Inside this UITheme.qml, there lives the properties that control font sizes:
So first for the Kindle I did this:
It looked the same on Desktop (as expected). Putting it on the tablet, it looked great. Next on my Android phone which has an even higher DPI (2.65 IIRC), the text was definitely larger, but too large as it started to now go off screen. But, the fix was even simpler: clamping with Math.min().
Once again, reloaded onto the Android phone; it looked good. Lastly, double checking on the iPad, it was perfect there too. Using a maximum font scale for 1.8 is what seemed to look best across all screen types I was testing on.
Getting it up on Google Play
Writing software is easy. Distributing it is a pain in the ass.
While I had built about two Android apps prior, I had never actually put them up on the Google Play store before. Nothing ever went far enough until now. So this was my first time experiencing it. One of the more important things was "version coding" which I'll talk about soon, but let me go over my other notes first:
- To sign up as a developer, there is a flat fee of $25. While some might not like it, I think it is very fair as it can help reduce spam and abuse in the Play Store. I can't seem to find this old article from years ago, which showed off how in the Windows/Microsoft app store used to be a plague of fake VLC apps that went on for pages. This was the only thing I could dig up: https://malwaretips.com/threads/fake-vlc-for-windows-8-1-apps-in-windows-store.19597/
- Once I was ready to release my app, it took about an entire week for it to receive an "E for Everyone" rating. The app would not be published without it. I read someone that on average it would take 3 days to review. But maybe being a new developer, they gave it some more scrutiny. Because of <CURRENT_WORLD_EVENT> there's also the possibility of that they have <STAFFING | LOGISTICS | RESOURCES> shortages right now.
- There is a somewhat lengthy questionnaire you need to fill out. Prompts like "Do you have in-app purchases?", "Does this app have user generated content that can be shared with other users?", "Is this a dating app?" Etc.
- Writing down a "Data Collection & Privacy" policy was kinda odd IMO. I'm required to have one. Even with the fact that this app collects no data whatsoever. This could be one of those things required by the much feared GDPR, but IDK. At most, the only data this app would store on your phone is PNG of the render in a temporary location.
- There are a few things that Google lets me know, but it's restricted to merely metadata. E.g. what kind of model of phone installed the app, geographic locations, etc.
There are many different types of Android devices out there. The Google Play Console reported to me there's a little more than 20,000 types of devices in active use. Qt for Android lets you build for Intel and ARM based Android, and 32 bit and 64 bit; so that's 4 different configurations. Most smartphones are of the ARM flavor. Whereas the Intel devices are probably Chromebooks. Your app will also target any device that's Android version 6.0 and up. The Google Play Console reports that PSRayTracing for Android can run on 15,000 different devices.
While it may not seem great that you're missing out on 25% of what's available, keep in mind that this number is not weighted as to how many total devices there are (not device types, but units). Android 6 was released back in Oct. 2015. So it's probably more likely that you're able to target more than 98% of the Android devices out there in use; all made within the last 5. You're well covered.
Something you need to keep in mind is that for each release of your app (e.g. v1.0, v1.1, v2.2) you technically can have 4 versions of each because of the Intel/ARM 32/64 bit stuff. (e.g. v1.0-x86, v1.0-x86_64, v1.0-ARM32, v1.0-ARM64, ... v2.2-ARM64). This is what Google/Android considers a "Version Code". These must be fully unique.

What you do for this code is completely up to you, but Qt does have a recommendation. Reading their Publishing to Google Play document, they have a recommendation for how to do version coding. Unfortunately, you need to build your programs 4 times over, once for each architecture type. IIRC, Qt 5 does support multi-ABI builds. I'm not sure where that went in Qt6. No biggie honestly. Back to version coding, here are some important things:
In your AndroidManifest.xml do not touch that Version Codes entry that is automatically generated. Leave it as is. In fact, up above I made sure to make a note of it in the screenshot of the manifest editor.
You see, when I started out, I was kinda dumb and changed that -- %%INSERT_VERSION_CODE%% -- value to 1.0. Oh boy did that cause some troubles. When I built my application, no matter what architecture, the "Version Code" was always set to 1.0. And when uploading to Google Play, I kept on getting an "Error, version code already in use". I had no idea the generated version code kept on being 1.0 until I created a new dummy project and saw that I needed to keep that to the default -- %% ... Qt folks, if you're reading this, please add a warning message to the field right below that you should not edit this field unless you know what you're doing. Or at least hide it.
One of the other pain points is "how do I get those version codes there?". Well, here's the other annoying part: You gotta do it yourself. Qt suggests on how you should version code, but they won't do it for you. Nor do they provide a code snippet (CMake or qmake) to work off of. They recommend to follow the pattern of <Platform><ABI><AppVersion>. platform=0 for ARM, or 1 for Intel. ABI should be either 32 or 64, and AppVersion should be some sort of numerical code that corresponds to your app. E.g. use 110 for your app's version is 1.10. And yes dear reader, that would lead to a problem for the chance you have app version 11.0 But from there, you can simply go from version 10.x over to 12.0; Just like how Microsoft skipped Windows 9, so can you!
That is unless you had an app version of 1.20, then you can do 10.x -> 13.0! But what if had to do 30 minor releases for 1.x and used a 1.30? Well my friend, just jump up to 14.0! As you can see, we're going to be here a while... The chance that you'll need to do any of these is slim to none unless you're releasing a new minor version multiple times a day. Honestly, don't worry about it and follow this versioning scheme and do the "big leap" only if need be, which should be rare.
Let me save you some trouble and give you the snippet of CMake that can do this for you automatically:
This is one of those things that should be provided by Qt out of the box, or at least included in their docs. Not having this readily available and easy to integrate is -1 point for Qt. Like I stated far above, I can only hope that this is no longer the case in the future and this blog post becomes outdated.
Lastly, don't forget to sign your builds. This can be done in the same section (Projects) where you generated the AndroidManifest.xml (The CMake Configuration). This does feel like one of those options that's more hidden than it really should be.
With all this out of the way, I was able to successfully publish the app to Google Play. And after three weeks, I've got a total of 20-ish installs. It's something. :]
![]()
Not Getting It Up On Apple's App Store (Updated: it now is)
Update Oct 23rd, 2023. This section was written more than a year and a half ago. Recently I've decided to bite the $100 fee to have the app published in the Apple App Store. But I also do not want to change what I haven written so readers can understand why it wasn't available on Apple's store up until now. I still stand by my belief that the fee is unfair to developers who want to publish free/noncommericial apps.
This is a real sore spot.
PSRayTracing's iOS version is not up on the Apple App store and won't be in the near future. That is, unless something changes. I spent a lot of time, effort (and money) trying to make sure that this app ran well on my iPad. The app isn't going up on Apple's store because of the fee for developers (and the policy surrounding it). I'm not talking about the well known 30% cut they take on transactions; PSRayTracing is a fully free application (both as in speech and beer).
If you want to publish any app of any kind (commercial or not) on the Apple App store, you need to sign up for the "Apple Developer Program" The fee for this is $100 per year. For someone in my situation, this makes zero sense.
I understand that similar to Google Play's one-time $25, this can help prevent abuse and make sure that only people serious about making apps can be published. But at this price point it's not really fair for what I want to do. To their credit, Apple does offer a fee waiver to certain groups like educational institutions and non-profits (only in specific countries). But working on this as an individual hoppy project, I do not qualify for this fee waiver.
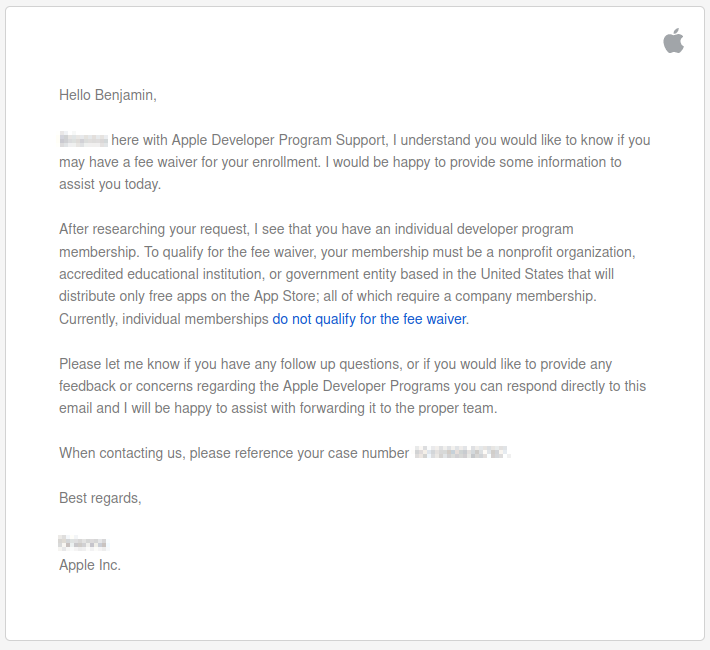
I tried reaching out to Apple (including a college friend of mine there) to ask if there was some way I could get a fee waiver due to the nature of my app (free, open source, educational, benchmarking tool, etc). But they only had this to say:
Within the past three months, I have spent more than $1,700 on Apple products. iPad Pro, M1 Mac Mini, and an Apple Pencil. Partially for work and part for fun. I've really enjoyed these tools. I spent a great amount of time making sure that the app would work with the iPad. To pay another $100 to get the chance to put the app up, is simply just unreasonable at this point.
Part of this could be my own fault for not doing full research on how app stores work before embarking on this project. But then again, I really wanted to test the cross platform nature of Qt, so that's why I maybe completely forgot about distribution and was focused on just getting the app working.
Do I have the financial means to pay for this? Yes, I do. As noted by my recent purchases, this is well within the range of my checking account. But once again, something about this just doesn't seem fair based on principle alone. I'm thinking about all of the younger programmers (e.g. the 14 year olds) who could be starting out on the path to becoming a software developer. Sure, anyone can make a web or desktop application and self-publish. But some people are not interested in that. Some people want to make native apps; because this is what interests them. Maybe all they have is a years-old low-end smartphone in their pocket because they couldn't afford anything else. They know that having any kind of app up in an online store is a gateway to a first job, internship. Possibly, they want to build upon an idea and start a company. I can't help but feel that this $100/yr fee pushes younger and less fortunate people out.
This is not me right now. But I used to be someone like that in the past.
I am confident in the future I would like to publish my own commercial apps to the Apple App store. At that time, then paying the developer fee would make sense to me. I would try to submit PSRayTracing's iOS port to Apple at that time too. Or if the cost was much less (e.g. $25/yr), or even one-time like Google, I would have no issue paying whatsoever. At the moment though, I will not. I'd rather be writing about issues with configuring plists or ranting about confusing CMake/Xcode settings rather than writing this section. And as I've stated before, I hope that these words become out of date.
( ಥ_ಥ )ノ🍎
I hope that someone from Apple is reading this and can help address the problem at hand.
If you want to run go and try out PSRayTracing for yourself on your iPhone/iPad, you'll have to build it yourself from source here . I don't have anything in the README now, but should in the future have detailed steps. Though, it should be straightforward if you've ever worked with Qt for iOS.
Final Thoughts
Very much, there are bugs I could fix, and ones that probably need to be. I never got to test this on a desktop with a high DPI display. If someone has a Retina MacBook Pro, hit me up yo. I'm going to be logging tickets in the issue tracker on GitLab. At this point, I really want to move onto other projects. So this is going onto the back burner once more. I'm still very happy with what I was able to accomplish here.
I'm sure there are some things I forgot to write down along the way, but let me share with you some things that I learned:
- Not so much different platforms are going to be your problem, different screen sizes, resolutions and pixel ratios will
- The tiniest little features can give you the largest headaches
- Right now, I'm thinking I should have put a drop down with a list of common resolutions instead of the "use screen resolution" button. Could have saved myself three weeks of work...
- Distribution & configuration is always more of a pain for software, rather than writing it
- With all of the concerns of Android fragmentation I hear about, iOS was much harder to work with. It feels like there so many more edge cases
- If you have anything platform specific, wrap anything & everything in an abstraction layer. Even if it's more work and may seem tedious right now, it can save you in the long run. Then if the platform specific issue goes away, you can still use that wrapper, or easily refactor it out. And if you ever need to add an extra platform, you'll have an interface to plug in any platform specific code into
- Make tiny little test projects for ideas rather before cramming it into the existing larger project
- I've had managers who didn't like this because "I wasn't working on the product" But I've found this to be a much easier way to work, especially if the feature you're working on is hidden behind layers that take upwards of two minutes to access.
Talking about Qt for the moment, 6.2.x is supposed to be their latest LTS release. With some of the bugs that I found while making and testing this GUI give me a little reservation about committing to it; at least for what I want to make. For example, the Apple Pencil one is really bad. It does steer me to stick with the older LTS release (5.15.x) for the moment. Though the updates to 6.2.x keep on rolling in at the rate of once every 1-2 months, coupled with changes to Qt creator as well. I think that for most people's cases, Qt 6 is probably the way to go as it can only get better. Be careful though.
While it is nicer to see much better CMake support as it is the de facto C++ build system, at times, it really does feel like a second class citizen compared to qmake. There's a lot of extra build script code that I needed to bolt on, which IMO, should happen automatically with Qt's CMake support. It needs to work out of the box. I shouldn't have to go digging for hours and resort to 3rd party sources. CMake is now the build system the Qt uses internally for itself, And while writing this post, Qt Creator 7 beta was announced, dubbed the "CMake update". I still have yet to take it out for a spin.
Also while I was mid way through this project Qt Creator 6 was released. I couldn't help but notice the starter project template's CMakeLists.txt file that are now generated want you to shove the .qml source files in that. Instead of putting them into qml.qrc like before. So now my project is slightly out of date... 🙃
But once again, this is not meant to be a stab at Qt, even though I can be very critical of it at times. I don't think there's any other cross platform framework out there that's as mature as it. I have been tinkering with Dart and Flutter, but there are areas where it does lack. I've done much with Gtk too in other free time projects. I really do love working with Qt and glad I've been able to start making a career out of it. If I didn't care for Qt, I wouldn't be filing bug reports. Or writing up a post mortem of this length.
I wanted to show others the processes of what goes into making a cross platform mobile/desktop app with C++. And perhaps, provide a framework for them on how to get started. I do also hope that the Qt folks read this to study the possible pitfalls one could encounter (and how to get out of them). Whether it be the UX of Qt Creator, improving CMake support, and bettering the documentation. Like I've said a few times before, I hope the contents of this blog post becomes out of date.
Once again, if you want to see the source, it's over here on GitHub in the qt_ui/ folder. Though, I do most of the work over on GitLab. There's some cleanup work that needs to be done, so PRs are always welcome, check the issue tracker for tasks. I'm always willing to help out someone who wants to help me out :] . If you have Android and simply want to give it a run, here's the Google Play link:
![]()
Hopefully in the future it will be up on Apple's store. EDIT Oct. 23rd, 2023: AND IT NOW IS!!:
I believe this has been the longest ever article I've ever written. For those of you who read it all, thank you for taking the time. Please go out there, have fun, and make something great.
Epilogue
Days after having this article's content written, I got to try out the app on a Pixel 6 Pro. It performs superb. But look what happened to my app icon. All other app icons were filling the full circle. PSRayTracing's was being scaled down to fit. It "fills" nicely on the LG Q7+ and Kindle Fire, which have more square icons.
![]()
Yay. More ugly inconsistencies. 🥳