Every single time I want to consider myself done with the PSRayTracing project, I find myself running back to it for something. Recently I’d like to start contributing to another ray tracer that was also based on the same books, so I asked the main developer if he had any testing infrastructure up. Other than some sample files, He really didn't.
So as to set a good example, adding some automated tests to PSRayTracing would be best! Before we begin, I want to note that testing software is a very broad topic, with all sorts of opinions flying around: test driven development, "Write tests, not to many. Mostly integration", behavior driven testing, achieve 117.3% coverage via unit tests only, etc. In this blog post, I want to show you how I did it for mine. The testing code is approximately 300 lines long. I try to break down each important part into bite size chunks, though things will be omitted for the sake of brevity. If you want to go and see the whole script, it’s available here.
I want to also note that the testing principles and techniques outlined here aren’t only for ray tracers. They can apply to more real time systems and just about anything under the sun of graphics programming. Please read this as a general guide on the topic, but not the end-all-be-all for the subject.
Methods of Testing
As mentioned before, testing can be a very hot topic.
Unit Testing vs. Integration Testing (for a Ray Tracer)
Two of the major camps in automated software testing are Unit Tests and Integration Tests. In a nutshell, unit tests are meant to be tests for small portions of code (e.g. a single math function) that can be run quickly (e.g 1 millisecond), and there should be a lot of them. Integration Tests on the other hand are meant to test a much larger chunk of code, and that all the smaller bits when added up together work as intended (e.g. a system that scans a directory for images and generates smaller proxy files). These tend to run much longer, definitely in the realms of seconds and quite possibly minutes.
Integration tests are my personally preferred method since it lets you look at the sum of the parts, getting a much bigger picture. It is also better for any larger existing projects that you might have inherited. You might not know how a small portion of the codebase is supposed to work, but you know what the expected output is supposed to be. Integration testing shines for that. Unit testing still has its place, as they can help pinpoint better where a regression happens. So for PSRayTracing, I'd think it would be best to go with integration testing as the primary method.
You could also set up a project where integration tests are your main source of testing, but as you add new functions, you add tiny unit tests for those. Whenever a bug might be found and fixed for existing code, you then add up a unit test for that case as well. That way you can have the best of both worlds. There are many times at jobs where I thought writing integration tests would be more robust, but other times I kept on running back to the same function to fix some minute detail.
What Exactly Can We Test?
This should be obvious; the generated renders from PSRayTracing. This is simple enough as looking at some inputs (on the command line) and marking sure we have the same output. Another topic to look at is performance testing too. While functionality/reproducibility comes first, performance is another very important aspect. Back in 2013, some of the scenes in Disney's Frozen took upwards of 30 hours to render a single frame! If you're making any change, it's very worthwhile to see the impact of that change on the render time. Good performance is a feature you don't want to break.
idiff (à la OpenImageIO)
The main workhorse of the testing program is going to be idiff. Given two images, it can tell us if they differ and by how much. PSRayTracing is supposed to be 100% fully deterministic, meaning that given a specific set of inputs, we should always have the same output no matter how many times the application is run. Down to the noise artifacts generated it should render the same! idiff's pixel perfect requirements help with this. While we could always write our own code that checks two images, it's much better (and easier) to use the work someone else has done for us. If your OS is anything from the Debian/Ubuntu family, you can easily get this utility from APT via the openimageio-tools package.
Take for example these two renders of the earth. The first one uses actual trig functions to paste the texture on the sphere, whereas the second uses faster trig. approximations.


If you're having some trouble trying to find the differences, look around the UK. The latitude line is slightly shifted. If you load up the images in two separate tabs and then quickly swap between them, you might be able to spot the difference more easily.
With idiff, here is how you check for equality:
$ # An example of a passing case:
$ idiff asin_ground_truth.png asin_ground_truth_copy.png
Comparing "asin_ground_truth.png" and "asin_ground_truth_copy.png"
PASS
$ echo $?
0

$ # An example of failure:
$ idiff asin_ground_truth.png asin_approx_with_ec.png
Comparing "asin_ground_truth.png" and "asin_approx_with_ec.png"
  Mean error = 0.000346436
  RMS error = 0.00412951
  Peak SNR = 47.682
  Max error  = 0.552941 @ (548, 408, B)  values are 0.403922, 0.521569, 0.145098, 1 vs 0.192157, 0.52549, 0.698039, 1
  46169 pixels (4.4%) over 1e-06
  46169 pixels (4.4%) over 1e-06
FAILURE
$ echo $?
2
It gives us a nice standard return code of 0 for pass and a non-zero for failure, and even goes into some detail. It can even produce show you were your images were different, if you pass in -abs -o <filename>.jpg into the command. (Note: I recommend creating a JPEG image, it's really hard to see on a PNG)
idiff -abs -o diff.jpg asin_ground_truth.png asin_approx_with_ec.png


As stated before idiff checks that images are pixel perfect. You might argue that the above two globe renders are the same image, or are practically the same. That's because they are very "perceptually similar". There's another tool available called Perceptual Image Diff which acts a lot like idiff, but also factors in parts of the human visual system to test how perceptually similar two images are. There's a lot of science in regards to human visual system and psychology that plays into this. If you're interested in this, read up on Color Science and related topics. It's a truly fascinating subject, but this is all beyond the scope of this document. If you're really interested in computer graphics, it's very worth looking into this subject as well since it's very beneficial for the field of computer graphics (e.g.it's how JEPG works).
Testing PSRayTracing
While it's going to be idiff doing all of the heavy lifting, a small vanilla Python script (approx ~300 lines) that will be running the show. Before we write that, we need to do a little infrastructure work. One important note is that project uses CMake for the build, and it assumes you've named the main build folder as build, and it's in the root of the repo; a fairly standard practice. How to do this is outlined in the repo's README right here.
Adding a "Testing Mode" to PSRayTracing
We're going to be relying on the command line output from PSRayTracing for our testing script. If you were to simply run the program and watch the console, something like this should appear on screen:
Scene: book2::final_scene
Render size: 960x540
Samples per pixel: 10
Max number of ray bounces: 50
Number of render threads: 1
  Copy per thread: on
Saving to: render.png
Seed: `ASDF`
Rendering: [=============>                                    ]  27% 5s
While this is very handy for someone waiting for a render (e.g. they see info and are given an updating progress bar), for testing this is a lot more noise than we need. A "testing mode" needs to be added in. The only things we care about during testing are:
- The render was completed without any program failures
- How long the render took
The code changes required are very simple:
- Add in a command line flag
--testing-mode - Suppress any normal text output if this flag is set to
true - Upon render completion, print out the total time, as nanoseconds
If you want to see the changes, you can read the commit diff right here. It's only about 20 lines in the main() function with some if checks. This being one of the more important parts:
This simple change now lets us do performance metering!
Generating Test Data and Test Cases
Aside from performance, figuring out what we can test for correctness is the next on the agenda. As stated before, Python will be used for the testing script. Writing automation code in needed and Python really stands out in this respect; it's our knight in shining amour.
Looking at the Parameters of PSRayTracing
Supplying --help to the program gives us a list of all the things that can be configured, most of them being options that effect the render. They can be further divided into two categories: those that can change the output, and those that shouldn't but can alter performance.
$ ./PSRayTracing --help
Options:
  -h [ --help ]                         Help screen (this message)
  --list-scenes                         List all of the available scenes to
                                        render
  --scene arg (=book2::final_scene)     Scene to render
  -s [ --size ] arg (=960x540)          Render size
  -n [ --num-samples ] arg (=10)        Samples per pixel
  -j [ --num-threads ] arg (=1)         How many threads to render with
  -d [ --depth ] arg (=50)              Maximum ray bounce depth
  -r [ --random-seed ] arg (=ASDF)      Seed string for the RNG
  -o [ --output-filename ] arg (=render.png)
                                        Filename to save render to (PNG only)
  --no-progress-bar                     Don't show the progress bar when
                                        rendering
  --no-copy-per-thread                  Don't make a copy of scene per thread
  --testing-mode                        Run in testing mode; only outputs how
                                        long render time took
What changes the output:
--scene, This is simply what picture will be rendered.- I want to note that normally a ray tracer would allow you to specify a scene as a file that can be loaded at runtime. But that wasn't in the original book code. This feature would take a while to implement. So instead I opted to keep the hard-coded scenes.
--size, The dimensions of the picture.--num-samples, How many samples to take per pixel. The larger the higher the quality (but also the longer the render time).--depth, How many times should a light Ray bounce. Bounce too much and renders can take forever. Bounce too little and colours may not look correct.--random-seed, A string which seeds the random number generator. This effects the noise of the image.
What doesn't change output:
--num-threads, Regardless if we render with one thread or eight, the resulting image should still be the same, even down to the grain of the noise. Changing this value should only effect render performance.--no-copy-per-thread, I noticed if each thread had its own copy of the scene graph, rendering would be much faster. If you want to read more about this, check out the section in the project's README.
Making Combinations of Arguments
Looking as the possible arguments, the range of possible inputs is infinite. For simplicity sake, let's pick some. This is left at the top of the file for ease of adding new options later on, or tweaking them.
You might notice that I haven't specified any scenes, but if you remember PSRayTracing has a another flag --list-scenes. This well, lists all of the possible scenes. We can use Python's check_output() to run in this mode and grab the list.
$ ./PSRayTracing --list-scenes
Available Scenes:
  book1::surface_normal_sphere
  book1::grey_sphere
  book1::shiny_metal_sphere
  book1::fuzzy_metal_sphere
  book1::two_glass_one_metal_spheres
  ...
In total, there's 35 of them.
The other benefit of this too is since is scans our application for scenes, if we add any new ones, we don't need to update the testing script per se. The master branch of this project contains scenes from books 1 & 2. Where as a separate branch book3 exists for that respective book's scenes (since then rendering logic is radically different in the final book). Now that we've collected a series of inputs for all of the rendering arguments, we can leverage the itertools.product() function. Given a list of lists/tuples (of varying size), it will then produce each possible combination.
Really astute readers might notice that we've gone and generated 35 x 3 x 2 x 3 x 3 x 3 x 3 possible combinations of arguments. My calculator says that computes to 17010 options. Now, if all of our these possibilities were to render in about 1 second it would take around 5 hours for that. But in reality, each render is anywhere between 1 to 120 seconds long on my computer. To run a full suite, we'd be here for days; if not weeks. So here it would actually be best to take a sub-sample of those possible options and then use those. generate_test_cases() has a parameter tests_per_scene (default being 10). It's simply an integer where we can specify how many different tests we want to run per scene.
Lastly to finish up, give each test case its own unique number and then save each one as an entry in a CSV file; which will be read back in during actual testing.
Now with this, we have a set of test cases that we can run, all with different options to feed to the program. We can refer to this as our "reference testing list". Later on, we'll do a "reference run", which will well, serve as our reference to test against when code changes are made. This generated CSV file is something we'll actually want to commit to our code base, as the common set of tests to use. I wouldn't recommend committing the renders themselves since it could make the repo a bit more hefty than it needs to be. It's much easier to pass around a single CSV file that's only 50 KB, versus hundreds of renders that can total 100 MB (or more).
Running the Test Cases
Before we get into the meat of the code that will run the test cases we'll need to construct three helper functions first. To start off, we need to write the function that will actually run idiff against two images. Leveraging check_output() again, it's quite simple:
If you remember from far above, I did mention that there are program options that shouldn't change the output. This is yet another thing that we should test: "different cases that should produce the same render". The final two functions will tell us if some test cases should produce the same pixel-for-pixel picture.
With that out of the way, let's start on run_test_cases(), that aforementioned "meat". It's a tad bit big, so I'm going to break it down a little into multiple sections. This function will take in the CSV file we made earlier, and then as the name implies, run the cases. Since we also need to first generate a "reference run" (for later code changes to be tested against), this function will also need to take in another parameter to know if we're rendering the references, or actually testing against them.
At the bottom of the snippet you'll notice that we also make a second CSV file. While we will print out the results of each case to the terminal, we also should save them to another other place where they can be retrieved later. It mostly follows the same format as CSV we read in, except that we add on two extra fields. "How long the render took" and "did it match the reference?"
CMakeCache.txt file from the build/ folder. If you're wondering why this might be helpful, it's possible that how the software was built can impact performance. E.g. if the reference test was built against GCC, but when doing later development you use Clang, you're going to see some differences in performance. One could simply run diff on the two CMakeCache.txt files and see what was different in the builds.With the test cases read in, we can actually now run them through the executable. Once again check_output() is being used, but this time, with also passing in the --testing-mode flag to the ray tracer.
When we're doing a real test run, we'll also need to check if the produced render matches the reference. For that, we'll use the test_images_match() function we built above:
And at the end of that, we'll just want to print out (and save) some of the metrics from the case:
That should be the end of our main loop where we run all of the test cases; it will take a while.
Right after it, we need to verify those test cases with different arguments but the same output. We've already figured out which cases are supposed to have matching renders. We'll use that data and verify the results:
And finally, one more metrics info block. But this time it's a summary of all of the tests:
One of the more important metrics here for the user is the total time it took to complete all of the renders. It runs off of a simple accumulator (measure all of the nano seconds it took). Sometimes we can have code changes (e.g. micro optimizations) that are so small to see individually, and we'll need to verify inductively by rendering a lot of tests over a very long time.
This completes the run_test_cases() function. The last thing that needs to be done is adding in a main() function.
Finishing Up the Testing Script
There are three different ways that this script can be used:
- Generate test cases
- Do a "reference test" run
- Do an actual test run
Generating the test cases will be something that will happen very rarely along with doing "reference test" runs. For those, we'll hide them behind some flags. -g for generating test cases. And -r for doing the reference run; we'll also have -r generate test cases if there is no CSV file found.
You'll also notice that there is a -n argument too This is so we can specify how make test cases to generate per scene. When I did my first reference run, it took about 50 minutes to render every test case! I thought that was WAY too much. After, I entered in a lower value for -n to find a sweet spot where I got enough tests, but also doesn't take too long.
Doing a Reference Run
The script is now complete. It's time now to do a reference run. With the script saved to the root of the repo, simply do: python run_verification_tests.py -r in a terminal. If everything was run, you should see something like this:
Wrote 350 test cases to `test_cases.csv`
Running 350 test cases:
  Test 001/350: [0.204 s]
  Test 002/350: [0.206 s]
  Test 003/350: [0.305 s]
...
  Test 349/350: [0.910 s]
  Test 350/350: [2.110 s]

Verifying cases where renders should be the same:
  test_cases.csv_refernence_renders/059.png -- test_cases.csv_refernence_renders/079.png : PASS
  test_cases.csv_refernence_renders/065.png -- test_cases.csv_refernence_renders/068.png : PASS
...
  test_cases.csv_refernence_renders/288.png -- test_cases.csv_refernence_renders/290.png : PASS
  test_cases.csv_refernence_renders/311.png -- test_cases.csv_refernence_renders/319.png : PASS

Total render time was 730.408 s
On my beefier machine this took about 12 minutes to complete, which I think is fairly acceptable. With 350 cases to test for correctness (including render time) and some cases with matching output to verify, I think this is good To prove that this testing works, let's intentionally break the ray tracer!
Doing a Real Test
Step 1: Mess with the RNG. Edit the main.cpp, where seed_str is set. Put this extra fun bonus in there:
Step 2: Re-build the ray tracer. Step 3: Run the testing script without any flags: python run_verification_tests.py
Running 350 test cases:
  Test 001/350: FAIL [0.204 s]
  Test 002/350: FAIL [0.201 s]
  Test 003/350: FAIL [0.307 s]
...
  Test 349/350: PASS [0.907 s]
  Test 350/350: PASS [2.108 s]

Verifying cases where renders should be the same:
  test_cases.csv_renders/059.png -- test_cases.csv_renders/079.png : PASS
  test_cases.csv_renders/065.png -- test_cases.csv_renders/068.png : FAIL
...
  test_cases.csv_renders/288.png -- test_cases.csv_renders/290.png : FAIL
  test_cases.csv_renders/311.png -- test_cases.csv_renders/319.png : PASS

Total render time was 720.795 s
If everything was "successful" (sort to speak), the tests should fail about half the time. You can also check the results.txt file that's saved in the test_cases.csv_renders/ folder for another summary:
169/350 tests passed
Total render time was 720.795 s (or 720794676060 ns)
Verifying cases where renders should be the same:
  test_cases.csv_renders/059.png -- test_cases.csv_renders/079.png : PASS
  test_cases.csv_renders/065.png -- test_cases.csv_renders/068.png : FAIL
  test_cases.csv_renders/107.png -- test_cases.csv_renders/109.png : FAIL
...
Loading up the results.csv file into your favorite spreadsheet software; you should see a nice table summary too:
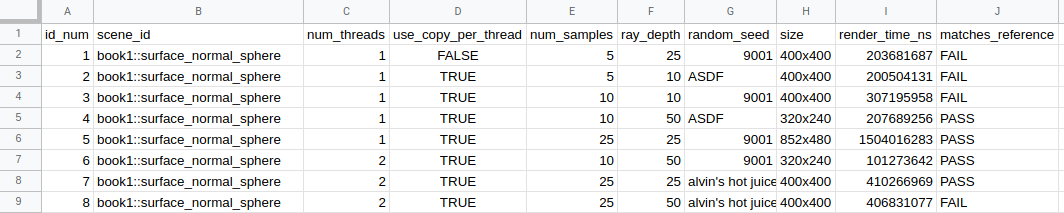
If you want to get even more fancy, you could take the results.csv from the reference renders folder, then compare the render times case-for-case. But that's beyond the scope of this article. I think the "total render time" metric suffices.
Moving Forward
There's more that we could do, but what we have done right now (in only a little bit of Python and with idiff) has provided a great framework for verifying the ray tracer works as intended. There are some things that could be improved or features added:
- Running tests in parallel. For example, my main workhorse has 12 cores, but at most any of the test cases we generated only uses 4 cores. This testing script could be a bit smarter and could queue up multiple renders at the same time.
- Though, this might cause the render time to not be as accurate (e.g. it could take longer). A solution to this could be to add a mode to do a "correctness only" run where it disregards the render time and only checks pixel-for-pixel accuracy. Then another mode could be added in to verify the performance of renders, by only running one test at a time.
- The script could also gather system information about the computer that the tests were running on. If the suite was run on an Intel Celron processor vs. an AMD Threadripper you're going to see some dramatic differences in performance. This information could be put in
results.txtor some other text file. - By having no reference images committed into the repo and not being tested against, this suite does assume that renders are 100% fully deterministic between different computers. I think it's very unlikely that an error like this could happen.
- Integration of a tool that could check for perceptual difference would also be a nice feature. When we broke the ray tracer above, all that was effected was the "visual fuzz" of the image since the rays being shot were given different random offsets. When doing a pixel-for-pixel test, this would fail. But humans wouldn't be able to tell the difference between the images for such a subtle difference.
idiff's ability to produce an image showing the differences could be used too. If you remember from the globe example, the "diffed pixels" were actually quite faint. If they appeared more vividly, we could consider that a noticeable/perceptual difference.
I hope that this walkthrough provided you with a good insight on how to add some level of testing to your graphics application. It's a topic that I don't seem much written about, but is fairly important.
I'd also like to note, that I am currently looking for work. If anyone is interested in hiring me, please check out my contact page (or Twitter) to get in touch with me. I do all sorts of things.
Update Feb. 21st, 2022: I recently added a Qt/QML based UI for PSRayTracing. It runs on Windows, Mac, Linux, Android, and iOS! Though if you have an Android device handy, you can grab it off of the Google Play store. Here's also a follow up blog post detailing the process.
![]()
Update Oct. 23rd, 2023: It's now on on the Apple App Store too now if you want it:
Note: If you want to look at this project's code, as well as the REAMDE which details the optimizations, you can find that here. This blog post moreso covers the process that I went through while working on this project. You could think of this as a post-mortem report, but I view it also as a guide for how to get more out of your CPU from your C++ program.
Extra thanks to Mr. Shriley for giving this post a proof read.
Right when I was fresh out of college, I was in the depth of my "Nim binge". I was looking to try a second attempt at writing a ray tracer after my so-so attempt back in a Global Illumination class. After a quick search on Amazon for "ray tracing" I found the Peter Shirley "Ray Tracing in one Weekend", "... The Next Week", and "... The Rest of your Life" mini books. At $3 a pop I thought it was a fair thing to take a look at. As an exercise to better learn the Nim language, I went through these books but used Nim instead of C++. Looking back at my first review of the book series, I feel as if I sounded a little harsh, but I really did have a pleasant time. I had some high hopes that my Nim version was going to perform faster than the book's code though it didn't. In fact, book no. 2 was much more woefully slow than the reference C++.
Now throughout the past 4-ish years, I've been seeing pictures from this book pop up here and there. Especially book 1's final scene. These books are now free to read online. I kind of now know what it feels like to purchase a game at release, only to see it go free-to-play a short while later. I think it's good that this introductory resource is now available to all. The HTML format is much better than the Kindle eBook in my opinion.
With the popularity of ray tracing exploding recently (thanks to hardware acceleration) I've only run across this book even more! A few months back I was itching to start a CG project. So I thought to myself "Why don't I revisit those ray tracing books, but this time do it in C++ 17. And try to optimize it as much as possible? Let's see if I can beat the book this time!" I chose this because I have been a little lax on learning the new(ish) C++17 features. I also wanted to see how far I could push a CPU bound renderer.
Here were some goals & restraints:
- Write modern, clean, standard C++ 17 code
- Needs to compile on Windows, Mac & Linux, under GCC & Clang
- Should be as vanilla as possible
- Two exceptions are single-header/static libraries (e.g PCG32), and one Boost library. Single header libs typically are pure C++ themselves and Boost is a defacto standard library for C++ anyways
- Give the code a nice, cleaner project architecture
- The books' original project structure is kinda messy to be honest
- I still have the keep the general architecture of the ray tracing operations itself, but I'm free to rename and re-organize things as I see fit
- Have it perform better than the books' implementation
- But add compilation (or runtime flags) to compare the book's methods with my own
- Add some extra features to the ray tracer
- Be able to reproduce every scene in the book, and deterministically
- Mutli-threading provided by
std::thread - I wasn't allowed to add any new rendering techniques that were beyond the scope of the book. E.g. No adaptive sampling. Threading is allowed since I can turn it off, as to compare the performance of my code vs. the books'. It's not really fair to compare Adaptive sampling vs. No adaptive sampling.
Books 1 & 2: Ray Tracing in One Weekend, and The Next Week
Revision 1
Setting out, it was pretty simple what I would do here. Read a section of the book, copy over the code, see if it worked, then continue on if so. While going through each section I would try to consider if there was a more performant way that the code could be written. Sometimes this would involve simply reordering lines of code, so that the compiler could do auto-vectorization. Other times, I would ponder if there was a more efficient algorithm.
A simple to follow example here would be the alternative *Rect::hit() methods (take XYRect::hit() for reference, the Book's code has this structure:
- Do Math (part A)
- Branch if A's math is bad (by doing math to check if so)
- Do more math (part B)
- Branch if B's math is bad
- Do even more math (part C)
- Store results (part C) in variables
If you want to speed up your program, one of the best ways to do this is reducing the number of branches. Try to put similar sections together. My code has the following structure for the hit() method:
- Do Math (parts A, B, & C together)
- Branch if math is bad (either A or B)
- Store the computed math (from C) if it's good
Compilers are pretty good at recognizing parts of your code that could benefit from auto vectorization. But putting all of the math operations together in one section gives the compiler better hints on how to solve these tasks much more efficiently. Reducing the possibilities of branches also helps as well.
Another great example of this comes from the AABB::hit(). The books' solution is chock-full with branches. The method I used (not 100% my own creation) eliminates the vast majority of the branching and keeps similar computations close together so that auto-vectorization can be achieved.
If you think you have something that's faster, the best way is to prove it is by measuring. And the best way to test this is by setting up a long render (e.g. 5 minutes). Don't forget to run it a few times, in order to make sure the renders complete within the same general time frame (with five minutes, it's okay to be off by a second or two). After that, you swap your changes and see if it shaves off a significant portion; which must be consistent through multiple runs.
Sometimes performance boosts from these ways could be quite significant (e.g. 8-15%), other times, they could be really-really tiny (e.g. 1-2%). For example, if you shave 10 seconds off of a 5 minute render time, that's only 3%. It can be a little difficult to conclude if a change truly saves on rendering time. So then that usually involves doing renders that would normally take upwards of 30 minutes, only to see if you still get that 3% render time improvement. You need to make sure that your computer is not running any other processes at the same time too.
And another important method of testing is to also verify any code changes on different hardware too. For example, sometimes on a Gen 7 Intel chip I would get a 30% speedup! But then on Gen 9 it was only 10% (still good). Then on a Gen 10 would maybe give me only mere 2%; I'd still take that.
I had a few optimizations that were in the ~1% area. These are the hardest to prove if there was any actual change on the rendering performance or not. This is where things start to get into the microbenching realm. It gets much more difficult to measure accurately. Environmental conditions can even start to affect measurements. I'm not talking about what operating system you're running on, but the actual temperature of your hardware. This page gives good detail on the relationship between heat and speed. Another way to test any micro optimizations is by taking the 1% changes and trying them out together. See if the sum of their parts makes a significant boost.
While running after all of these little improvements, I was reminded of Nicholas Omrod's 2016 CppCon presentation about small string optimizations at Facebook. After a lot of work, they were able to get a custom std::string implementation that was 1% more efficient. For them, that can be a very big deal. Though to your average company, that might not be so enthralling to spend time on. I can't remember the exact words, but some other wisdom was given in that talk: "For every small change we make, it adds up; and eventually, we make a big leap."
A very important tool that I cannot forget to mention is Matt Godbolt's Compiler Explorer. Those of you in C++ circles have definitely seen this before. For those of you outside of them, this tool lets you look at the generated assembly code for any given C/C++ snippet. With this, you can see if any C++ code rewriting/reordering would generate more efficient CPU code. The compiler explorer can also help you search for micro optimizations. Which as stated before, can be a little hard to measure with purely time lapping alone. I used the compiler explorer to see if there was a way to rewrite code that would reduce branching, use vectorized instructions or even reduce the amount of generated assembly.
I do want to note that in general reducing the amount of instructions a program has to run through doesn't always mean that it will run faster. For example, take a loop that has 100 iterations. If it were to be unrolled by the compiler, it would generate more assembly in the final executable. That unrolled loop will run faster since the loop no longer needs to check 100 times if the iteration is done. This is why we always measure our code changes!
One of the other key problems here was ensuring that my renders were always deterministic. Meaning, given the same inputs (resolution, samples-per-pixel, scene setup, etc.), the output render should be exactly the same. If I re-rendered with more or less cores, it should be the same as well.
The RNG controls where a Ray is shot. When the ray hits an object it could be bounced into millions of directions. Maybe 1/2 those possibilities will send the ray into the sky (where next to no objects are), and the other half could send it into a hall of mirrors filled with diamonds (an unlimited no. of bounces). A small tweak in the RNG could bias it (ever so slightly) into one of those areas more than the other. And if the hall of mirrors scene was set up by another RNG, any changes to that will also change the scene quite a bit, thus also changing the render time.
For example, the final scene of book 2 had three components that rely on the RNG. The floor (a bunch of boxes of varying heights), a "cloud" of spheres, and the BVH node structure. I tested out an optimization for the Box object that required the RNG. Rendering the cornell box example was about 6% faster. But when rendering out the aforementioned final scene it was 15% slower... I noticed that all of the floor boxes and "sphere cloud" were placed differently with the optimization on/off. At first I thought that couldn't be the issue. But when I used two separate RNGs (one for controlling the layout of the scene, the other for the Box optimization). Not only did I get back my original scene layout, I also got that perf boost I saw from the Cornell Box scene.
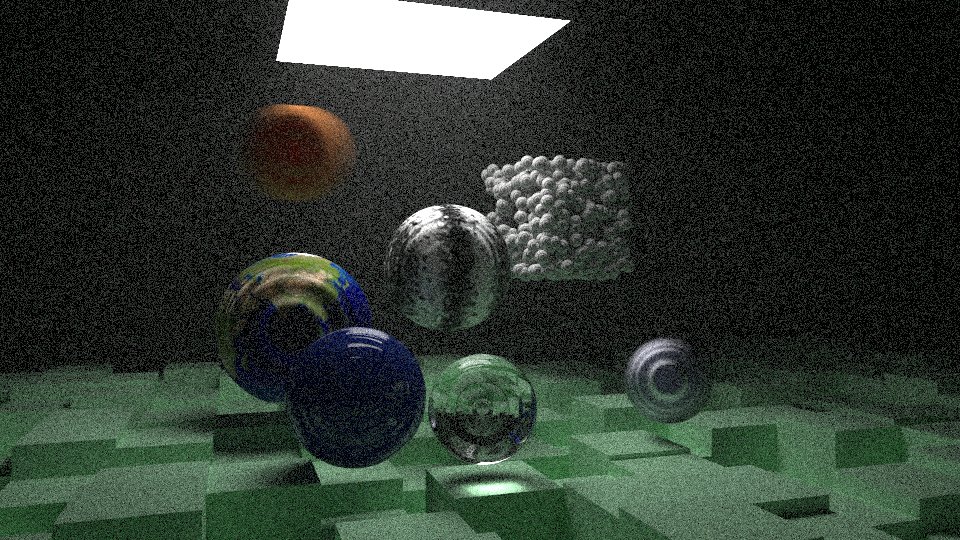
![Final Scene (book 2) [seed = ASDF]](https://storage.googleapis.com/sixteenbpp/blog/images/psraytracing-retrospective/render_final2_seed-ASDF.png)
![Final Scene (book 2) [seed = 0123456789]](https://storage.googleapis.com/sixteenbpp/blog/images/psraytracing-retrospective/render_final2_seed-0123456789.png)
Let's take two different renders of that final scene, but for the first image, I set the RNG to be "ASDF" and for the second it's "0123456789". These were rendered a few times over (to get a good average). The above rendered in an average of 973.0 seconds. The lower took an average of 1021.1 seconds. While that not seem like much, changing the RNG's seed made it render 5% slower!
I tried to make it when toggling on/off my optimizations, the resulting images would be the same. But there are some cases in which this ideal was bent a little. To be more specific, I'm talking about the trig approximations. If you're making a flight control system or a spacecraft, you want to be damn sure that all of your mathematical formulas are correct; but when it comes to graphics, we can fudge things if they fool the user. A.k.a the "eh... looks good enough" guideline.
Another good example here is that of the approximations for asin() and atan2(). For texturing spheres, the difference is barely noticeable, but the speed boost was impactful. It's very unlikely that without a comparison that flips between the two images quickly, no one would notice the difference! Though if we were to have a much higher detailed texture, and be zoomed in much closer to any of the trouble points (e.g having only the UK & Ireland in view), it's more likely a viewer might see something odd.
![Earth [ground truth]](https://storage.googleapis.com/sixteenbpp/blog/images/psraytracing-retrospective/earth_ground_truth.jpeg)
![Earth [ground truth]](https://storage.googleapis.com/sixteenbpp/blog/images/psraytracing-retrospective/earth_approx_with_ec.jpeg)
While the approximation optimization doesn't produce the exact same image. I guarantee you if you showed one of these renders to a person for a minute, told them to look away, then showed them the other, they would tell you it's the exact same picture. If you can get a faster render and don't need it to be mathematically accurate, approximations are great!
Not all attempts at trying to squeeze more performance were successful. I'm sure a lot of us have heard about the famous fast inverse square root trick that was used in Quake. I was wondering if there was something similar for computing the non-inverse version, std::sqrt(). The best resource that I found on the subject was this. After exhausting all of the methods presented, they either produced a bad image, or were actually slower than std::sqrt().
Revision 1 (or as it's tagged in the repo, r1) was where most of the work was done in this project. There were other possibilities I wanted to explore, but didn't have the time initially, so I delegated these to later releases. They aren't as grand as this initial one, but each of them has their own notes of significance.
Revision 2
While I was initially working on the Box object, I couldn't help but think that using six rectangles objects stored in a HittableList wasn't the most efficient way of rendering such an object. My initial optimization was to use a BVHNode instead (which also required an RNG). While that led to a reduction in rendering time, I felt that this could be pushed further. Looking at the hit() functions for each constituent rectangle, It seemed they could be put together in one grander function. This would have some benefits:
- Reduced memory overhead of creating seven extra objects. Which also means less memory traversing (or pointer chasing)
- Don't need to traverse a list (or tree) to find out what hit
- The code to check for hits looks like it could be easily auto-vectorized and have reduced branching
I don't want to bore you with the gory details ( you can see them here). This alternative Box::hit() function, it's quite SIMD friendly. From some of my measuring, this method was about 40% faster to render than the books' method!
Revision 3
At this point, I was starting to exhaust most of the "under the hood" optimizations that I thought could make an impact. Two more I explored this time around were "Deep Copy Per Thread" and "BVH Tree as a List".
Talking about that first one, this optimization was only available because my implementation allowed for rendering with multiple cores (the books' code does not). The scene to render is stored as a tree structure, filled with shared pointers to other shared pointers to even more shared pointers. This can be very slow if we're only reading data from the tree; which is what happens during the rendering process. My hypothesis was "For each thread I render with, if I make a local copy of the scene tree to that thread, the render will finish faster".
I added an extra method to each object/material/texture called deep_copy(), which would well, produce a deep copy of the object and its children. This was quite a bit of a tedious task. But when, for example, doing a render with 4x cores. Having "copy per thread" turned on, it would render the scene 20-30% faster! I'll admit I'm not 100% sure why this was so beneficial. I posed the question to one of Reddit's C++ communities, but I have yet to be given a satisfactory answer.
"BVH Tree as a List" was more of a complex experiment. While it was slightly more performant, it did not yield the results that I hoped for. The BVHNode class is nothing more than a simple object that may contain either another hittabale object, or two child BVHNodes. These are all stored with shared pointers. I was concerned that (reference counted) pointer chasing and fragmented (dynamic) memory might not be too efficient.
My thought was "If I take all of the AABB's for each node, and store them linearly in an array (i.e. list), but in such a way they can be traversed as a tree, this would allow for faster traversal". The hope was that it would be more memory/cache friendly to check all of the AABBs, rather than testing a chain of BVHNodes. The speedup was quite piddly; I measured about 1-2%. The code is much more convoluted than the standard BVHNode. If you wish to read it, it's here (don't forget to check out the header file too!)
At this point, I thought I had hit a limit on what I could change without breaking the architecture. I was looking to work on the implementation for book 3, but I decided it might be best to take a little break.
Revision 4
As I mentioned before, this mini-book series has exploded in popularity. Reading Peter Shirley's Twitter, I saw him retweeting images of a project called RayRender; a ray tracer for the R programming language that's useful for data-viz. This ray tracing program was actually based off of these mini-books. After that, I subscribed to Tyler Morgan-Wall's Twitter. In part, watching his progress made me interested in revisiting these books.
In a Christmas Eve tweet, he said that he was able to give RayRender a 20% performance boost. My curiosity was piqued and I started to scour through his recent commits.
For the HitRecord class, he simply changed a shared pointer over to being a raw pointer. That was all. HitRecord and its material pointer member are used a lot during the rendering process. It really makes no sense for them to be shared pointers at all. This little change netted me a 10% - 30% perf. boost! This one I'm a little upset about not realizing myself.
Book 3: Ray Tracing the Rest of Your Life
Before working on r2 I tried to make an attempt at book 3. But while working through its initial chapters, I soon realized it was impossible to make sure I could render any older scenes. This was because the core logic of the main rendering function was changing quite a bit from chapter to chapter.
But in the interest of completeness (and that I exhausted all other possible optimizations I could think of), I set out to finish the series. It's in a separate branch called book3. It can't render any of the older scenes from books 1 & 2.
Revision 5
There is nothing special about this revision. It's nothing more than book 3 alone. It only supports four scenes; the Cornell Box box with various configurations.
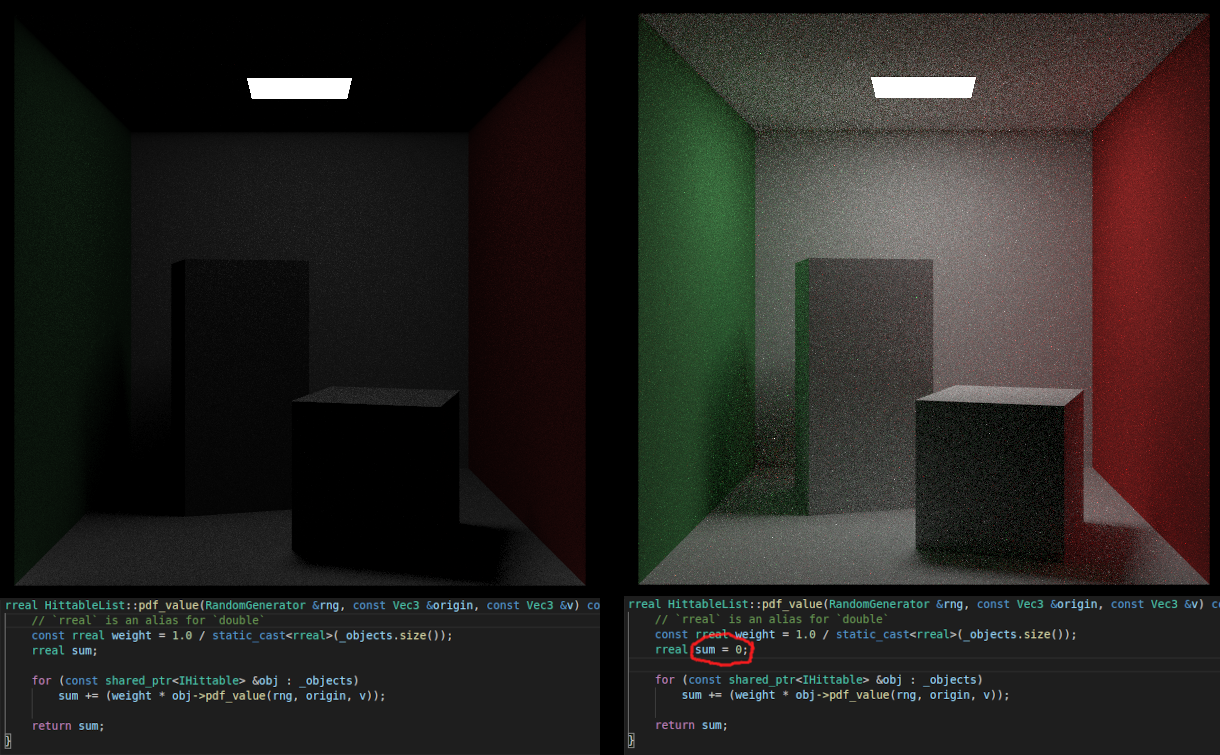
While I was working on it, I did encounter a "fun" rendering bug that was an absolute pain to figure out. I forgot to set an initial value for a variable. Take this as a good lesson on why you should always assign an initial value to anything.
Revision 6
While going through Book 3, I couldn't help but notice that during the rendering stage, we allocate dynamic memory and pass it around with shared pointers; this is an absolute speed killer. This was being done for the PDFs. Taking a stern look at the code, it looked like the PDFs could be allocated as stack memory instead.
Part of the issue is that inside some of the objects' hit() functions, it could generate a PDF subclass of any time. But then that function had to return the PDF as a pointer to a base class. Then later on, the PDF would be evaluated with virtual functions; value() and generate().
So I thought "Wouldn't it be possible to pass around PDFs using a variant?" One of the rules for variants is that they must be allocated on the stack. This solves the issue of dynamic memory (and usage of shared pointers). Then when we need to evaluate the PDF, the variant can tell us exactly which specific PDF to use, and thus the appropriate value() and generate(). Therefore, PDFVariant was born. Any of the existing PDF subclasses can be put into it.
The code for this is on another separate branch called book3.PDF_pointer_alternative. This also breaks the architecture a little. MixturePDF was a little bit of an issue since it originally required two shared pointers to PDFs. Replacing PDFVariant for those pointers doesn't not work, so I needed to use raw pointers to PDFs instead.
Final Thoughts
It was a really great experience to re-explore this book series, as well as Ray Tracing. There are other optimizations I think that could push the performance much further, but these all would require breaking architecture more than I already have. Just some ideas:
- Remove all uses of shared pointers and use raw ones instead
- Incorporate libraries like Halide so some parts could be run on the GPU (breaks my "CPU-only" rule though)
- Incorporate other sampling methods; e.g. blue-noise or sobol
- See if rendering could be performed "breath first" instead of "depth first"
When I first went through the book series four years ago, there were bits of errata here and there. I made sure to email Mr. Shirley whatever I found. I think all of them have been cleaned up. But since this book series is now freely available online and a community project, some more have been introduced; I recall finding more in book 3 than others.
There are some other things I find a little unsatisfactory too:
- Having to throw away all of the other scenes from books 1 & 2 to do book 3. It would be fun to revisit those former scenes with PDF based rendering
- Rotations are only done along the Y axis, and there is no way to change the point an object is rotated about. Though, anyone who wants to add this for the X & Z axis should be able to easily do so. Maybe in a future revision of this book having the rotation method use quaternions instead
- The Motion Blur effect feels wrong. Only spheres can be motion blurred. And for the feature, we had to give Rays a sense of time
But keep in mind the ray tracer that is built more on the educational side rather than being more "real world application" focused. It serves the purpose of teaching well. I still recommend that anyone who is interested in computer graphics give this book a read through.
There are other parts of CG programming I want to explore; I think it's a good time to move on.
I like to call myself a "hobbyist game developer." One, because I'm very interested in video game design (mechanics, art, story, structure, etc.) and development (software implementation, physical hardware, etc.). Two, I don't do it professionally. And three, I kind of always approach things the wrong way.
detailed game design docs.
Sure, I do like to draft up design documents of how I'd like the game to function. But I have this really bad notion of "I'm going to do everything by myself, and do it The Hardcore Way™!" Which always ends up (probably,) being that wrong way. What is The Hardcore Way™ you might ask? That's the little evil voice inside my grey matter saying such adorable things like "You should build your own game engine & framework around low level libraries! It would be way more efficient and fun!!"
Well, I don't think he's completely incorrect. But it's something I need to stop doing if I actually want to make games. A few weekends ago I was participating in the Linux Game Jam 2017 where I made Pucker Up. I decided to build the thing in Nim w/ SDL2 and raw OpenGL calls. And since Nim is quite young, I also had to make things for myself like a geometry and collision system. There's a common joke in the game dev scene, is that when you're at that tier, you're not even making a game. For a good two thirds of the jam, that is what all I was doing; no actual game mechanic implementation, just framework stuff. It sucked. And because of that time sink, I had to forgo adding a lot of content to Pucker Up that I wanted. All I could do were the basics.
I've always had the idea of sitting down and taking some time to learn an off the shelf game engine. But my experiences with the LGJ2017 is what prompted me to actually now try that. I know Unity is very hip and hopin' with the young and popular cool kid indies. Though playing games made with the engine, I have always had some issue with it running under Linux. So: pass.
What other engine has a massive following, loads of documentation, spectacular tooling, great performance, works on Linux and commercial success? Unreal. As a bonus, Epic Games is nice enough to let people peek into the source! Pretty cool.
![]() I'm also someone who likes to learn from taking classes or reading books. I'm not totally adverse to reading online tutorials, but I don't mind paying money for words. After taking a few minutes to query the Amazon for "Unreal Engine 4 book," I found this; Unreal Engine 4 for Beginners. It's written by a David Nixon. He looks quite young and it seems like this is his first book that he has ever written. Props to him doing that so early in his life. I couldn't find too much more about him online except for this snippet:
I'm also someone who likes to learn from taking classes or reading books. I'm not totally adverse to reading online tutorials, but I don't mind paying money for words. After taking a few minutes to query the Amazon for "Unreal Engine 4 book," I found this; Unreal Engine 4 for Beginners. It's written by a David Nixon. He looks quite young and it seems like this is his first book that he has ever written. Props to him doing that so early in his life. I couldn't find too much more about him online except for this snippet:
David Nixon is a professional software developer and amateur game developer who holds a degree in Computer Science from Florida Atlantic University. He started his career developing websites and providing SEO services for companies nationwide. He then dove into the world of mobile gaming. Recently, he worked as a web developer for a major SaaS company.
It was $50 for a print copy or $10 for a kindle. Being cheap, I went for the later option. Here's a special feature about the Kindle Edition of this book: You cannot read it in the Amazon Cloud Reader; you have to use a physical device. Normally when I'm reading a book that I assume has code samples, I like to read it on a computer and have it side by side with my text editor. I tried using emulation systems such as Shashlik and ARChon, but none of them worked. I wanted to try to contact the author, asking him why this was so or if he could provide me with a non-kindle copy, but he doesn't have a personal website setup or any public email address. I'm lucky enough to have a tablet where I was able to read this on, but this really sucks for programming books.
Anyways, so what is actually in the book? Here is the table of contents:
- Getting Started
- Basic Concepts
- The Level Editor
- Actors
- Blueprints
- Players & Input
- Collisions
- User Interfaces
- Audio
- Additional Topics
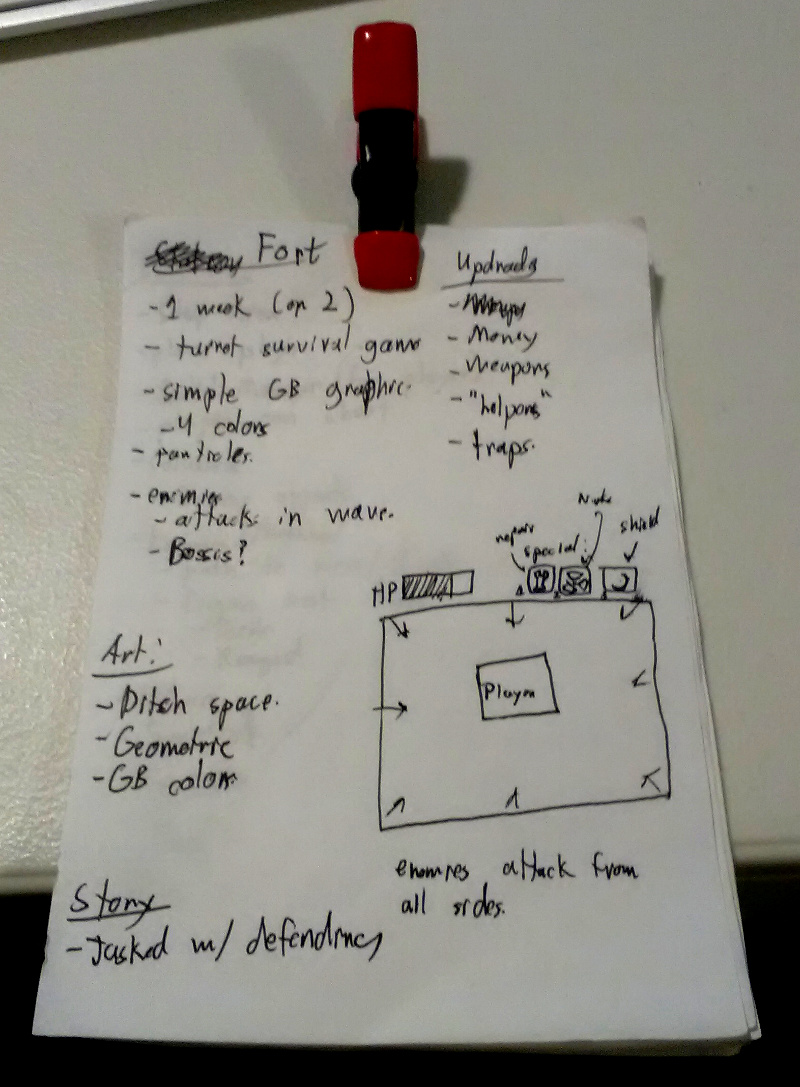
All of the chapters have the same structure: Introduce the chapter topics, divide into sections, then divided into further subsections, maybe a small example, and a quiz at the end. That's it. Rinse and repeat nine more times for nearly five hundred pages. That many pages might also seem like a lot but to be honest, I think I read the entirety of the book in less than an hour and a half. If you're wondering how I did that so fast, take a look at page 20:

I think this page is the one that has the most text on it, and it's not that much. Many of the other pages contain a lot of spacing for headers, paragraph breaks, images, section spacers, etc. If this book were to be in something like pt. 12 font size Times New Roman, I think it could be pegged at 150 pages maximum.
As for the actual quality of the content, there is not that much I can really say for it. It was an underwhelming read for me. Aside from the quizzes there was no engagement with the reader whatsoever. Sure there were some examples but they were sparse and all of them were with using the Blueprints Visual Scripting (more on that later).
I bought this book expecting it to be a sort of in depth tutorial. Every other game development book I have bought in the past 10+ years has been walkthrough where you build a game from the ground up. Unreal Engine 4 for Beginners left me with nothing other than a few common mechanisms (e.g. how to do simple character movement). Most of the content too was just mentioning what something does for you; not really much how to use it along with other things. The entire time I felt like I was reading simplified reference documentation. Nothing was detailed or highly constructed.
Now about the Blueprints. I'm not going to lie and say I'm fond of visual programming languages; I am very much so not. All of the entire code for this book was with Unreal's Blueprints. I was hoping to do some of that C++, but nope. It was dragging nodes and connections all of the way. I can understand the importance of visual scripting languages for people who work with Unreal yet don't have a traditional programming background but it was a real disappointment for me. On top of that Chapter 5, which is dedicated to introducing Blueprints was 1/6 of the entire book. And by no means is it a good introduction to how programming works. Most of the sections of this chapter would simply state "This is an <x> node, it functions like so." Most sections didn't have an example tied to them to better explain how the statement would work.
And… That's all I can really say about the actual content of the book. There was nothing that really made me a massive impression on me or gave me a good insight on how the Unreal Engine works or good practices with using it. Most of the information presented could have been scoured from the official UE4 documentation. In fact, I would say that this book was nothing more than a light reference manual than an actual tutorial. I really wanted to have this book show me how to build a game with Unreal; it did not do that.
I don't feel as if I got my money's worth out of this purchase. It was only $10 so it's not too much out of my wallet. But do avoid dropping $50 on the hard copy. I will cut Nixon some slack because this is his first book and does seem like a recent graduate. I wish him the best. He does also offer a course on Udemy about UE4, but I have not paid for it so I can't judge the quality of the content.
My conclusion is that I don't recommend getting it. I'll be looking for a different Unreal book in the future.
As of the past year Glitchet has been one of my favorite parts of the week. It's a mini newsletter that covers all sort of futurism and computer arts thing that I'm interested in. A While back (seven months actually), I contacted the curator of webzine and told him he should do an article on Random Art. I didn't hear back from him until a few days ago.
He asked me if I was willing to write a piece on how it works. Everything was fresh in my mind from my Nim port of Random Art, so I agreed. Over the weekend I came up with this. It gives you a simple overview of how the process works and where these pretty pictures come from. If you don't understand anything, I'm sure you'll be able to grasp something at least.
It seems like every one to two weeks I've been writing a new package for Nim. I've been playing around with the JavaScript target. There is some basic stuff there in the dom module for HTML manipulation but I noticed something very important was missing; the canvas tag. So well, I added a thin wrapper for it (GitHub mirror). It's available under the html5_canvas package in nimble.
When I first heard about HTML5 and read the spec a little, I think one of the most important things that was added was the canvas tag, and along with it a JavaScript API for all sorts of drawing operations. Interactive content for the web that was being made with technologies like Flash and Java (applets) could now closer to the browser level (and have better performance to boot)!
The only thing is that I don't really like writing JS code; it's my least favorite language out there. But you know we live in a time where you don't have to write JavaScript to write JavaScript anymore! While Nim's JS backend is still marked as experimental I think that its nice enough where we can still make some cool stuff with it.
I tried to keep the API as close as possible to the one listed in the Mozilla docs. Though I did have to make a few changes. One of those in particular are the fillStyle and strokeStyle getters and setters. The problem with these two fields of CanvasRenderingContext2D is that they can be one of any three different types (see here). Nim being a strongly typed language wouldn't let me put those properties right under the type ... object definition. Luckily though there is still a way to keep the API so it looks like we're setting a field instead of having to add a setFillStyle() proc. Taken from the source, look a this:
proc `fillStyle=`*(
  ctx: CanvasRenderingContext2D;
  color: cstring
) {.inline.} =
  {.emit: [ctx, ".fillStyle=", color, ";"].}

# Can do this now!
ctx.fillStyle = rgb(255, 0, 255)
But as for the getters I had to do this:
proc fillStyleColor*(ctx: CanvasRenderingContext2D): cstring {.inline.} =
  {.emit: [result, "=", ctx, ".fillStyle;"].}
There's one for Gradient and one for Pattern as well.
For some extra fun, I ported over my 3D Canvas Cube from Dart (another language that compiles to JS). I've put the source up in my toybox repo. What's also pretty cool is that the compressed JS output from dart2js was about 90 kilobytes, where as Nim's compressed JS is around 20 kilobytes! Originally when when did full imports (i.e. import math) I was getting 124 KB compressed, but when I changed to selective imports (from math import Pi, sin, cos, floor) I was able to drastically reduce the size.
I was able to get the animation to work by adding a mini proc to wrap JS's setTimeout() function:
proc setTimeout(function: proc(); ms: float) =
  {.emit: ["setTimeout(", function, ",", ms, ");"].}
If you're bored with 2D graphics and want to do something 3D in Nim (and in the browser), take a look at stisa's nice WebGL wrapper.
Here is the link to the repo for this again (GitHub mirror). It's also on nimble under html5_canvas. Have fun!