About two weeks ago, I decided to revisit Random Art once more. This time around, I wanted to put it in a browser, so I made a WebGL port. You can write equations in a scheme-like syntax, or generate your own. I was going to use Nim at first, but I opted to try out TypeScript instead. I've heard about this new JavaScript replacement language for quite a bit and I thought it was time to give it a go. It's not bad IMO, but I'm not ready yet to fully commit to it.
In other news, about a month ago I started a daily Japanese practice blog (毎日日本語練習ブログ). I call it 日本語ベン強 (nihongo-benkyou). It's a pun; you won't get it unless you know some of the language. Since February of 2018, I've started taking Japanese classes. Foreign languages have always been an affinity of mine, and I was looking for a new hobby that's not related to tech. I created the blog so I could get some practice writing Japanese. Even if it's not the most correct. So far it's been fun.
https://gitlab.com/define-private-public/Bassoon
I created this since I wanted to be able to do audio playback in C# on Linux, Windows, and OS X. While there were some packages available on NuGet, they were not preferable to me, so I took the time to make my own. It's hobbled together using P/Invoke bindings to `libsndfile` and PortAudio. At the moment it does not support MP3 decoding (though that is planned), which is one of the main drawbacks. And you also need to build the native dependencies yourself, but a CMake file is provided to handle that. In the future, I hope to also add some more features such as audio recording and some minor effects. So far I am happy with it.
I like to call myself a "hobbyist game developer." One, because I'm very interested in video game design (mechanics, art, story, structure, etc.) and development (software implementation, physical hardware, etc.). Two, I don't do it professionally. And three, I kind of always approach things the wrong way.
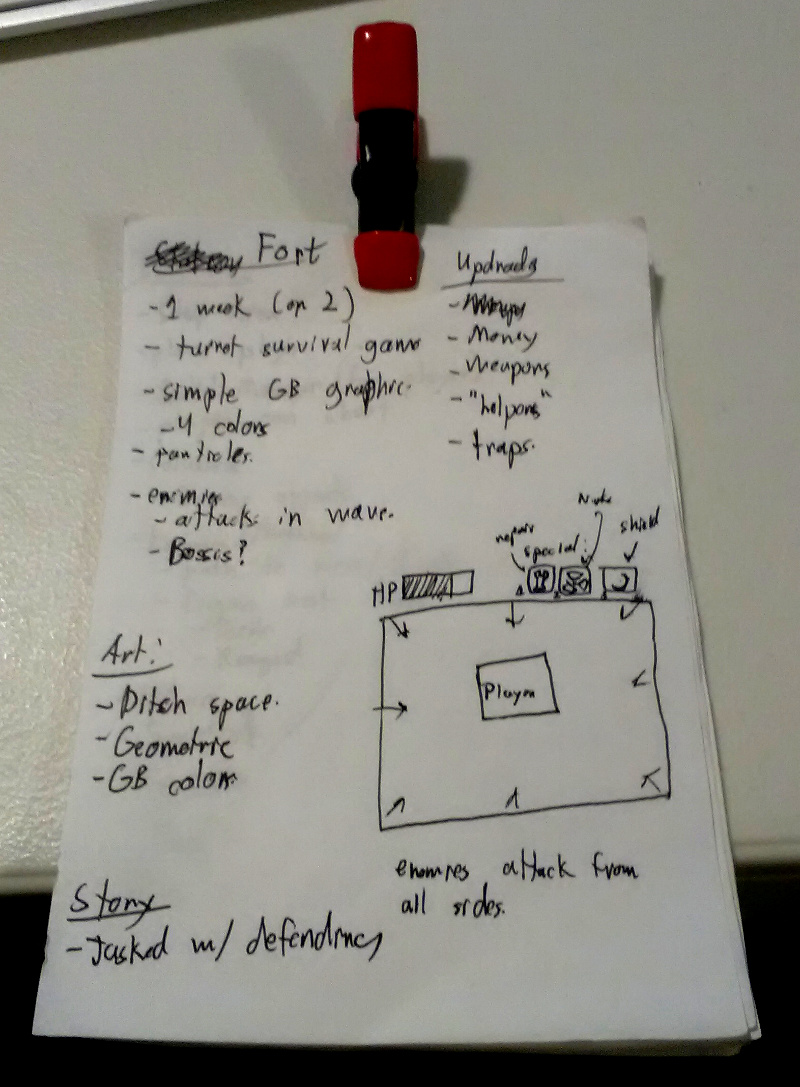
detailed game design docs.
Sure, I do like to draft up design documents of how I'd like the game to function. But I have this really bad notion of "I'm going to do everything by myself, and do it The Hardcore Way™!" Which always ends up (probably,) being that wrong way. What is The Hardcore Way™ you might ask? That's the little evil voice inside my grey matter saying such adorable things like "You should build your own game engine & framework around low level libraries! It would be way more efficient and fun!!"
Well, I don't think he's completely incorrect. But it's something I need to stop doing if I actually want to make games. A few weekends ago I was participating in the Linux Game Jam 2017 where I made Pucker Up. I decided to build the thing in Nim w/ SDL2 and raw OpenGL calls. And since Nim is quite young, I also had to make things for myself like a geometry and collision system. There's a common joke in the game dev scene, is that when you're at that tier, you're not even making a game. For a good two thirds of the jam, that is what all I was doing; no actual game mechanic implementation, just framework stuff. It sucked. And because of that time sink, I had to forgo adding a lot of content to Pucker Up that I wanted. All I could do were the basics.
I've always had the idea of sitting down and taking some time to learn an off the shelf game engine. But my experiences with the LGJ2017 is what prompted me to actually now try that. I know Unity is very hip and hopin' with the young and popular cool kid indies. Though playing games made with the engine, I have always had some issue with it running under Linux. So: pass.
What other engine has a massive following, loads of documentation, spectacular tooling, great performance, works on Linux and commercial success? Unreal. As a bonus, Epic Games is nice enough to let people peek into the source! Pretty cool.
![]() I'm also someone who likes to learn from taking classes or reading books. I'm not totally adverse to reading online tutorials, but I don't mind paying money for words. After taking a few minutes to query the Amazon for "Unreal Engine 4 book," I found this; Unreal Engine 4 for Beginners. It's written by a David Nixon. He looks quite young and it seems like this is his first book that he has ever written. Props to him doing that so early in his life. I couldn't find too much more about him online except for this snippet:
I'm also someone who likes to learn from taking classes or reading books. I'm not totally adverse to reading online tutorials, but I don't mind paying money for words. After taking a few minutes to query the Amazon for "Unreal Engine 4 book," I found this; Unreal Engine 4 for Beginners. It's written by a David Nixon. He looks quite young and it seems like this is his first book that he has ever written. Props to him doing that so early in his life. I couldn't find too much more about him online except for this snippet:
David Nixon is a professional software developer and amateur game developer who holds a degree in Computer Science from Florida Atlantic University. He started his career developing websites and providing SEO services for companies nationwide. He then dove into the world of mobile gaming. Recently, he worked as a web developer for a major SaaS company.
It was $50 for a print copy or $10 for a kindle. Being cheap, I went for the later option. Here's a special feature about the Kindle Edition of this book: You cannot read it in the Amazon Cloud Reader; you have to use a physical device. Normally when I'm reading a book that I assume has code samples, I like to read it on a computer and have it side by side with my text editor. I tried using emulation systems such as Shashlik and ARChon, but none of them worked. I wanted to try to contact the author, asking him why this was so or if he could provide me with a non-kindle copy, but he doesn't have a personal website setup or any public email address. I'm lucky enough to have a tablet where I was able to read this on, but this really sucks for programming books.
Anyways, so what is actually in the book? Here is the table of contents:
- Getting Started
- Basic Concepts
- The Level Editor
- Actors
- Blueprints
- Players & Input
- Collisions
- User Interfaces
- Audio
- Additional Topics
All of the chapters have the same structure: Introduce the chapter topics, divide into sections, then divided into further subsections, maybe a small example, and a quiz at the end. That's it. Rinse and repeat nine more times for nearly five hundred pages. That many pages might also seem like a lot but to be honest, I think I read the entirety of the book in less than an hour and a half. If you're wondering how I did that so fast, take a look at page 20:

I think this page is the one that has the most text on it, and it's not that much. Many of the other pages contain a lot of spacing for headers, paragraph breaks, images, section spacers, etc. If this book were to be in something like pt. 12 font size Times New Roman, I think it could be pegged at 150 pages maximum.
As for the actual quality of the content, there is not that much I can really say for it. It was an underwhelming read for me. Aside from the quizzes there was no engagement with the reader whatsoever. Sure there were some examples but they were sparse and all of them were with using the Blueprints Visual Scripting (more on that later).
I bought this book expecting it to be a sort of in depth tutorial. Every other game development book I have bought in the past 10+ years has been walkthrough where you build a game from the ground up. Unreal Engine 4 for Beginners left me with nothing other than a few common mechanisms (e.g. how to do simple character movement). Most of the content too was just mentioning what something does for you; not really much how to use it along with other things. The entire time I felt like I was reading simplified reference documentation. Nothing was detailed or highly constructed.
Now about the Blueprints. I'm not going to lie and say I'm fond of visual programming languages; I am very much so not. All of the entire code for this book was with Unreal's Blueprints. I was hoping to do some of that C++, but nope. It was dragging nodes and connections all of the way. I can understand the importance of visual scripting languages for people who work with Unreal yet don't have a traditional programming background but it was a real disappointment for me. On top of that Chapter 5, which is dedicated to introducing Blueprints was 1/6 of the entire book. And by no means is it a good introduction to how programming works. Most of the sections of this chapter would simply state "This is an <x> node, it functions like so." Most sections didn't have an example tied to them to better explain how the statement would work.
And… That's all I can really say about the actual content of the book. There was nothing that really made me a massive impression on me or gave me a good insight on how the Unreal Engine works or good practices with using it. Most of the information presented could have been scoured from the official UE4 documentation. In fact, I would say that this book was nothing more than a light reference manual than an actual tutorial. I really wanted to have this book show me how to build a game with Unreal; it did not do that.
I don't feel as if I got my money's worth out of this purchase. It was only $10 so it's not too much out of my wallet. But do avoid dropping $50 on the hard copy. I will cut Nixon some slack because this is his first book and does seem like a recent graduate. I wish him the best. He does also offer a course on Udemy about UE4, but I have not paid for it so I can't judge the quality of the content.
My conclusion is that I don't recommend getting it. I'll be looking for a different Unreal book in the future.
Animation is one of my loves. Back when I was a second and third year university student, I had the oppourtunity to take some animation classes. They were more focused on things like The Principles of Animation instead of general film making. Back then I did upload two of my assignments that I was really proud of, but three years later, I've kind of summed up the courage to upload the majority of my work from those few classes. I'd like to share them with you; they are all below:
A Ball in a Box (Intro. to Animation Final) from Benjamin N. Summerton on Vimeo.
For RIT's "Intro. To Animation," course, there was a final assignment to show the instructor what we have learned. So I decided to make this little half a minute short called "A Ball in a Box."
I know there are quite a few sound syncing issues, I do apologize.
Dynamics of Musicality Assignment from Benjamin N. Summerton on Vimeo.
For week 3 (?) of RIT's "Intro. to Animation," course, we had to create an animation that would sync up to the playing music.
Bowling Ball Bounce (Assignment) from Benjamin N. Summerton on Vimeo.
A pencil test for an animation assignment I did a while back at RIT's SoFA. We had to do a ball bounce, but with a very heavy bowling ball. I think I got the weight of it pretty good.
Perspective Ball Bounce (Assignment) from Benjamin N. Summerton on Vimeo.
A pencil test for an animation assignment I did a while back at RIT's SoFA. We had to do a ball bounce in perspective. I decided to have a little extra fun with it and pretend there were some obstacles making it bounce a little differently,
Water Balloon Roll (Assignment) from Benjamin N. Summerton on Vimeo.
A pencil test for an animation assignment I did a while back at RIT's SoFA. We had to have a balloon filled with water roll off of an imaginary ledge.
Paper Fall (Assignment) from Benjamin N. Summerton on Vimeo.
A pencil test for animation assignment I did a while back at RIT's SoFA. We had to made a sheet of paper fall through air; I had a little fun with it.
Flour Sack Jump (Assignment) from Benjamin N. Summerton on Vimeo.
A pencil test for an animation assignment I did a while back at RIT's SoFA. We had to have a sack of flour do a little jump.
Flour Sack Getup, Walk, & Slip (Assignment) from Benjamin N. Summerton on Vimeo.
A pencil test for an animation assignment I did a while back at RIT's SoFA. We had to have a sack of flour wake/get up, walk a step or two, then fall over.
Tarzan (Assignment) from Benjamin N. Summerton on Vimeo.
A pencil test for an animation assignment I did a while back at RIT's SoFA. We were given a sequence of key frames of a "Tarzan," character doing a jump n' swing with a rope, and we had to do everything in between.
Walk Cycle (Free Exercise) (My First!) from Benjamin N. Summerton on Vimeo.
A pencil test for an animation assignment I did a while back at RIT's SoFA. We had walk cycles coming up in a few weeks, so I wanted to get a little bit ahead and try doing one myself. I showed it to one of my animation professors and he said that it looked more like a march... I guess that's something at least. :P
Walk & Run Cycles (Assignment) from Benjamin N. Summerton on Vimeo.
A pencil test for an animation assignment I did a while back at RIT's SoFA. We had to do walk and run cycles (in place), along with a transition for each.
Lip Sync (Assignment) from Benjamin N. Summerton on Vimeo.
A paper cutout animation assignment I did a while back at RIT's SoFA. We had to do a lip sync, choosing any audio we liked. I went a small snippet from Charlie Chaplin's "The Great Dictator."
I haven't had too much time to play around with Nim and other technology since I've had to move to accept a new job, but I decided to take some time this weekend to write a tutorial on how to do code "hot loading," in Nim. I'm pretty bad at making the first link in my blog posts link to what I'm actually talking about, so for a change it's right here.