Finals are over and I'm back at home now. I haven't really had a nice long break in the past 2-3 years, so I'm really looking forward to these next five weeks. I'm currently waiting for from stuff from Amazon to work on my project for the break (I'll make a separate post later).
In the mean time, I decided to take a look into Google's JavaScript replacement; Dart. So far, I've really liked it. I did the Pirate Badge tutorial, but to really get into it, I went ahead and ported my 3D Canvas Cube to the language. There were also some improvements. Addition of a perspective view, better scaling, and fixing a bug where I was drawing an Impossible Cube.
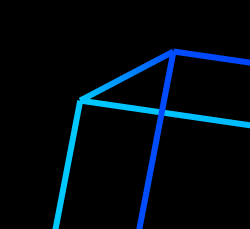
When the line width of the cube was at the size of "1," it's pretty hard to see, but when you scale up the size, it's clearly visible. To fix this, I employed a simple algorithm:
sortedLines = List of "Line," objects
zLineMap = Key-Value map of floating points and a List of "Line," objects
For each line:
  Look at the z coordinates of each endpoint of the line
  zMin = Take the lesser of the two z's

  If zMin is a key already in zLineMap:
    Append it to the List at zLineMap[zMin]
  Else:
    Create a new list containing only the line
    Add it to zLineMap at key zMin (i.e. zLineMap[zMin])

zKeys = sorted List of the keys in zLineMap (ascending)
i = 0
For each key in zKeys:
  For each line in zLineMap[key]:
    Put the line into sortedLines at i (i.e. sortedLines[i] = line)
    increment i by 1
This algorithm might not be the most efficient (mostly likely because I haven't formally studied any computer graphics), but it avoids the issue of accidentally drawing an impossible cube. This bug was happening because I had an array of lines, would apply a rotation "matrix," to them, then sent them off to be drawn. The drawing function would process them in the order that they were indexed. Sometimes it would look right, but most of the time it would not.
The rotating cube that you see in this post had been compiled to JavaScript with the dart2js tool. If you want to see the source, it's in my toybox repo here. Don't forget the accompying HTML page.
Instead of studying for my CS Theory final, I thought it would be a better use of my time to add a "Contact," page for this site. I'm not sure if that was the best idea in the world, but I've still got 3 days until the exam. :P
Anways, it's something I've wanted to add for a week or two now. The more I've been using Django, I've really grown to love it more and more. Using all their fun tools for forms made adding user generated content much simplier. I remember years ago working in PHP this stuff. It wasn't too bad, but it was a lot more... manual.
If you want to shoot me a message, you can do so here.
It's finals week right now and though I should be studying, but I decided to play around a bit and see if I could make some sort of pseudo-3D renderer. Originally I was going to work on it in C/C++ and SDL, but I should try something different and check out this newfangled HTML5 & JavaScript stuff. I'm not the biggest fan of JavaScript, in fact, every single time I've ever had to do something in the language I've found it to be quite a painful experience. But I have to admit, with HTML5's Canvas tag, you can do cool things like this:
The "3D plane," wasn't too hard to setup, and it's pretty bad 3D as it is. Using some of the basic slope mathematics, and rotation matrices I was able to achive this effect. HTML5 canvas gradients also were used to create the illustion of depth.
I'll be taking Computer Graphics next semseter; I'm really looking forward to it. If you want to check out the code for this, I put it in my toybox repo.
Something that I've wanted to add to this blog was a pagination feature, but I didn't see the need for it now because I only had a few posts. But it's now added and enabled. By default, I have it showing only five posts per page. One of the reason why I love Django is because of its pagination tool, which really makes my life easier. You can see the paginator in the upper right hand corner of the blog. I might move the location later on, but it looks nice and cosy right up there.
I actually had the update done before the end of last weekend, but I was a little lazy on uploading it to my webserver. As for future stuff, I'm going to get a contact page up soon as well as some more tutorials/walkthroughs.
So for the past couple of days I've had a little break, so I decided to write a tutorial/walkthrough on how to deploy Django with Apache & mod_wsgi. When deploying the Python/Django port of my blog, I found it wasn't easy to do. My issue was that there weren't any tutorials online that walked you through all of the steps; all of the information seemed to be scatered. So I decided to write my own. If you're interested, you can find it under the "Pages," section (or here is a direct link).
On top of that too, I decided to add in Markdown support for content here. I was going to install CKEditor but I figured Markdown was simple and quick enough. Normally I would go over to the CKEditor Demo and write my content in there, then paste it into a text box here, but this is much more convient to do. On top of that, I added an extra thing that will let me chose whether I want to work with straight up HTML or Markdown syntax.
