Hey, I'm still alive here.
I meant to post something back in March, but I was quite busy with school. I've been off for a month now; mainly just have been decompressing. Went camping up in the Adirondacks which was a lot of fun, but mainly was just catching up on all the Burn Notice I've missed since starting college. One of the main things I did for this site was move it over from a Raspberry Pi running in the corner of my apartment over to this "cloud," thingy. It was fun while it lasted.
As for my projects, I've had to put the coffee machine on hiatus and I've added some more features and changes to the CHIP-8 emulator. I've got something else (much smaller) in the works right now. You can expect a post on each soon enough.
While I'm at home for a month, I figured I was going to be pretty bored unless I find something to do. So I decided to start a new project that I hope to get done before I get back from break. So I would like to announce:
![]() Buzz; a networked coffee machine
Buzz; a networked coffee machine
I am going to take a coffee machine, modify it, and then link it up with the Internet so I can order coffee remotely. Whether or not I actually end up using this in the future is a question left to time, but for now I think it will be pretty something fun to do. Below is my work area.
Currently there are three main components of this project that I'm looking at:
- Augmenting the coffee machineAdding a servo motor to control the flow of coffee
- Adding water level sensors
- Hacking in extra controls to the existing electronics
- Some method to detect there is a cup underneath the coffee nozzle
- Developing “barista software,” to manage all of the above, as well as process orders
- Drafting the “Buzz Protocol,” an XML interface for ordering coffee

For modifying the machine, the most difficult parts will be figuring out how to control the built in circuitry and figuring out if there is an empty cup below the dispenser. I'm thinking that I might be able to do that with via acoustic distance sensing. I bought one of those ultrasonic ping sensors/transmitters over the summer, but never did anything with it. I've also never worked with servos before, so that might be another spot of difficulty.
The barista software shouldn't bee too much of a challenge. I plan on making a Django application that will be the web interface for the system. I was originally going to write this software targeting an Arduino with an Ethernet shield, but using a BeagleBoard is much cheaper and gives me some extra power/functionality that an Atmel chip wouldn't.
The last thing might be a bit more of a postmortem component, and I'm not entirely sure if the barista software will implement the protocol. In case though I ever want to network another machine, having a common interface for controlling machines would be useful, and I could move the barista software over to the client. The original idea of this project was to draft the protocol, create a client program to send XML payloads, and have the barista software interpret those messages. Though thinking it over a bit I'm not sure if that is best for the small project that this is. I still want to have the protocol ready on the side if I ever get any other machines up and running.
Cheers!I hope this project goes well, and I'll be sure to document it as I go along. I am going to post everything related in the github repo.
I've been a little bored while waiting for the parts and tools to come in for my January project. After playing Fez and trying out the stereoscopy mode, I decided to pass the time by trying to add the feature to my 3D cube.
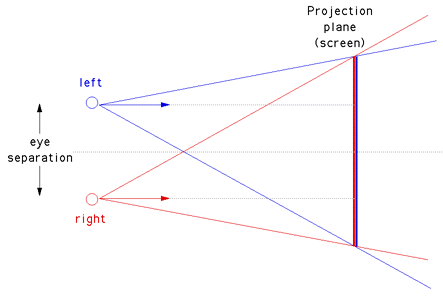
Stereoscopy works by creating two cameras, one for the right eye and one for the left. These two cameras are a small distance apart. Each of them will see a slight different image/projection of the 3D objects. An image from anSGI tutorial written by Paul Bourke gives a great visualization:

There are multiple ways to view the right and left images. Probably the most common is the use of red and cyan filters. Though systems like the RealD 3D use polarized light to achieve this effect. The first method has significant color quality loss on images, where as the later has much less loss. The reason why the first method is much more prevalent is that it is much cheaper and easier to do. E.g., it doesn't require any extra equipment (sans the glasses) and is not to difficult to implement. Systems like Nintendo's 3DS use a phenomenon known as Autosteroscopy that doesn't require glasses, this is achieved by having Lenticular Lenses applied to the display. It's pretty nifty, and the quality isn't too bad, but there is there are the slight problems that it is more expensive and the viewer need to be in a “sweet spot,” to see the 3D image.
I decided to go with the red/cyan image method. In the current state of my 3D cube program, I don't have anything complicated like cameras added in, so to get this working I did this:
p = a perspective projected line
q = an oblique projection on p,
    with theta = PI / 180, and a small skew value on the x component
r = an oblique projection on p,
    with theta = PI, and a small skew value on the x component
color q with blue
color r with red
draw q
draw r
It's definitely an improper method, NEVER DO THIS, but it does give off the effect. I updated the repo page in case you want to view the source. Just change the variable renderStereo to be true.
Below is the stereo-scoped 3D cube (as JavaScript)
Finals are over and I'm back at home now. I haven't really had a nice long break in the past 2-3 years, so I'm really looking forward to these next five weeks. I'm currently waiting for from stuff from Amazon to work on my project for the break (I'll make a separate post later).
In the mean time, I decided to take a look into Google's JavaScript replacement; Dart. So far, I've really liked it. I did the Pirate Badge tutorial, but to really get into it, I went ahead and ported my 3D Canvas Cube to the language. There were also some improvements. Addition of a perspective view, better scaling, and fixing a bug where I was drawing an Impossible Cube.


When the line width of the cube was at the size of "1," it's pretty hard to see, but when you scale up the size, it's clearly visible. To fix this, I employed a simple algorithm:
sortedLines = List of "Line," objects
zLineMap = Key-Value map of floating points and a List of "Line," objects
For each line:
  Look at the z coordinates of each endpoint of the line
  zMin = Take the lesser of the two z's

  If zMin is a key already in zLineMap:
    Append it to the List at zLineMap[zMin]
  Else:
    Create a new list containing only the line
    Add it to zLineMap at key zMin (i.e. zLineMap[zMin])

zKeys = sorted List of the keys in zLineMap (ascending)
i = 0
For each key in zKeys:
  For each line in zLineMap[key]:
    Put the line into sortedLines at i (i.e. sortedLines[i] = line)
    increment i by 1
This algorithm might not be the most efficient (mostly likely because I haven't formally studied any computer graphics), but it avoids the issue of accidentally drawing an impossible cube. This bug was happening because I had an array of lines, would apply a rotation "matrix," to them, then sent them off to be drawn. The drawing function would process them in the order that they were indexed. Sometimes it would look right, but most of the time it would not.
The rotating cube that you see in this post had been compiled to JavaScript with the dart2js tool. If you want to see the source, it's in my toybox repo here. Don't forget the accompying HTML page.
Instead of studying for my CS Theory final, I thought it would be a better use of my time to add a "Contact," page for this site. I'm not sure if that was the best idea in the world, but I've still got 3 days until the exam. :P
Anways, it's something I've wanted to add for a week or two now. The more I've been using Django, I've really grown to love it more and more. Using all their fun tools for forms made adding user generated content much simplier. I remember years ago working in PHP this stuff. It wasn't too bad, but it was a lot more... manual.
If you want to shoot me a message, you can do so here.
