Over the course of working on PSRayTracing (PSRT), I've been trying to find all sorts of tricks and techniques to squeeze out more performance from this C++ project. Most of it tends to be alternative algorithms, code rewriting, and adjusting data structures. I thought sprinkling the final keyword like an all purpose seasoning around every class was "free performance gain". But... that didn't really turn out to be the case.
Back in the early days of this project (2020-2021), I recall hearing about the noexcept keyword for the first time. I was reading through Scott Meyer's works and picked up a copy of "Effective Modern C++" and watched a few CppCon talks about exceptions. I don't remember too much, but what I clearly recall:
- Exceptions are slow, don't use them
noexceptwill make your code faster
I re-picked up a copy of the aforementioned book whilst writing this. "Item 14: Declare functions noexcept if they won't emit exceptions" is the section that advocates for this keyword. Due to copyright, I cannot post any of the text here. Throughout the section the word "optimization" is used. But, it neglects any benchmark.
For those of you unfamiliar with noexcept, here is the nutshell explanation: you can use it to mark if a function will not throw an exception. This is useful for documentation and defining APIs. Personally, I really like that the keyword exists.
Similar to what I did for the final keyword, I created a NOEXCEPT macro that could be used to toggle on/off the use of noexcept at CMake configuration time. This way I could see by how much the keyword could improve throughput by.
When I did the initial A/B testing, I don't recall seeing that much of a speedup. The rendering code (which is what is measured) had zero exceptions from the start. PSRT does have a few, but they are all exclusively used in setup; not during any performance critical sections. I still left it in (and turned on) because it didn't seem to hurt anything and potentially help.
Back in April 2024 when I published that one article about my findings of final's performance impact, I submitted it to CppCast via email. Timur Doumler (one of the co-hosts) asked me if I had any performance benchmarks about the use of noexcept. I did not.
But since the time I first added in NOEXCEPT, I had created automated testing tools (which also tracks the performance) and an analysis suite to view the data. I decided to re-run all of the same tests (including more), but this time to truly see if noexcept actually does have some impact on performance.
The short answer is: yes, but also no; it's complicated and silly.

Prior Art
In his email, Mr. Doumler told me that no one else in the C++ community had yet to publish any benchmarks about the keyword; to see if it actually did help performance.
At first, I wasn't able to find any. But eventually I did stumble across a 2021 answer to a 2013 stack overflow question. vector::emplace_back() was found to be about 25-30% faster if noexcept was being used. Fairly significant! But this lacks telling us what CPU, OS, and Compiler were used.
In the 11th hour of writing this, I found a lighting talk from C++ on Sea 2019. Niels Dekker (while working on ITK) did his own version of the NOEXCEPT macro along with benchmarks. He is reporting some performance improvements, but his talk also said there are places where noexcept was negative. One other finding is that it was compiler dependent.
And, that's about it. From cursory Googling there is a lot of discussion but not many numbers from an actual benchmark. If any readers happen to have one on hand, please message me so I can update this section.
How Does noexcept Make Programs Faster?
This is something I had some trouble trying to figure out (and I don't seem to be the only one). An obvious answer could be "because it prevents you from using exceptions that slow down your code." But this isn't satisfactory.
Among performance minded folks, there is a lot of hate for exceptions. GCC has a compiler flag -fno-exceptions to forcibly turn off the feature. Some folks are trying to remedy the situation by providing alternatives. Boost itself has two: Outcome and LEAF. Right now LEAF seems to be winning in terms of speed.
Kate Gregory wrote an article entitled "Make Your Code Faster with noexcept" (2016) that provides more insight. Quote:
First, the compiler doesn't have to do a certain amount of setup -- essentially the infrastructure that enables stack unwinding, and teardown on the way into and out of your function -- if no exceptions will be propagating up from it. ...
Second, the Standard Library is noexcept-aware and uses it to decide between copies, which are generally slow, and moves, which can be orders of magnitude faster, when doing common operations like making a vector bigger.
While this provides how noexcept can help performance, it neglects to provide something important: a benchmark.
Why "Don't Use noexcept"?
I didn't understand this either. I couldn't find many (simple) resources advocating for this camp. I found a paper (from 2011) entitled "noexcept Prevents Library Validation". I'm not sure how relevant it is 13+ years later. Else, Mr. Doumler sent me a good case via email:
Meanwhile, sprinkling
noexcepteverywhere causes lots of other problems, for example if you want to use things like a throwing assert for testing your code that just doesn't work.
Assertions are great for development and debugging; everyone loves them. They are absolutely vital to building any major C/C++ project. This is something I do not want taken away.
Personally, I like the noexcept keyword. It's very useful for documentation and telling others how to use code. We've all been burned by an unexpected exception at some point. It's nice to have in the language in my opinion for this reason.
How This Test Works
It's the exact same as the last time for what I did with final. But for those of you who aren't familiar, let me explain:
- It's a simple A/B test of the
noexceptkeyword being turned on and off with the same codebase - The test is an implementation of Peter Shirley's Ray Tracing in One Weekend book series
- It's fully CPU bound and vanilla-as-possible-modern-standard-C++
- All scenes from the book are rendered 50 times without
noexceptturned on- Each test case has slightly different parameters (e.g. image size, number of cores, random seed, etc.)
- One pass can take about 10-20 hours.
- Only the time spent rendering is measured (using nanoseconds)
- Once again, we repeat the above, but with
noexceptturned on - The off vs. on time difference is calculated as a percentage
- E.g.
off=100 msandon=90 ms. Speedup is 10 ms, so we say that's an +11% performance boost
- E.g.
- All of the above is repeated for a matrix of different chips (AMD, Intel, Apple), different operating systems (Linux, Mac, Windows) and different compilers (GCC, clang, MSVC). This time I tested 10 different configurations
All of the code was built using CMake and compiled with Release mode on, which should give the most performant runtimes (.e.g GCC/clang use -O3 and MSVC has its equivalent).
One important thing I do need to state about this test:
Unfortunately, 100% of all images rendered did not come out the same. The overwhelming super majority did; and when they were different it's negligible. When I first worked on this project I didn't know std::uniform_int_distribution doesn't actually produce the same results on different compilers. (A major issue IMO because that means the standard isn't really portable). A few scenes (such as Book 2's final scene) use an RNG to place objects and generate some noise textures. For example, GCC & MSVC (regardless of CPU/OS) seem to produce the exact same scene and same pixels. But clang has a few objects in different positions and some noise is different. Surprisingly, it is mostly intact compared to the other two. I find this astonishing. But I don't think the difference is that much to require a redo of the experiment. You can see the comparisons in this hefty .zip file.
This discrepancy shouldn't matter that much for two reasons:
- The differences are not too significant (see the .zip linked above if you're skeptical)
- The comparison is
<CHIP> + <OS> + <COMPILER> with <FEATURE> offvs.<CHIP> + <OS> + <COMPILER> with <FEATURE> on
With this said, at the end I do some fun number crunching in a Jupyter notebook and show you some colourful tables & charts alongside analysis.
Please keep in mind that this is a fairly specific benchmark. The (initial) goal of PSRT was to render pretty CGI pictures really fast (without breaking the original books' architecture). It works in a mostly recursive manner. Different applications such as financial analysis, protein folding simulations, or training AIs could have different results.
If you're wondering how I can turn off and on the use of noexcept, it works by (ab)using preprocessor macros:
And thus we powder it all around the code like so:
Once again, this is something I would never EVER do in production code; and you shouldn't either.
Also, I am (now) aware there is noexcept(true) and noexcept(false) that I could have done instead. I didn't know about it at the time and did this ugly C macro. Please forgive me merciless internet commentators.
Almost every function in this project has been marked with this macro. There are a few... exceptions... but these are in the setup or teardown sections of the program. None are in any of the rendering code (which is what is measured). This should allow us to see if marking functions as noexcept help performance or not.
PSRayTracing is not a "real world" application. Primarily serving as an amateur academic project, it does try to be modeled based on real world experiences. Personally, I do believe that commercial products like Unreal Engine or Pixar's RenderMan can serve as better benchmarking tools in general. But I have no idea about their ability to A/B test the C++ language, algorithms, data structures, etc. This is something PSRT has been set up to do.
Results From The Suite
Running the entire test suite an exhausting 22 times, it took cumulatively an absolutely melting 370 hours 🫠🫠
One thing I need to note is the AMD+Windows runs are "artificial" in a sense. When I did the initial analysis I noticed some of the variance in the data was higher than desired. So I ran the suite a second time (once for GCC and MSVC), but for each test case I took the fastest runtime between both attempts. This way AMD+Windows could be given the best chance possible.
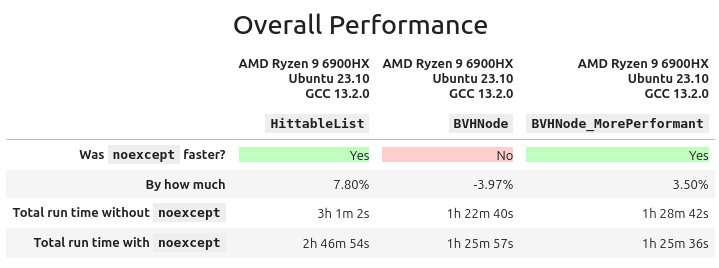
So, does noexcept help performance? Here's the grand summary:

We can see here that in some configurations, noexcept gave a half to full percent performance increase; which I think unfortunately could be declared fuzz. In the situations where there was a drop, it's around -2% on average. noexcept isn't really doing that much; it's even acutely harmful for performance. Bar charting that data:
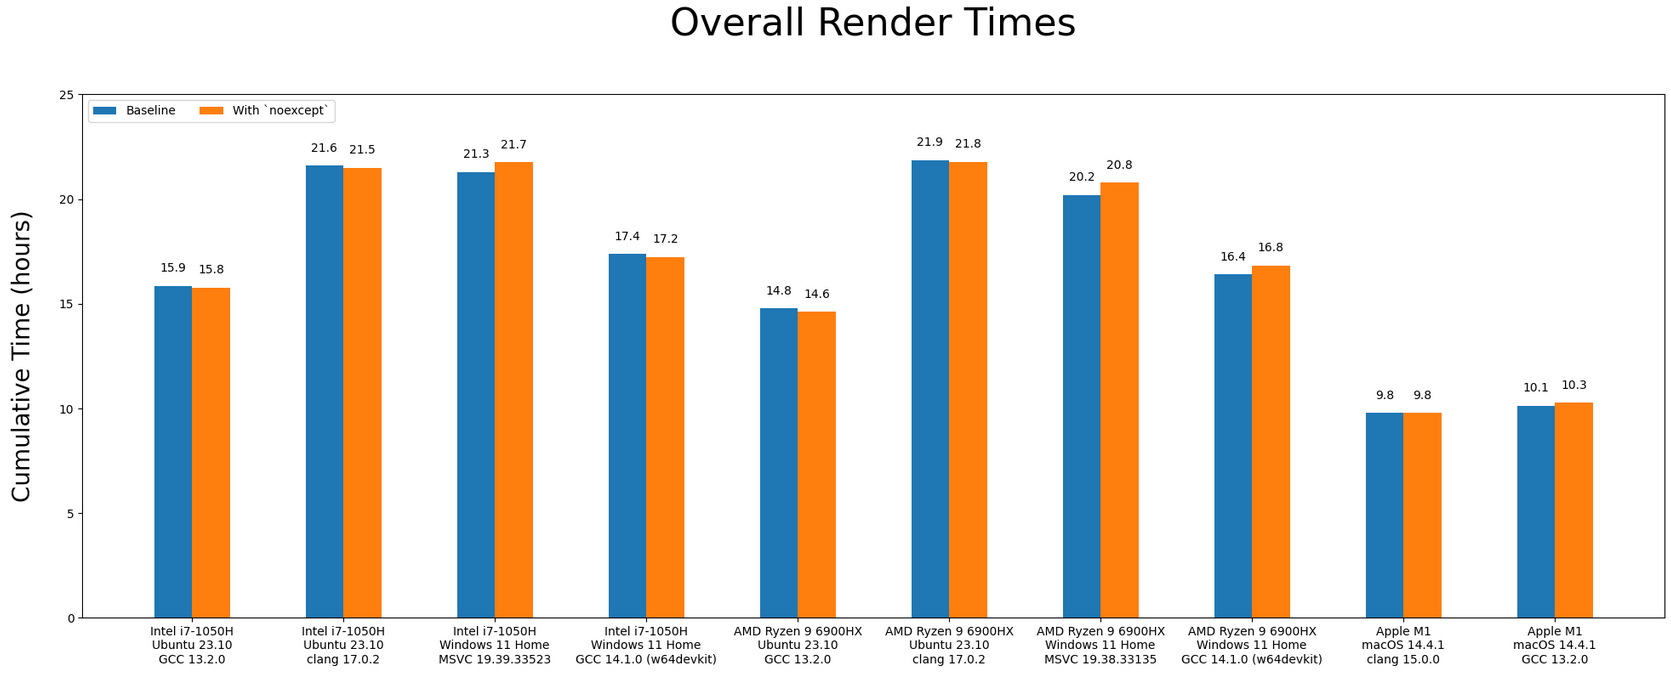
I do need to remind: this is not supposed to be a Monday Night Compiler Smackdown cage match, but once again there are interesting things to observe:
- Like last time, the Apple Silicon trounces everything else, and by a significant amount
- clang (on Linux) is considerably slower than GCC
- If you were to overlay the AMD bars on top of the Intel ones, it almost looks the same
- Your OS (the runtime environment) can have a significant impact on throughput. GCC is doing way better on Linux than Windows.
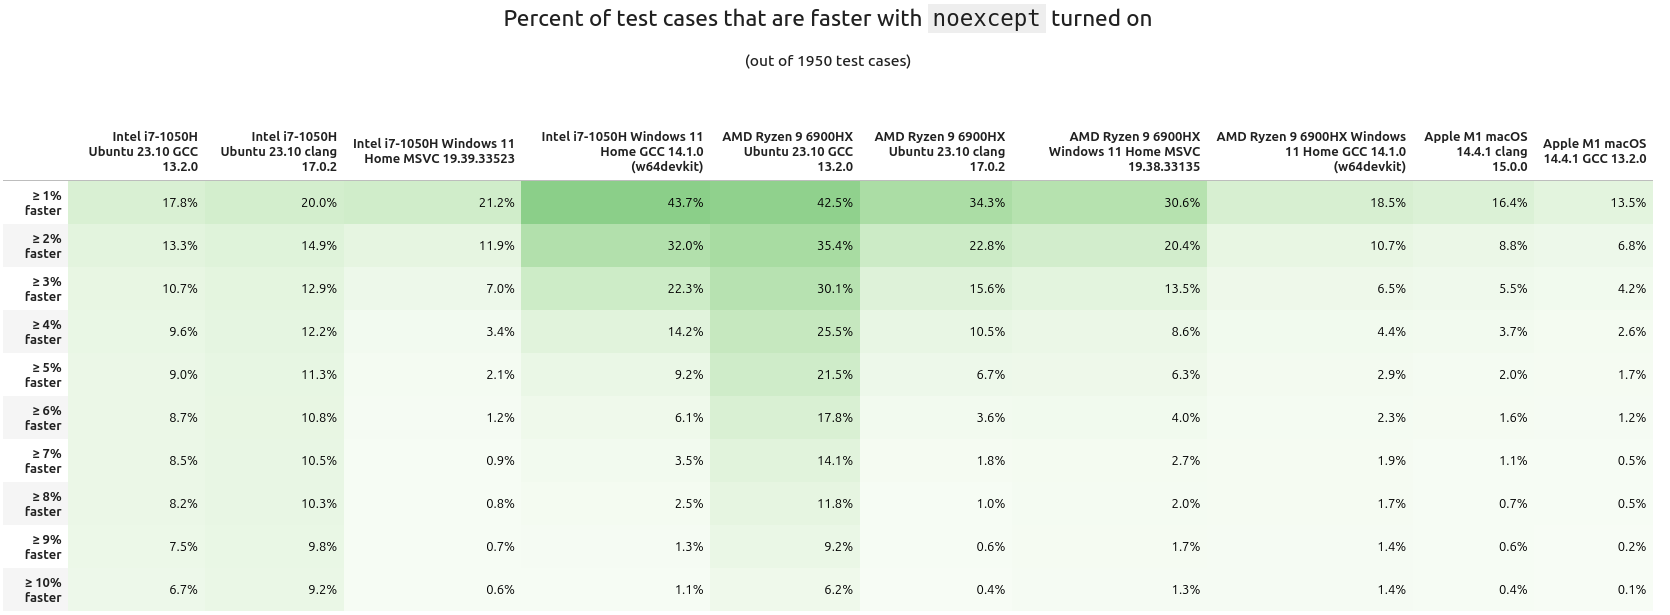
Summaries are okay, but they don't tell the whole picture. Next, let's see how many of the test cases had a performance increase. While a 1% speedup could not seem like much, for some applications that does equal a lot in cost savings.
What about the inverse? Here are the percentages of tests having a slowdown with noexcept:
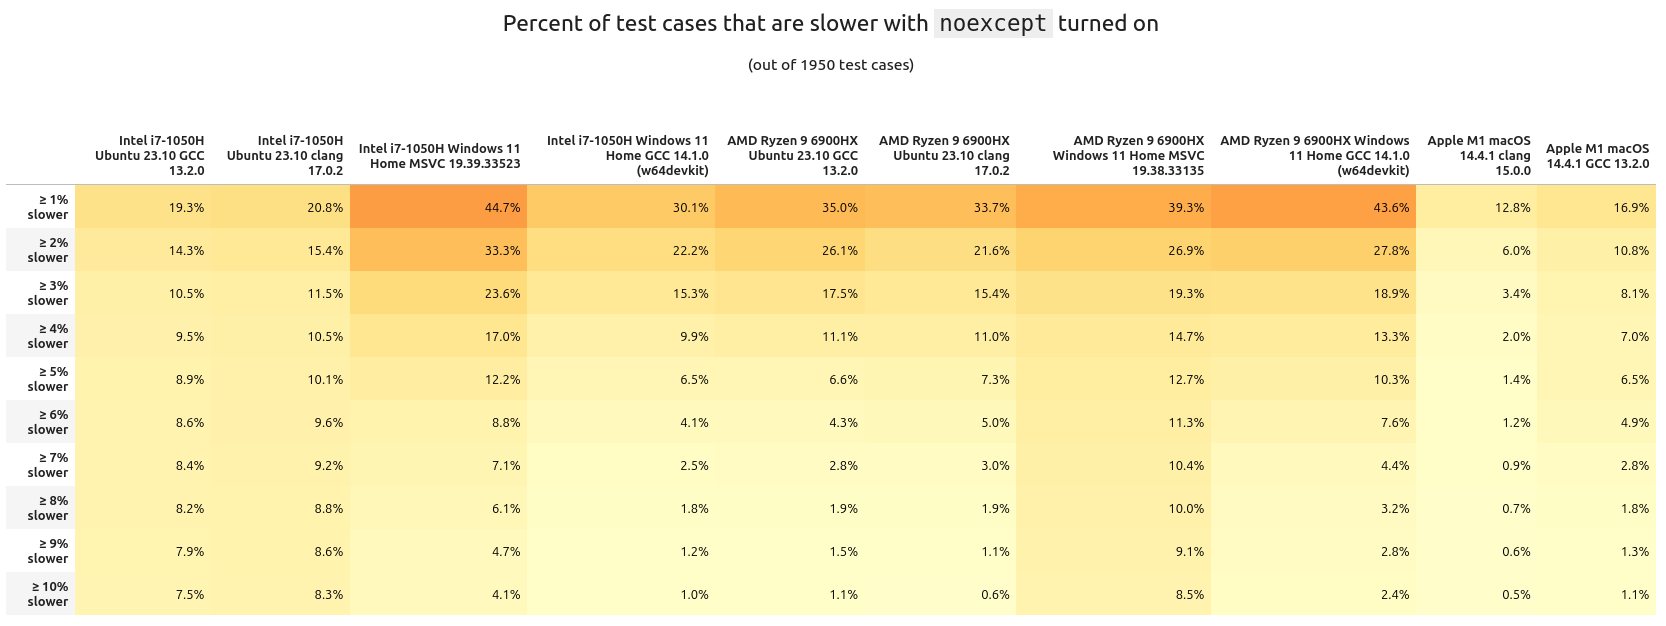
I don't think there's too much we can glean from these tables other than the runtime delta typically stays within the (very) low single percents. Looking at it per scene tells a different story:

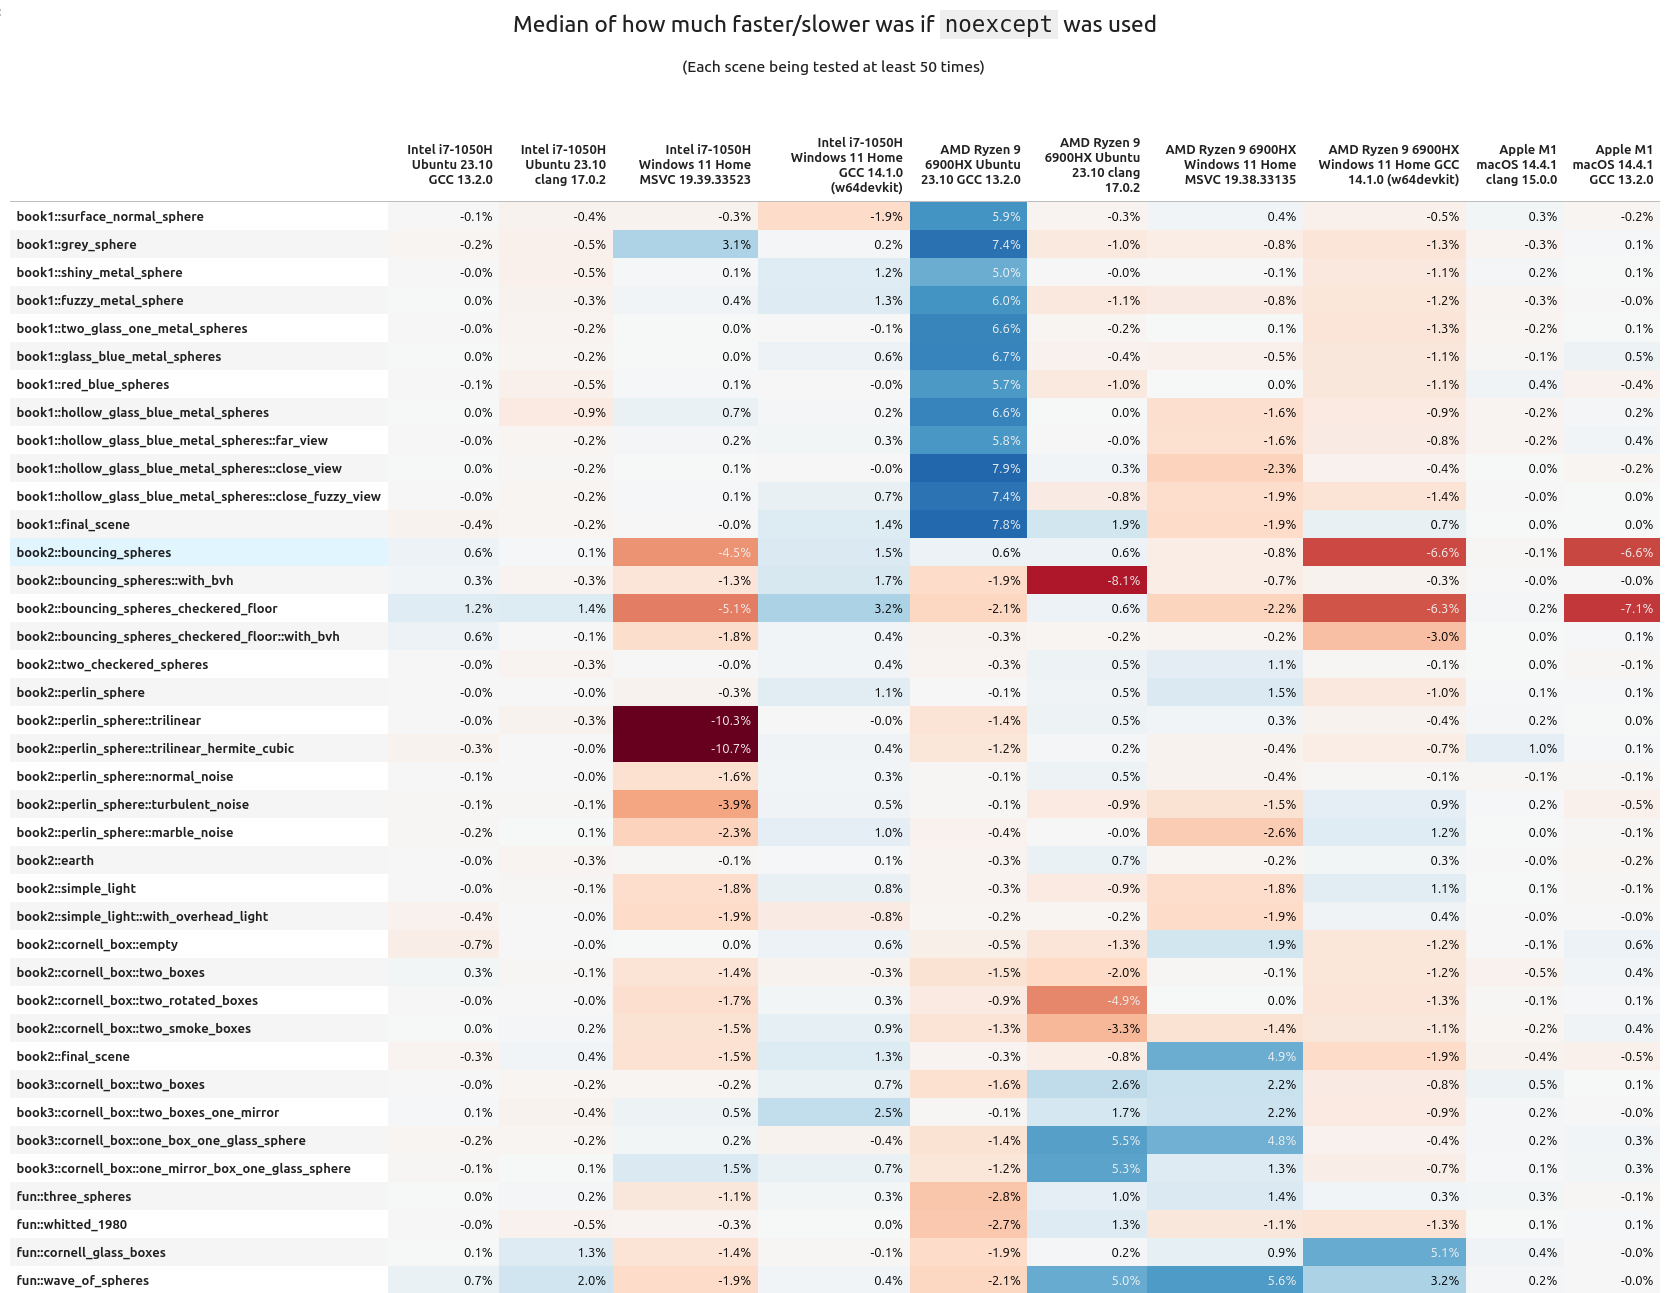
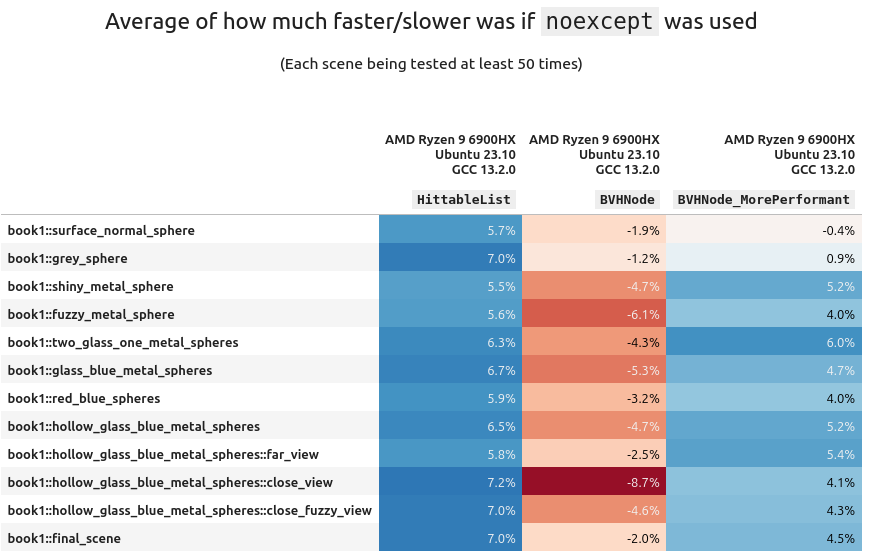
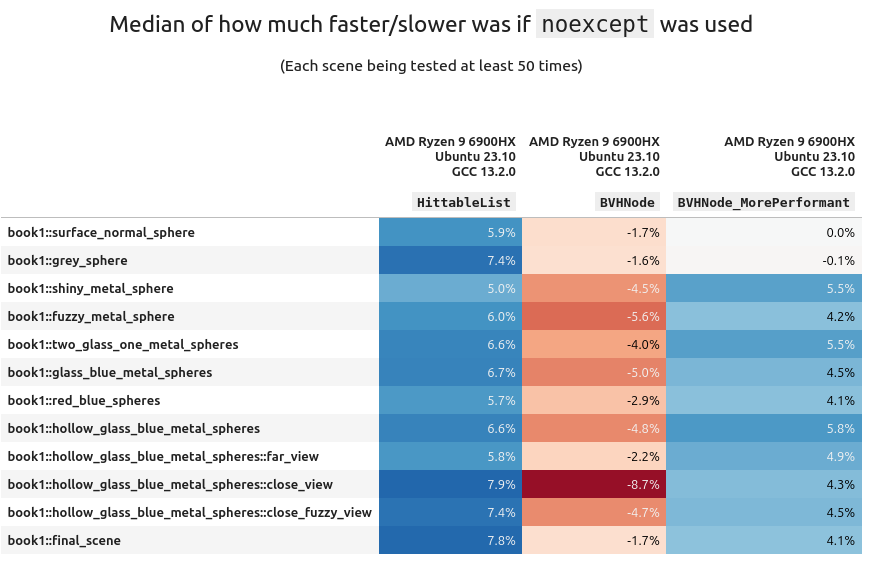
When we look at the average "percentage performance delta per scene", we can clearly see there are some scenes that benefit quite well from noexcept, others are getting hit quite hard. It's also interesting to note how many scenes are barely helped or hurt. Means are good, but seeing the median gives a more fair look at the results. When that is done with the above data, noexcept looks to be less impactful:
If you want to look at the variance, I have the table right here. I don't think it's as interesting as the above two (though you can have it anyways).
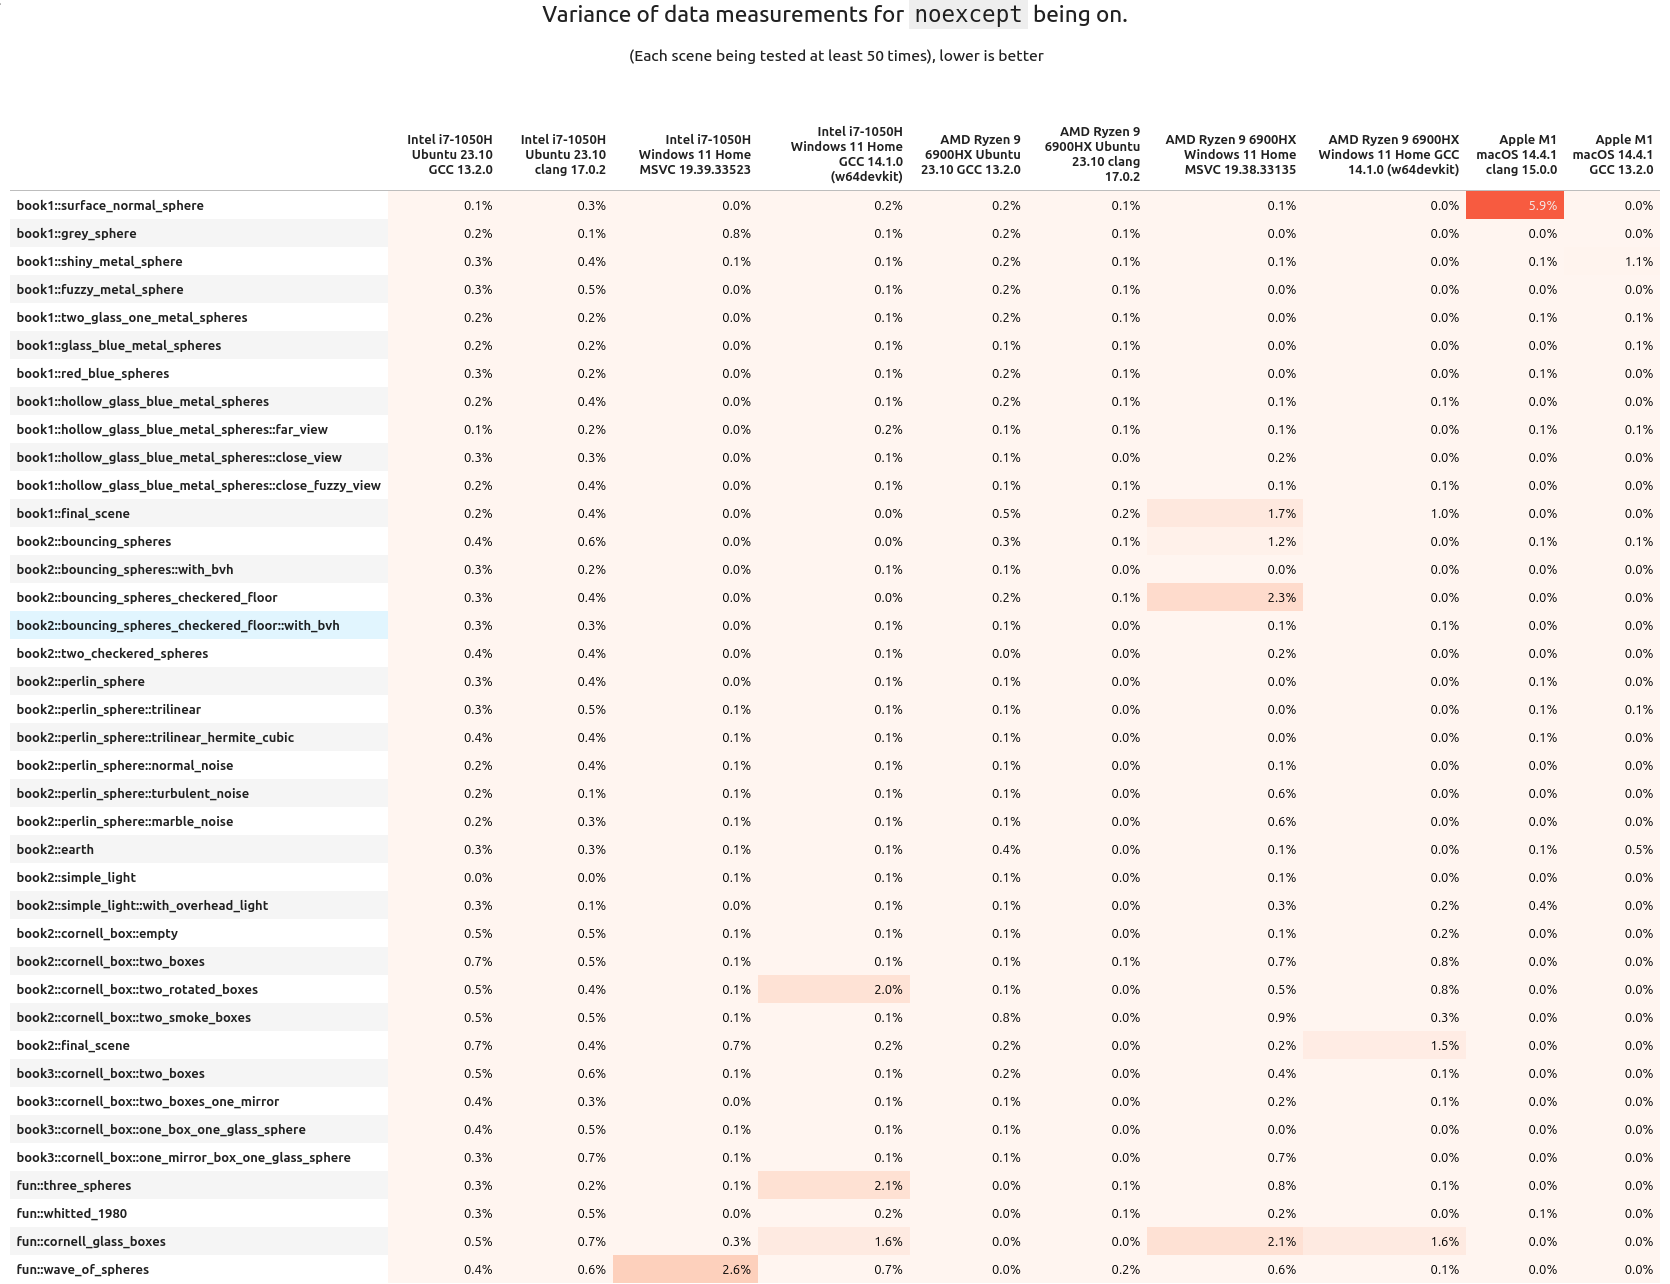
So overall, it mostly looks like noexcept is either providing a very marginal performance increase or decrease. Personally, I think it is fair to consider the measured performance increase/hit from noexcept to be fuzz; that means it kind of does nothing at all to help runtime speed.
There are some interesting "islands" to take a look at from the above chart.
The AMD+Ubuntu+GCC configuration
We actually see a very significant and consistent performance boost of 6-8% with noexcept turned on! But this is only for the scenes from book 1. When I first saw this I was wondering what could have caused it, and eventually I realized it was related to the architecture of the scene geometry from the first book.
All scene data is stored inside of a std::vector called HittableList. For these scenes, when the ray tracer is traversing through the scene geometry it's doing a sequential search; this was done for simplicity. Any practical graphics engine (realtime or not) will use a tree like structure instead for the scene information.
Starting in book 2 the second task is to use a BVH to store the scene. This provides a massive algorithmic boost to the performance. All subsequent scenes in this book use a BVH instead of a list of objects. This is why we don't see that same speedup in Book 2 (and in fact, a minor performance hit).
From up above, if you remember one of the arguments for "noexcept is faster" is the standard library is aware and can use (faster) memory move operations instead of (slower) copy operations. This is most likely the cause of the performance increase. But the BVH node is not part of std::, and doesn't have move constructors implemented. Therefore when using it noexcept does nearly nothing.
What is more fascinating is that the boost was only seen on AMD+Ubuntu+GCC configuration. Swap out any one of those variables (CPU, OS, or compiler) and no significant gain (in fact a tiny loss) was observed.
Digging A Little Bit Deeper
So... There's actually two BVH tree implementations in PSRT. One of them is the original from book 2. The other one is something I cooked up called BVHNode_MorePerformant. It's 100% API compatible with the standard BVHNode. But under the hood it works a little differently. The quick gist of it: instead of using a tree of pointers to store and traverse, the data is stored in a std::vector in a particular order. The traversal is still done in a tree-like manner, but because of the memory layout of what needs to be checked it can be more efficient. Years ago when I first wrote and tested this class I did see a small speedup in lookups.
It might be good to measure replacing HittableList in book 1 (on AMD+Ubuntu+GCC) with both BVH implementations and see the results:

(Variance table available here if you're interested (it's boring)).
Using std::vector with a dash of noexcept in your code will make that container faster. But we have to remember it's algorithmically inefficient compared to a BVH. And slapping noexcept on top of that (the BVH) can actually be harmful!!. And much to my dismay, my BVHNode_MorePerformant was beaten by the book's default implementation 😭
Shortly below there is a secondary benchmark that has a "reduced" version of HittableList across the configurations. But I would like to address a few other points of interest.
Intel+Windows+MSVC
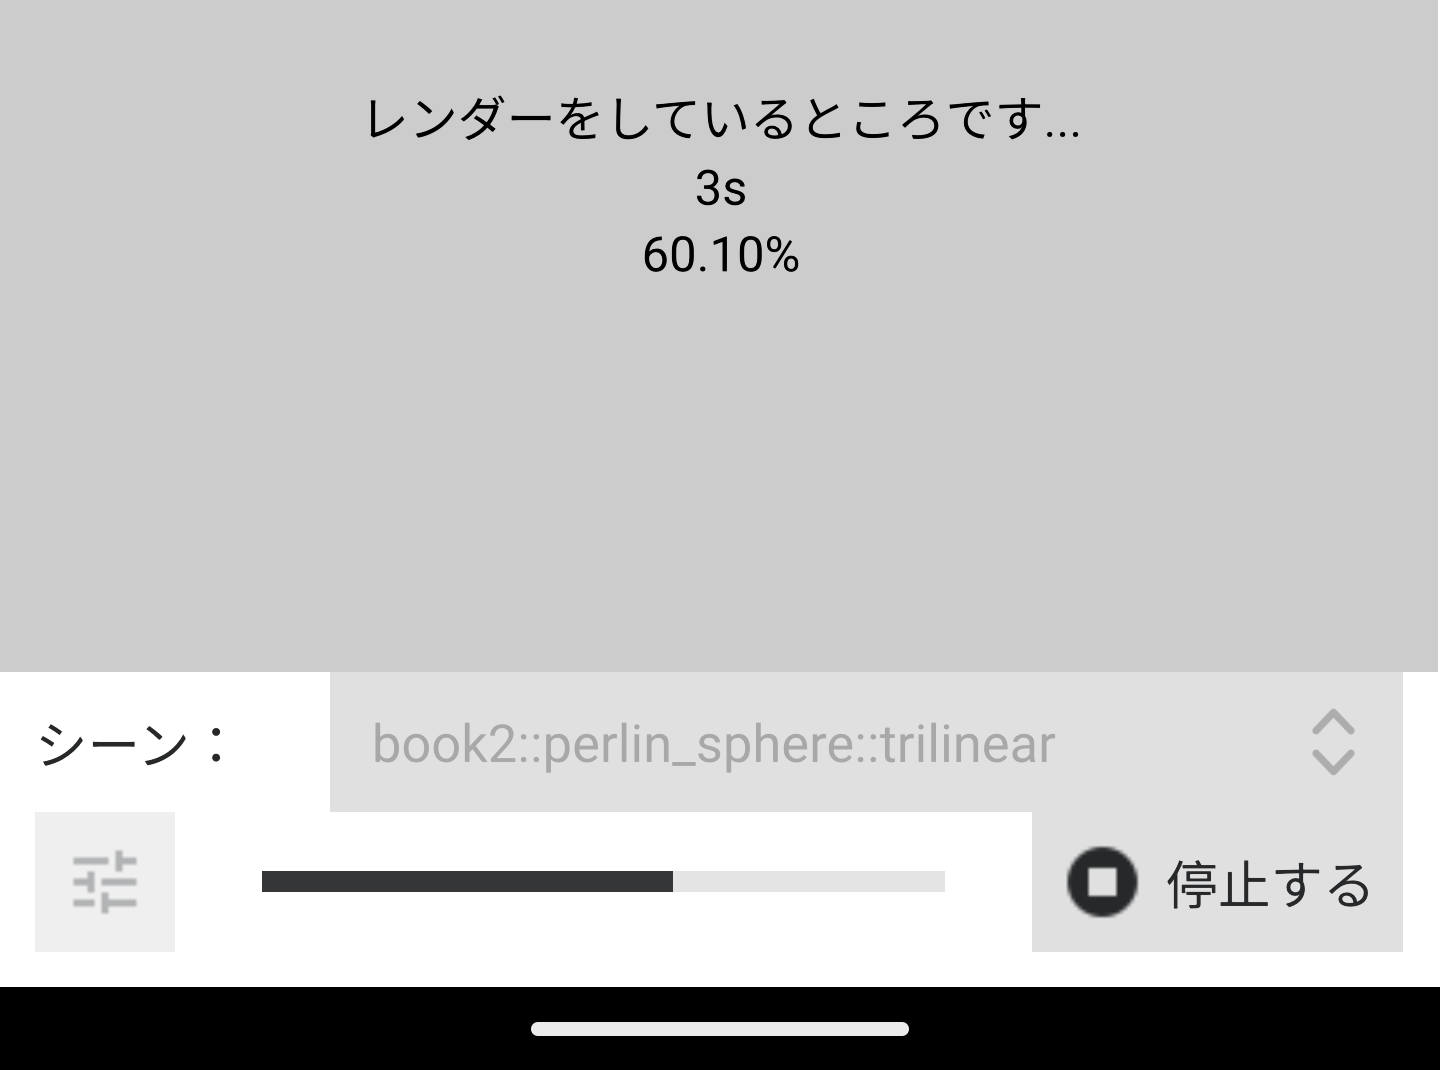
Looking at the mean/median tables from further above, the Intel+Windows+MSVC run seems to get a little bit of a hit overall when using noexcept. The book2::perlin_sphere:: series of tests steer towards a negative impact. And there are two scenes that have a whopping -10% performance hit with the keyword enabled!!

I am wholly confused as to why this is happening. As you can see, they are pretty simple scenes. Looking at the two cases with the larger performance hit, they are using trilinear interpolation (hermetic and non-hermetic). The code is right here. There are some 3-dimensional loops inside of the interpolation over some std::array objects. This is maybe the source of the slowdown (with noexcept on) but I do not want to speculate too much. It's a very minor subset of the test suite..
If you look at the source code, those three dimensional loops can be manually unrolled, which could (and I stress "could") lead to a performance boost. Sometimes the compiler is smart enough to unroll loops for us in the generated assembly. I didn't want to do it at the time since I thought it was going to make the code overly complex and a maintenance nightmare. This is something to take a look at later.
Looking (a little) More At std::vector
I think it is fair to conclude using std::vector, with noexcept does lead to a performance increase (compared to without the keyword). But this is only happening on one configuration.
I thought it would be best to write up a small testing program (that operates just like HittableList). It does the following:
- Generate a list of random numbers
- Generate a number to search for (could be out of range)
- Try to find that number in the list
- With this part we turn on/off
noexcept
- With this part we turn on/off
The program (of course) was compiled with -O3 and was supplied the same arguments across each configuration. It's run like this and here is the output:
ben@computer:folder$ ./list_test_clang_17 1337 9999999 10000
Checking 9999999 elements, 10000 times...
  plain average time: 2976 us
  `noexcept` average time: 2806 us

  plain median time: 2982 us
  `noexcept` median time: 2837 us
After testing on each configuration these were the grand results:
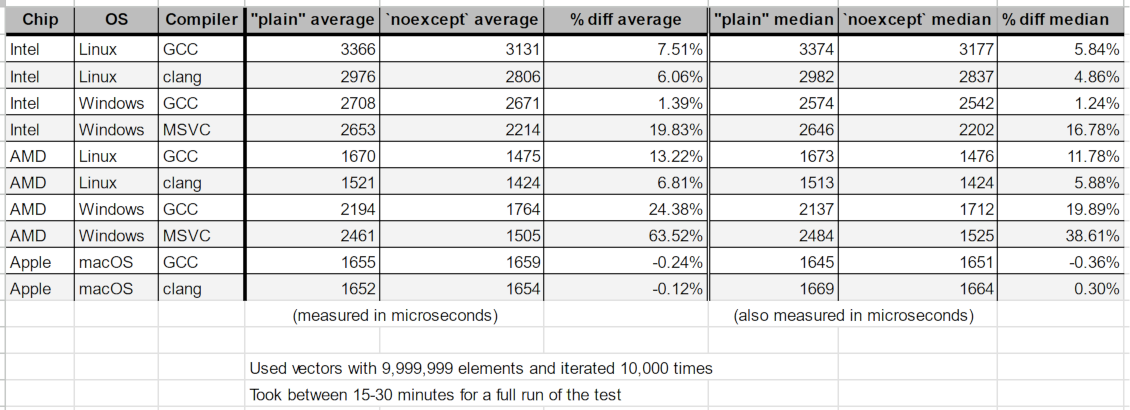
This is a very limited test. We can see there is a fairly consistent speedup for all x86 cases (and a very nice one for AMD+Windows). Apple Silicon has nothing and is likely fuzz.
The people who like noexcept might find this validating, but it's at odds with the tables from measuring PSRT: The speedups here aren't being matched with all the results from book 1, which uses the same "sequential search in std::vector" technique.
Look at the median chart from above. The only reliable speedup came from AMD+Linux+GCC, of around +7%. All other configurations were flat or possibly fuzz. In this mini test AMD+Linux+GCC meters 12% and many other configurations have a significant positive impact from noexcept.
In a more complex program the speedup wasn't reproducible.
From the last article, a commenter on HackerNews mentioned how they didn't like PSRT as a benchmark because it was too large. They preferred tests of small components. This is absolutely ludicrous since as software developers we're not writing small programs. We are building complex systems that interact, move memory around, switch contexts, invalidate cache, wait on resources, etc.
Just because a speedup is seen for a single component doesn't mean it will show up later when programs become large and have a lot of moving parts.
Hopefully I've illustrated this point.
Looking At The Assembly
C++ isn't what's running on the CPU, it's the generated assembly code. Usually to prove that something is faster, I've seen other articles post the generated assembly code, saying "It's optimized!!" I saw this for final, but what is noexcept doing?
Using the above testing program, let's see what the difference is in the generated x86 assembly (from GCC 13 with -O3):
These two look... oddly the same. I'm only spotting one difference, this line where the arguments are swapped in order:
<   cmp DWORD PTR [rdx+rax*4], esi

---

>   cmp esi, DWORD PTR [rdx+rax*4]
I'm not well versed in assembly, but what I can tell from documentation, it doesn't seem like the order of arguments from the cmp instruction instruction matter. If they do, someone please tell me so I can correct this information. I'd be VERY surprised if this swapped order is what caused the speedup in the limited benchmark above. Anyone who understands assembly much better than I, please provide insight. I would be grateful.
Assembly inspection usually can give insights, but it's no excuse for not measuring your code.
Wrapping up this detour into std::vector, other STL containers might have a performance increase, but we do not know for certain. Thus far only measurements from std::vector have been taken. I have no idea if something like std::unordered_map is impacted by noexcept. There are many other popular alternative container implementations (e.g. Boost, Abseil, Folly, Qt's). Do these get helped, hurt, or placebo'd by noexcept? We don't know.
And keep in mind, in the context of PSRT, we only saw a consistent speedup on one specific configuration (out of ten); some even saw a minute drop. The CPU, OS, and compiler play a role.
I really question whether noexcept helps performance. Just like with final, it doesn't seem to be doing much. Some cases it helps, other cases it hurts. We did find one solid case for Book 1 with AMD+Linux+GCC; but that's it.
And after seeing that overall hit/gain can be from -3% to +1%, I've actually become skeptical and decided to turn it off. I still like the keyword as a documentation tool and hint to other programmers. But for performance, it mostly looks to be a sugar pill.
My most important advice is the same as last time: don't trust anything until you've measured it.
Last Notes
I really didn't think I was going to be running such a similar test again and so quickly. This has inspired me to take a look at a few other performance claims I've heard but yet to have seen numbers posted for.
As for the benchmark itself, I would have loved to throw in some Android and iOS runs as well, but I do not have the bandwidth for that, or infrastructure to make it possible unless I were to quit my day job. We don't have too much high performance computing on mobile and ARM chips yet, but I can see it being something in the future. This is one of the deficiencies of this test. I'd really like to throw Windows+clang into the mix too, but right now there isn't a turnkey solution like how w64devkit provides GCC for Windows. Embedded and other "exotic" chips/runtimes have been given any love either. Maybe even playing with an IBM z16 might be fun 😃
PSRT doesn't also have a good way to "score" how intense a scene is. E.g. number of objects, what kinds, how complex, what materials, textures, lighting, etc. All that can be done right now is "feature on vs. feature off". I'd also want to expand this to other applications out side of computer graphics too.
If you want to follow what goes on with PSRayTracing, check out the GitHub page and subscribe to the releases. But do note the active development is done over on GitLab. You can find all of my measurements and analysis tools in this section of the repo.
EDIT Aug. 10th 2024: There has been discussion about this article on /r/cpp and Hacker News. Read at your leisure.
Till next time~
Vector Pessimization
(This section was added on Aug. 24th, 2024)
I wanted to give it about two weeks before reading the comments in the discussion threads (see above). On Hacker News there was an insightful comment:
... The OP is basically testing the hypothesis "Wrapping a function in `noexcept` will magically make it faster," which is (1) nonsense to anyone who knows how C++ works, and also (2) trivially easy to falsify, because all you have to do is look at the compiled code. Same codegen? Then it's not going to be faster (or slower). You needn't spend all those CPU cycles to find out what you already know by looking.
There has been a fair bit of literature written on the performance of exceptions and noexcept, but OP isn't contributing anything with this particular post.
Here are two of my own blog posts on the subject. The first one is just an explanation of the "vector pessimization" which was also mentioned (obliquely) in OP's post — but with an actual benchmark where you can see why it matters. https://quuxplusone.github.io/blog/2022/08/26/vector-pessimi... https://godbolt.org/z/e4jEcdfT9
The second one is much more interesting, because it shows where `noexcept` can actually have an effect on codegen in the core language. TLDR, it can matter on functions that the compiler can't inline, such as when crossing ABI boundaries or when (as in this case) it's an indirect call through a function pointer. https://quuxplusone.github.io/blog/2022/07/30/type-erased-in...
About 10 days later the author wrote an article entitled noexcept affects libstdc++'s unordered_set. I had some concern that this keyword may impact performance in other STL containers and the author has provided a benchmark which proves such a case. I thank them for that. Vector Pessimization was something I wasn't aware about and does seem like a fairly advanced topic; which isn't apparent at the surface level of C++. I recommend you go and read their posts.
I have never had to do a follow up to any blog post I've ever written; but I feel like I really need to with that last one and clarify a few things.
At the time of publishing I thought I was merely lighting a firecracker, but it seems more like I set off a crate of dynamite. I knew there was going to be some discussion about the results, but I did not anticipate the nearly 350+ comments. People are very particular about performance and benchmarking (as it is fair to be). Everyone is allowed to call BS if they see fit.
It's been three weeks since the article went live. I wanted to take some time for the dust to settle in order to read through what everyone wrote; and respond. If you haven't been privy to any of the discussion, it's been on /r/cpp and Hacker News. Along with some talk on Hackaday.
"I didn't understand how to use final properly"
I saw this comment pop up a few times; that I missed the point of final. The proper use of final wasn't the thesis of my article.
There are plenty of resources explaining how to use it and its purpose in the design of a C++ application. My concern was other articles claiming it can improve performance without a benchmark to back up their statements. Please read the titles of these articles:
- The Performance Benefits of Final Classes (March 2020)
- Using final in C++ to improve performance (November 2022)
- All About C++ final: Boosting Performance with DeVirtualization Techniques (January 2024)
None of these have any metrics posted. But all of these titles imply "final makes code go faster". They all talk about how final is used, including the generated assembly and what's happening at the machine level. That fills the "how?" and "why?" of final. But that isn't a benchmark. To say it improves performance but not have any proof to back it up is dangerous.
For the longest time we have been living in an environment where we skim articles (reading only a headline) and glean information to take it as fact; without actually verifying anything. Part of my previous blog post was trying to highlight what can happen if you do this. It is what I did initially, noticed nothing was matching those claims and decided to test it a bit further.
There was one thing I was wrong about: someone else did a benchmark of final in the past. In their case they found a consistent performance increase. They even re-ran their benchmark and saw the same results from 10 years ago. In my case it was faster in some instances, slower in others. I thank them for reaching out and have updated my older post.
I recall there being a comment about how my "improper" use of final could be a reason why clang had its performance slowdown. My counter to that: GCC had a consistent performance increase with use of the keyword. It was used the keyword as intended (and described by the linked articles above). I put it on many classes that have no further subclassing, and there was a performance boost in this case. Clang on the other hand, had a decrease with the exact same code.
"This isn't a good benchmark"
The previous article was written with the context that others may have read the project's README or have read some of the other prior posts. Let me rewind a little:
PeterShirleyRayTracing, a.k.a. PSRayTracing (a.a.k.a. PSRT) didn't start out as a benchmarking tool. I wanted to revisit a ray tracing book series I read when I was fresh out of university (2016), but this time with all the knowledge of C/C++ I had accumulated since that time. I first went through the books but as an exercise to learn Nim. Between then and 2020 I had seen images from the book pop up online here and there. Mr. Shirley had actually made the mini-books free to read during that time. Reading the book's old code and the newer editions, I noticed there were a lot of areas for improvement in performance. PSRT at first was an experiment in writing performant C++ code, but with some constraints:
- Has to follow the book's original architecture
- Needs to be cleaner and modern
- Must showcase safer C++
- E.g. The book's old code used raw pointers.
std::shared_ptrwas used in later versions; I know this is a bottleneck but that is something I've meant to look at later at later on. (But some other work as been done.)
- E.g. The book's old code used raw pointers.
- Must be standard and portable
- Full support for GCC and Clang (then later MSVC)
- Be "Vanilla C++" as possible. I don't want to force someone to bring in a hefty library
- There is an exception for libraries (like PCG32) that allow an increase in performance and are easily integrated like being a single header library
- Be able to turn on and off changes from the book's original code to see the effects of rewriting parts
- Extending is okay, but they can't violate any of the above rules
- E.g. multithreading was added and some new scenes. The Qt UI is a massive exception to rule no. 6 (but it's not required to run the project)
For the initial revision of PSRT, its code was 4-5x faster than the books' original code (single threaded). I was very proud of this.
Later on a Python script was added so PSRT could be better tested via fuzzing. Parameters could differentiate scenes, how many cores to use, how many samples per pixel, ray depth, etc. It was both meant to check for correctness and measure performance. The measurement of performance only is the time spent rendering. Startup and teardown of PSRT is not measured (and it's negligible). This way if I came across some new technique a change could be made and verify it does not break anything from before. The script has evolved since then.
To explain how the testing and analysis operates a little more simpler:
- Each scene would be fuzz tested, say three times (real tests do way more), and their runtimes recorded. Parameters could be wildly different
- For this example let's say once scene resulted in the times of
[3.1, 10.5, 7.4](real testing used 30 values)
- For this example let's say once scene resulted in the times of
- Then the same suite would be run, but with a change in code
times=[2.7, 8.8, 6.9]
- From this a percentage difference of each test case would be computed
[13%, 17%, 7%]
- A mean & median per scene could be calculated
mean=12.3%,median=13%- Each scene is different. Sometimes radically, other times only slightly. That's why it's important to look at the results per scene
- From there a cumulative "how much faster or slower" for the change could be found
I hope this explains it better.
I neglected to mention what compiler flags were used. All of the code was built with CMake in Release mode. This uses -O3 in most cases. This was something I should have specified first. I know there are other flags that could have been used to eek out some other tiny gains but I do not think it was relevant. I wanted to use the basics and what most people would do by default. I also configured the machines to only run the testing script and PSRT. Nothing else (other than the OS). Networking was disabled as well so nothing could interrupt and consume any resources available.
Simple vs. Complex
One commenter pointed out how they didn't like this, saying that they preferred simpler tests benchmarking atomic units. For example, measuring a bubble sort algorithm and only that. There are already a plethora of tests out there that do just this. That isn't good enough. In the real world we're writing complex systems that interact.
Prefer integration tests; verify the whole product works. Unit testing is good for small components but I only like to do this only when the tiny bits need testing. E.g. if a single function had a bug and we want to double check it going forward.
Other Benchmarks
In all of the comments that I read, I only recall coming across one other benchmark of final; they reported a speedup. But our methods of testing are completely different. They were testing atomic components. Mine was not.
In episode 381 of CppCast it was discussed that there are many practices in the C++ world that are claimed to be more performant without providing any numbers. To anyone who doesn't think this was an adequate benchmark: Do you have an alternative? I'm not finding any. If you don't think this was a good benchmark please explain why and tell me what should be done instead.
"The author provided no analysis about clang's slowdown"
This is one that I think is a more fair criticism of the article. In my defense, this is a topic I do not know that much about. I'm not a compiler engineer, not an expert on the subject of low level performance optimization, nor the inner workings of clang and LLVM. For earlier development of PSRT, tools like perf, flame graphs, valgrind/cachegrind, Godbolt's Compiler Explorer, etc. were used. But I do not feel comfortable providing a deep analysis on the issue with clang.
Time could have been spent researching the subject more and doing proper analysis, but this would have taken months. I did reach out to a friend of mine who works at Apple who provided me with some tips. Reading the comments on Hacker News, avenues seem to be looking at LTO, icache, inlining, etc. (Tickets have already been filed for further investigation.)
Someone did ask me to check the sizes of the generated binaires with final turned on and off. Devirtualization causing excessive inlining could be the cause. With final turned on, the binary was 8192 bytes larger; I'm not sure how significant that is to impact performance. For comparison, GCC's compiled with final was only 4096 bytes larger than no final. But GCC's binary was about 0.2 MB larger (overall) than clang's. I do not think binary size is a factor.
LLVM Engineer
On Hacker News there was a comment left by someone who works on the LLVM project. Quoting them:
"As an LLVM developer, I really wish the author filed a bug report and waited for some analysis BEFORE publishing an article (that may never get amended) that recommends not using this keyword with clang for performance reasons. I suspect there's just a bug in clang."
- I am not sure if this was a bug. I have had performance drops with clang compared to GCC, so I didn't view this as bug worthy. I checked the LLVM issue tracker in the week after publishing and saw that no one else had. So I went ahead and filed a ticket.
- I have amended articles in the past in light of new information. A previous revision of this project added in the aforementioned Qt GUI. When I noticed some bugs in Qt, an engineer from the company reached out to me and I updated the original article. Last week, I thought there were no other benchmarks about
finalin existence. I found out I was wrong and my previous article has been adjusted to include that new information.
If there is a bug in clang/LLVM, it becomes fixed, and the slowdown from usingfinalis reduced (or reversed), I will update the article.
Random Number Generator Might Be The Cause of Clang's Slowdown
The RNG was already a vector for performance improvement in the past. Compared with the original book's code, using PCG's RNG showed improved performance over what was available in standard C++. In the past I was wondering if there could be further improvements in this area.
One reader decided to dig a bit deeper. That person is Ivan Zechev. He's done some amazing work already and found that the issue with clang might have been related to the RNG and std::uniform_real_distribution. Calls to logl were not being properly inlined. And this looks like a long standing issue in clang/LLVM that has never been fixed.
Mr. Zechev sent me a merge request for review, but I have held off on merging it because it actually changed how scenes were set up. This can drastically alter how long it takes to render an image, because the scene is now different. In our case, it was book2::final_scene. At first the floor was completely changed. Later he was able to correct for that, but other elements were not matching. The uniform distributor (in clang) was producing different numbers with his changes. For this, I cannot merge. I commend him for his investigation and will be looking at it in the future. Thank you.
But this only uncovers a horrible problem: Things in std:: are not portable; which kind of means that the "standard library" really isn't ... well... standard. In regards to std::uniform_real_distribution there is some more information here. The C++ standard allows this but it doesn't seem right.
"There's no inspection of the assembly"
The other articles have talked about what assembly is generated. I do not see why it was needed for mine. What the other articles neglected to do was measure. This is the gap I wanted to fill in.
I use C++ at the surface level. I'm pretty sure most people do as well. Part of the point of having a higher level language is to abstract away these lower level concepts. PSRT is meant to be written this way; portable, memory safe, modern C++. Knowing assembly definitely helps, but it should not be a requirement. This is a C++ project.
Update May 15th, 2024:
After posting this article on /r/cpp, user /u/lgovedic provided a well thought out comment. I'd like to repost that here for other readers:
Glad you addressed the comments on both platforms! But I agree with others here that some things were left unaddressed.
When it comes to software performance, I live by the words "don't trust performance numbers you can't explain". Your measurements seem robust, but I think you went too far in assuming that the correlation between the final keyword and overall performance implies a causal relationship.
I respect that you and many others don't want to jump into assembly, and I agree you should be able to just write high-level code. But I do think diving into assembly and providing evidence for the causal link is required if you want to make fundamental statements about C++ performance like "using the final keyword does not always yield performance gains".
To be fair, on a high-level, that statement is not false. And I appreciate that you shed light on the issue so that people will be more mindful of it and measure the performance of their code more often (that's always a good thing).
But from your results and without further investigation, I think a more appropriate statement would be "using the final keyword can drastically alter the layout and size of generated code, which might result in an overall slowdown". Because (again, without further investigation) that's a much more likely explanation, in my opinion. And more importantly, it provides much better advice for using the final keyword than just "be careful"
There will be follow ups and other investigations; but not immediately. I am willing to amend anything in light of new data. This is not my full time job and only a hobby project. Anyone is allowed to contribute and is welcome to do so.
If you're writing C++, there's a good reason (maybe...) as to why you are. And probably, that reason is performance. So often when reading about the language you'll find all sorts of "performance tips and tricks" or "do this instead because it's more efficient". Sometimes you get a good explanation as to why you should. But more often than not, you won't find any hard numbers to back up that claim.
I recently found a peculiar one, the final keyword. I'm a little ashamed I haven't learned about this one earlier. Multiple blog posts claim that it can improve performance(sorry for linking a Medium article). It almost seems like it's almost free, and for a very measly change. After reading you'll notice something interesting: no one posted any metrics. Zero. Nada. Zilch. It essentially is "just trust me bro." Claims of performance improvements aren't worth salt unless you have the numbers to back it up. You also need to be able to reproduce the results. I've been guilty of this in the past (see a PR for Godot I made).
Being a good little engineer with a high performance C++ pet project, I really wanted to validate this claim.
Update May 3rd, 2024: When posting on /r/cpp, someone else did mention they did some perf testing of final before and had some numbers. Theirs was from about a decade ago. I did not find this in my initial searches. The comment thread and their article can be found here.
I keep on finding myself unable to get away from my pandemic era distraction, PSRayTracing. But I think this is actually a VERY good candidate for testing final. It has many derived classes (implementing interfaces) and they are called millions of times in normal execution.
For the (many) of you who haven't been following this project, the quick and skinny on PSRayTracing: it's a ray tracer implemented in C++, derived from Peter Shirley's ray tracing minibooks. It serves mainly an academic purpose, but is modeled after my professional experiences writing C++. The goal is to show readers how you can (re)write C++ to be more performant, clean, and well structured. It has additions and improvements from Dr. Shirley's original code. One of the big features I have in it is the ability to toggle on and off changes from the book (via CMake), as well as being able to supply other options like random seeds, multi-core rendering. It is somewhere 4-5x faster than the original book code (single threaded).
How This Was Done
Leveraging the build system, I added an extra option to the CMakeLists.txt:
Then in C++ we can use (ab)use the pre processor to make a FINAL macro:
And easily it can slapped onto any classes of interest:
Now, we can turn on & off the usage of final in our code base. Yes, it is very hacky and I am disgusted by this myself. I would never do this in an actual product, but it provides us a really nice way to apply the final keyword to the code and turn it on and off as we need it for the experiment.
final was placed on just about every interface. In the architecture we have things such as IHittable, IMaterial, ITexture, etc. Take a look at the final scene from book two, we've got quite a few 10K+ virtual objects in this scenario:

And alternatively, there are some scenes that don't have many (maybe 10):

Initial Concerns:
For PSRT, when testing something that can boost the performance, I first reach for the default scene book2::final. After applying final enabled the console reported:
$ ./PSRayTracing -n 100 -j 2
Scene: book2::final_scene
...
Render took 58.587 seconds
But then reverting the change:
$ ./PSRayTracing -n 100 -j 2
Scene: book2::final_scene
...
Render took 57.53 seconds
I was a tad bit perplexed? Final was slower?! After a few more runs, I saw a very minimal performance hit. Those blog posts must have lied to me...
Before just tossing this away, I thought it would be best to pull out the verification test script. In a previous revision this was made to essentially fuzz test PSRayTracing (see previous post here). The repo already contains a small set of well known test cases. That suite initially ran for about 20 minutes. But this is where it got a little interesting. The script reported using final slightly faster; wtih final it took 11m 29s. Without final it was 11m 44s. That's +2%. Actually significant.
Something seemed up; more investigation was required.
Big Beefy Testing
Unsatisfied with the above, I created a "large test suite" to be more intensive. On my dev machine it needed to run for 8 hours. This was done by bumping up some of the test parameters. Here are the details on what's been tweaked:
- Number of Times to Test a Scene:
10→30 - Image Size:
[320x240, 400x400, 852x480]→[720x1280, 720x720, 1280x720] - Ray Depth:
[10, 25, 50]→[20, 35, 50] - Samples Per Pixel:
[5, 10, 25]→[25, 50, 75]
Some test cases now would render in 10 seconds, others would take up to 10 minutes to complete. I thought this was much more comprehensive. The smaller suite did around 350+ test cases in 20+ minutes. This now would do 1150+ over the course of 8+ hours.
The performance of a C++ program is also very compiler (and system) dependent as well. So to be more thorough, this was tested across three machines, three operating systems, and with three different compilers; once with final, and once without it enabled. After doing the math, the machines were chugging along for a cumulative 125+ hours. 🫠
Please look at the tables below for specifics, but the configurations were:
- AMD Ryzen 9:
- Linux: GCC & Clang
- Windows: GCC & MSVC
- Apple M1 Mac: GCC & Clang
- Intel i7: Linux GCC
For example, one configuration is "AMD Ryzen 9 with Ubuntu Linux using GCC" and another would be "Apple M1 Mac with macOS using Clang". Not all versions of the compilers were all the same; some were harder to get than others. And I do need to note at the time of writing this (and after gathering the data) a new version of Clang was released. Here, is the general summary of the test results:

This gives off some interesting findings, but tells us one thing right now: across the board, final isn't always faster; it's in fact slower in some situations. Sometimes there is a nice speedup (>1%), other times it is detrimental.
While it may be fun to compare compiler vs. compiler for this application (e.g. "Monday Night Compiler Smackdown"), I do not believe it is a fair thing to do with this data; it's only fair to compare "with final" and "without final" To compare compilers (and on different systems) a more comprehensive testing system is required. But there are some interesting observations:
- Clang on x86_64 is slow.
- Windows is less performant; Microsoft's own compiler is even lagging.
- Apple's silicon chips are absolute powerhouses.
But each scene is different, and contains a different amount of objects that are marked with final. It would be interesting to see percentage wise, how many test cases ran faster or slower with final. Tabling that data, we get this:

That 1% perf boost for some C++ applications is very desirable (e.g. HFT). And if we're hitting it for 50%+ of our test cases it seems like using final is something that we should consider. But on the flip side, we also need to see how the inverse looks. How much slower was it? And for how many test cases?

Clang on x86_64 Linux right there is an absolute "yikes". More than 90% of test cases ran at least 5% slower with final turned on!! Remember how I said a 1% increase is good for some applications? A 1% hit is also bad. Windows with MSVC isn't faring too well either.
As stated way above, this is very scene dependent. Some have only a handful of virtual objects. Others have warehouses full of them. Taking a look (on average) how much faster/slower a scene is with final turned on:

I don't know Pandas that well. I was having some issues creating a Multi-Index table (from arrays) and having the table be both styled and formatted nicely. So instead each column has a configuration number appended to the end of its name. Here is what each number means:
- 0 - GCC 13.2.0 AMD Ryzen 9 6900HX Ubuntu 23.10
- 1 - Clang 17.0.2 AMD Ryzen 9 6900HX Ubuntu 23.10
- 2 - MSVC 17 AMD Ryzen 9 6900HX Windows 11 Home (22631.3085)
- 3 - GCC 13.2.0 (w64devkit) AMD Ryzen 9 6900HX Windows 11 Home (22631.3085)
- 4 - Clang 15 M1 macOS 14.3 (23D56)
- 5 - GCC 13.2.0 (homebrew) M1 macOS 14.3 (23D56)
- 6 - GCC 12.3.0 i7-10750H Ubuntu 22.04.3
So this is where things are really eye popping. On some configurations and specific scenes might have a 10% perf boost. For example book1::final_scene with GCC on AMD & Linux. But other scenes (on the same configuration) have a minimal 0.5% increase such as fun::three_spheres.
But just switching the compiler over to Clang (still running on that AMD & Linux) there's a major perf hit of -5% and -17% (respectively) on those same two scenes!! MSVC (on AMD) looks to be a bit of a mixed bag where some scenes are more performant with final and others ones take a significant hit.
Apple's M1 is somewhat interesting where the gains and hits are very minimal, but GCC has a significant benefit for two scenes.
Whether there were many (or few) virtual objects had next to no correlation if final was a performance boon or hit.
Clang Concerns Me
PSRayTracing also runs on Android and iOS. Most likely a small fraction of apps available for these platforms are written in C++, but there are some programs that make use of language for performance reasons on the two systems. Clang is the compiler that is used for these two platforms.
I unfortunately don't have a framework in place to test performance on Android and iOS like I do with desktop systems But I can do a simple "render-scene-with-same-parameters-one-with-final-and-one-without" test as the app reports how long the process took.
Going from the data above, my hypothesis was that both platforms would be less performant with final turned on. By how much, I don't know. Here are the results:
- iPhone 12: I saw no difference; With and without
finalit took about 2 minutes and 36 seconds to perform the same render. - Pixel 6 Pro:
finalwas slower. It was 49 vs 46 seconds. A difference of three seconds might not seem like much, but that is a 6% slowdown; that is fairly significant. (clang 14 was used here BTW).
If you think I'm being a little silly with these tiny percentages, please take a look at Nicholas Ormrod's 2016 CppCon talks about optimizing std::string for Facebook. I've referenced it before and will continue to do it.
I have no idea if this is a Clang issue or an LLVM one. If it is the latter, this may have implications for other LLVM languages such as Rust and Swift.
For The Future (And What I Wish I Did Instead):
All in all this was a very fascinating detour; but I think I'm satisfied with what's been discovered. If I could redo some things (or be given money to work on this project):
- Have each scene be able to report some metadata. E.g. number of objects, materials, etc. It is easily doable but didn't seem worth it for this study of
final. - Have better knowledge of Jupyter+Pandas. I'm a C++ dev, not a data scientist. I'd like to be able to understand how to better transform the measured results and make it look prettier.
- A way to run the automated tests on Android and iOS. These two platforms can't easily be tested right now and I feel like this is a notable blindspot
run_verfication_tests.pyis turning more into an application (as opposed to a small script).- Features are being bolted on. Better architecture is needed soon.
- Saving and loading testing state was added, but this should have been something from the start and feels like more of a hack to me
- I wish the output of the results were in a JSON format first instead of CSV. I had to fuddle with PyExcel more than desired.
- PNGs are starting to get kinda chunky. One time I ran out of disk space. Lossless WebP might be better as a render output.
- Comparing more Intel chips, and with more compilers. The i7 was something I had lying around.
Conclusions
In case you skimmed to the end, here's the summary:
- Benefit seems to be available for GCC.
- Doesn't affect Apple's chips much at all.
- Do not use
finalwith Clang, and maybe MSVC as well. - It all depends on your configuration/platform; test & measure to see if it's worth it.
Personally, I'm not turning it on. And would in fact, avoid using it. It doesn't seem consistent.
For those who want to look at the raw data and the Jupyter notebook I used to process & present these findings, it's over here.
If you want to take a look at the project, it's up on GitHub (but the active development is done over on GitLab). Looking forward to the next time in one year when I pick up this project again. 😉
Update May 3rd, 2024: This article has generated quite a bit more buzz than I anticipated. I will be doing a follow up soon enough. I think there is a lot of insightful discussion on /r/cpp and Hacker News about this. Please take a look.
I still can't seem to escape my PSRayTracing project. If you maybe remember, it was only available on the Google Play Store; despite the code working for iOS. The reason being that I didn't want to pay for the $100/yr subscription Apple required to publish (even) free apps.
Recently I've wanted to get back into app development a bit, so I bit the cost and formally published a version to the Apple App Store. If you'd like to take PSRayTracing out for a spin on your iDevice (or M1/M2 Mac), you can get by clicking the button below.
Software translation is a topic that I don't see being discussed too much. It's something I've wanted to write a blog post about for a while now. At most, all I see is the "wrap your user facing strings in a translation macro", and call it a day. There's a lot more to be concerned about in my opinion.
Despite being in the industry for only a few years, I've gotten to work quite a bit with making software speak more than one language. I've led translation projects in the past. Taking some products from a single language (English) to many; whilst leaving breathing room for more. When it comes to this topic, there is both a technical and non-technical side. In order to be good little developers, I think it is very important to cover the softer parts as well.
This blog post (probably my second longest thus far,) is divided in about three major sections. Feel free to skip a section if it doesn't interest you.
- Localization in Qt apps
- Good guidelines for localization
- A story of localization from a previous job
Professionally, I am a C++/Qt programmer. I may be a bit biased here, but I feel that Qt has one of the best localization infrastructures out there. It's got your basic "replace this [English] string with that [French] translation" feature, yet it also provides GUI translation tools (such as Linguist) and locale specific resource/asset loading. While this guide will have a focus on use of the Qt framework, it will also cover general principles as well.
If you're looking for a non-Qt solution, Boost.Locale looks to be an excellent alternative. Outside of C++ land, there's the lower-level GNU gettext which is available for many other languages (Boost.Locale actually uses this under the hood). I've not used these solutions myself, but they are battle hardened throughout the years and are worth your attention.
If there is one component I wish I could rip out of Qt and shove it into its own independent library it would be the string handling (QString et. al) and localization ecosystem. It has some of the most handy string manipulation functions out there. I wish there was a Qt-like-but-non-Qt equivalent out there that I could pull into other projects of mine.
The one thing I will not talk about is money. That's a whole other can of worms you can go hire an overpriced consultant for.
What prompted me to write this post was extending the PSRayTracing app once more. I wanted to (and did) add both a German and Japanese translation. It's fairly tiny, only has about 30 user facing strings. It's now live on Google Play (EDIT Oct 23rd, 2023: and now Apple App Store too) if you want to take it for a spin. And the full source code is available on GitHub. Please help me, I can't escape this project no matter what I do...
![]()
Translation vs. Localization
This gets into philosophical things here a bit more, but I think it's an important matter to cover. When you are trying to internationalize an app of yours, you should strive for localization over simple translation. If you're wondering what's the difference, here's the quick version:
Translation → The reinterpretation of meaning from one language into another, but keeping things such as names and places intact.
Localization → Translation, but also changing specific elements to better match with the target language/culture.
If you're wondering why localization is better, a good example I can think of is the colour red. In many western cultures, red colours are usually reserved for the "no good bad thing". E.g. stop signs, error messages, etc. But in Chinese culture, red elicits good luck and happiness. This is a very stark contrast in meaning. It could lead to some dangerous behavior if not properly addressed.
Shoot for localization.
Localization in Qt
Qt has their own guides on this subject. I would recommend giving them a brief read as well:
To start things off simple, let's just talk about strings for the moment. In your application, strings can be divided into two groups:
- User facing strings/messages. This is what you want to translate
- Non-user facing strings/messages. These would be your debug messages, (some) file paths, shell calls, etc
Your user facing strings will go into what's known as a .ts file. This is what you would hand to a translator to, well, translate. You can have multiple of these for a project. It should be one .ts file per language. E.g. myapp_en_US.ts, myapp_de_DE.ts, etc.
Translations are put back into the .ts file by the translator via a tool called "Linguist". It has very nice features such as adding notes, marking completeness, phrasebook, and more. Once you've received your .ts file, you must then transform it into a .qm file. These are known as the "Translation Modules". They are what needs to be shipped with your application to support a different language.
User Messages
If you want to collect those user facing strings into something you can hand off to a translator, you'll need to use the QObject::tr() function. If your string lives in QML, then use qsTr(). It works exactly the same (down to the parameters too). Explaining the arguments, we've got:
const char *sourceTextconst char *disambiguation = nullptrint n = -1
sourceText is the most important one here. This is the text that you want to show to a user. "User Facing Messages" as I tend to call it. Next we have disambiguation. This is important if you have an overloaded word, but when translating to another language you need to use a more specific case. If you're confused about this, let's do an English → German example.
- "No, that is false" → "Nein, das ist falsch"
- "I have no idea" → "I habe keine Ahnung"
Even if you haven't taken a German 101 class, you probably know that "nein" means "no". But that's for the case when you want to disaffirm or deny something. But when you state that you have "no units of something", you need to use "kein". Here's what will show up in Linguist when specify a disambiguation for two matching sourceTexts.
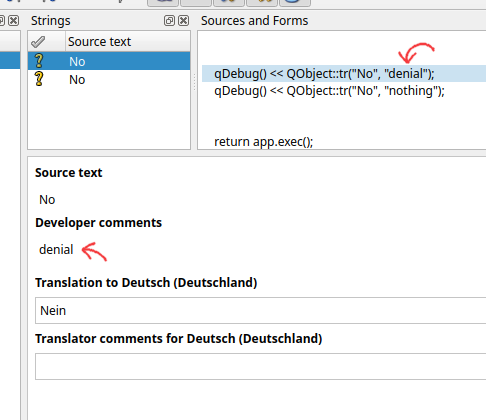
Handy, isn't it?
As for the last argument, we've got an n. This is a "plural specifier". As English speakers, notice how we say things like:
- 0 Apples
- 1 Apple
- 2 Apples
At some point in your life you've seen some software that showed text such as 4 Apple(s). While this is programmer friendly, it isn't really natural. I'm sure you're already thinking of some solution where you can use conditional logic to show different strings; don't do that.
- That gets ugly, and fast
- That little
nparameter? Qt implements this already for you
Pluralization rules can get quite nasty for other languages. There's a very old Qt Quarterly article that goes into this whole plural string thing way better than I can. Go read it. It has everything else I want to say.
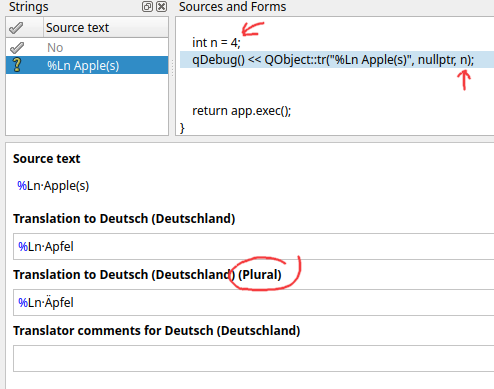
As you can see in Linguist, you need to provide a singular and a plural string (possibly third string, language dependent). The value for n will then control what will be shown at the time. In the above image, there's a happy little umlaut over the A for the plural case. Which is the correct plural form of "Apples" in German.
If you're wondering why in the display string I'm using %Ln instead of %n or a %1, we'll get to that later.
Other Strings
The other type of strings that we can have in our app is not necessarily user facing one's. In regards to translation, there's not too much more to talk about here, except that it's possible to accidentally forget to mark a string for translation. Where it could "slip" through. That's bad.
A way to remedy this is having you (the programmer) explicitly mark all of your strings as translatable (with tr()) or as literals. This is something that we did at a previous place that I worked. The programmers prior to my arrival never intended the product to use multiple languages, so they never bothered to wrap any of the strings in tr(). This was quite the headache for me to go and audit the software to figure out which strings needed to be translated, and which ones didn't.
There are two macros that you can define at compile time to help with this. QT_NO_CAST_TO_ASCII and QT_RESTRICTED_CAST_FROM_ASCII. This way, compilation would fail if you did anything like this:
And you would need to do this instead:
This will force you to mark what you want translated, but also what you don't.
I will note that this can get quite pedantic and annoying, but at this place that I was working at the time, it did help the other programmers on the team to mark their intentions for string usage. If you want to read up on QStringLiteral woboq has a nice article here, but it is also fair to note that there are others who aren't fond of it.
In my personal opinion, I would not like to force it for any new project I was working on as it can be frustrating. But when you are coming into a code base that is an absolute mess, needs refactoring, and you want to ensure others on your team be explicit with their intentions, requiring QStringLiteral will help.
Localization of Resources
It is very likely that you might have some resources in your app (e.g. an image) that you can't use in another language. Take for example the title screen of the first Pokemon game. It was drawn in Katakana for the original Japanese release. Though it needed to be in English for the US. Seeing as this asset is an image and not some plain text, something more needs to be done.
You might be thinking you could get away with a qsTr("logo-en_US.png") in your source. Then swap that out with, say, logo-fr_FR.png with Linguist. While that does work, it's a bit clunky. There's a much better way by leveraging Qt's fantastic resource system.
When I was trying to work on the Japanese translation of PSRayTracing, I was facing a bit of an issue. The fonts weren't legible at all, they were too small. The glyphs for latin based scripts are pretty simple and can be rendered quite tiny, but still be legible. Using the same font size for east asian languages (E.g. Chinese, Japanese, Korean) is not really doable. Take for example, one of my favorite Kanji: 鬱 (which has the meaning of gloom & depression).
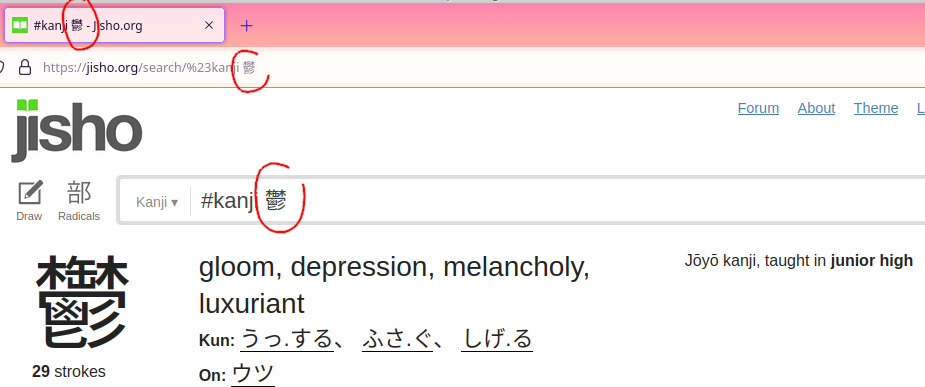
You're not able to discern many of the specific strokes when it's tinier. Yes, this is a more of an extreme example, but there are quite a few Kanji's that are very similar. We need to make the text larger here.
And how was this fixed? Since PSRayTracing's GUI is 100% QML, loading up a different, language specific qtquickcontrols2.conf file at startup is what was done. Normally I use a font size of 12 for the app, but bumping it up to 15 is good. First, I made a file called qtquickcontrols2_ja_JP.conf, with the Japanese specific adjustment:
Then in the main resource file, it is added in, but with a Language Selector. Don't forget to alias the _jp_JP variant to the original.
Now when Japanese is loaded up, the font size of the application is larger and more legible.
Going back to the original example of localized logos, you can use this feature to swap out images when a different language is detected. Should be simple enough.
Localizing Numbers
This is a short topic to cover, so there's not too much to mention here, but I feel it's important.
Have you ever seen the inside of a German store and thought, "Why are the commas and decimals in the wrong places?" Well, they're not. Some countries just have a different way of writing numbers. In places such as Deutschland (compared to America), the comma and decimal are swapped.

When we write software we should be aware of these differences.
To account for this In Qt, where you would use %n to display a number, use %Ln instead. Qt. will take care of the rest at runtime and format your number for the proper locale. Microsoft's Number Formatting document gives a good overview on this topic. And if you want to go deeper, read the Wikipedia article on the Decimal Separator. Please, use %Ln by default. You'll make your life easier and others will appreciate it.
CMake Setup
IMO, setting up translations is a bit easier in qmake, but I'm using CMake, like the rest of the C++ world. So let me show you how to set that up.
And that's it! I very much recommend reading the documentation page for qt_add_translations() so you can better understand what is going on. For instance, I was having some issues with the translation modules (the .qm files) not appearing to be generated or embedded. Reading the docs, I found out manually specifying the release_translations target as a dependency of myapp did resolve the problem:
Translation modules can also be generated directly from the lrelease tool without having to rely on the build system. I rarely use it directly, so I'm going to keep it out of the scope of this document. You can read more about how to do this over here. For now, just pretend that the .ts → .qm step is magic.
Updating Translations
So far I've made mentions of these .ts files, but I've not really told you that much about them. They are the core of the translation system. They are generated from Qt's tools by scanning your source for the tr()/qsTr() calls and then placing the strings into the aforementioned .ts files. This is done with the lupdate tool. From there, you hand the .ts files to your translator, tell them to get a copy of Linquist, and then get to work. Under the hood, these files are actually XML:
As you can see, there's a lot more than the simple "String A equals String B". Translations can be marked as incomplete, disappeared, have a source, etc. These are visually displayed inside of the Linguist tool. This becomes super handy for tracking down the context of a translation or seeing if something has changed.
With the above CMake command of qt_add_translations(), lupdate should actually be invoked during build time. For PSRayTracing, I initially was having some trouble with it for some odd unknown reason (that I'm no longer able to repro). In case you need to, manually invoking lupdate is fully possible. Please check the docs here on how to do it.
"Installing" a Translation (a.k.a. Changing Languages)
Having a translation is no good if you can't actually use it. In Qt's terminology, this is referred to as "installing a translation". But for the rest of us, we simply refer to this as "setting the language". When generating a new project in Qt Creator, this code should come default, but if you happen to not have it, here it is:
This should go inside of your main() function, right after instantiating the QApplication/QGuiApplication instance, but before any UI is shown. In summary, this will check all of the languages that you specified (on your system) as desirable. The first one it finds, it will use that translation. And if it doesn't, welp, then you're stuck with whatever is shown inside of the tr("...")/qsTr("...") calls.
I think it's fair to point out as well that some others in the Qt world aren't fond of the above block of code being the default "load translation" block. This blog post by KDAB illustrates the issues and provides an alternative: https://www.kdab.com/fixing-a-common-antipattern-when-loading-translations-in-qt/
It's fully possible for the language of your app to change on the fly too. Looking in the docs for QEvent, there's an event type called QEvent::LanguageChange.
While this might seem like a cool thing to support, I don't recommend it. It could be handy during development. For example, in order to figure out how all of the UI elements will fit together to support multiple languages. It will put a lot of stress on you, the programmer, to make sure all of the UI elements are being correctly updated. It would be best to handle the QEvent::LanguageChange event just to let the user know they should restart the app to see the language changes take effect.
Fudging a Locale at Runtime
Normally for testing I'd recommend that you change your device's (or users') locale. But for development, this can be a pain. It's easy on Android/iOS/macOS where you can toggle this in settings quite quickly. On Linux, you have to log in and log out again. It gets tedious. But there is a quick and dirty way to change your app's language: Just force the locale at runtime. Here is how to do it in a single line. Put this right at the top of your main(), right before instantiating the QApplication:
I am aware of setting the LANG environment variable on Linux devices, but in my experience, that hasn't worked well. The above has been way more reliable for me and works on all platforms.
Note that this alone might not change the language of your app, that is if you're using the "translation installer" from the above section. That is because what you (manually) set the locale to be, might not exist in the uiLanguages (despite there being a translation module). But there is a quick fix for that:
When a new QLocale object is created, and a locale isn't specified, it will use the default that's set. Make sure to undo these changes before deployment.
Okay, that's not so much "runtime" and moreso "hardcoding", but I think you get the idea here. If you want you, it's possible to make something more complex that could be set at runtime, with a configuration variable (e.g flag at launch). But I leave that as an exercise for the reader.
Misc. Qt. Stuff
And now, just some other random things I'd like to get out of the way:
- Not all languages operate on a Left-to-Right system like we do in the West. There are many popular languages such as the Semitic family that use Right-to-Left reading systems. Qt has built in functionality to help you out with that. Personally, I've never had to use it, but with the growing importance of the middle east region don't be surprised if software starts being translated there more and more often, such that UIs need to accommodate this.
- Need to give someone a
.pofile (another industry standard) instead of a.tsfile? Qt has you covered. There is a tool that's shipped with Qt calledlconvert. IMO, it seems to be only semi-documented, but it will let you convert between these two formats. It's invocation is super simple:lconvert myapp_en_US.ts -o myapp_en_US.po lconvert myapp_de_DE.po -o myapp_de_DE.ts
- I do love the linguist tool, but it does have one major deficiency: newlines and HTML are not rendered. This would be SUPER helpful for any translators. In PSRayTracing, there are a few places where I have multi-line strings. In Linguist, they only come out as
\n. And in another section, I use some light HTML for formatting (including escape characters); none of this is rendered out. Get ready for you and your translator to pull each other's follicles out from your scalps. - If you change a single source string, it's going to cascade down the line to all languages. This is an absolute nuisance. Especially if you had something misspelled in your source language. IIRC, Linguist can detect if a source string changes. But it might also say that you have both an obsolete string and a brand new one.
- And you're going to have to notify your translators of the change anyways...
- Your app might have a base "English Translation" despite the native tongue of your app being English. If you generate a new project in Qt Creator the wizard at some step will ask you about a Translation. It's wise to put this in, despite that your source strings are written in English
- One of the benefits here is that this helps you handle plural forms mentioned above
- This "base translation" could serve as something you give to translators for brand new languages. E.g. Linguist lets you add comments to each string, so putting them in the "base English" translation can be helpful.
- Another thing is that in your source code you could do this:
tr('hello-msg'). In Linguist, havehello-msg→Hello Worlddefined (for example). So now all of your "truly user facing strings" are defined in.tsfiles; not in source.
- EDIT 8/12/2022: Reddit user /u/disperso pointed out that
QFileSelectoris something worth mentioning too. It's something that I haven't personally used yet, but gleaning from the docs, it does seem very useful. It can be used to pick the correct variant of a localized file, depending upon the current application's locale. Please go read the docs for now to use this one.
General Principles and Things I've learned
Now, we've come to the time in the blog post where we let go of Qt and I'd just like to share some of the things I've learned while translating existing software. But also making new projects translation friendly. Keep in mind, this is not a rulebook; simply a guideline.
Keep Your Content Organized
Put your localized content in an i18n/ folder. From there, if you want to create further subdirectories for each locale (e.g. i18n/de_DE/, i18n/ja_JP/ etc.), you can do that too. Keep your projects organized.
German Will Break Your Layout
In fact, I've found both French and Russian to be just as bad. I'm having some trouble trying to find screenshot examples of this. But it is very well known that the German language can have some quite long words. It's not uncommon when you plug in a non-English European language for your UI to completely break. I got pretty lucky with translating PSRayTracing where I didn't have to adjust the UI that much. I only had two big breakers:
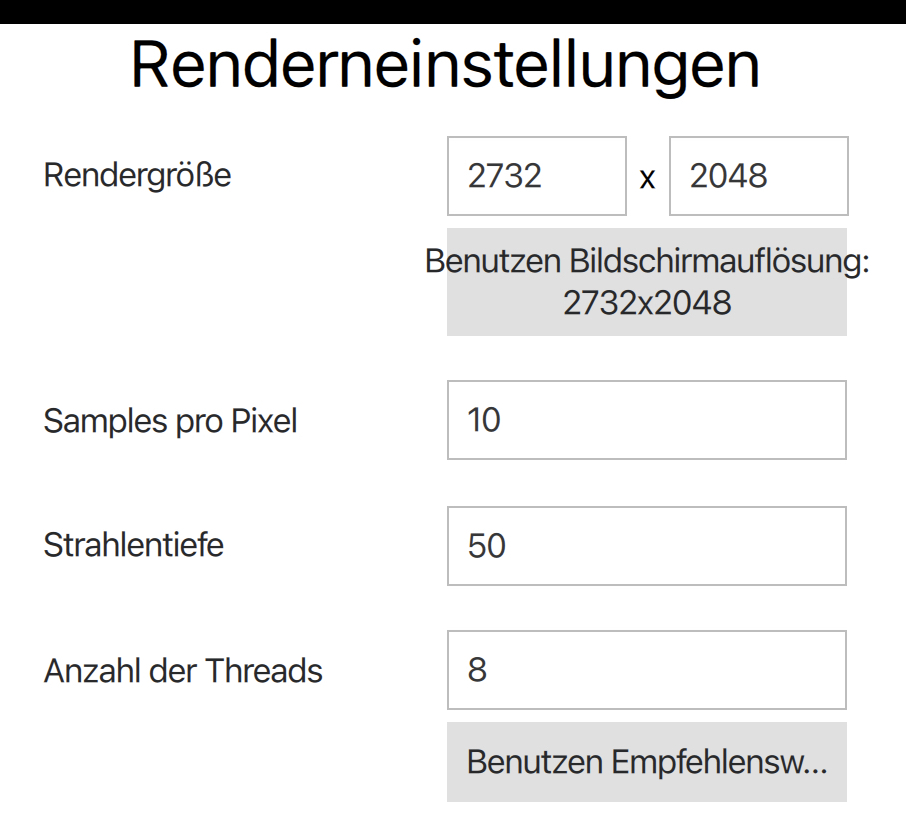
Both of these buttons' text were easily fixed by inserting newlines after Benutzen. This is something I've commonly seen. Another common tactic is to also provide abbreviations.
Chinese, Japanese, and Korean Glyphs are W-I-D-E
These are referred to as the "CJK Fonts". For computing these have presented many issues compared to simpler Latin/Cryrlic based systems. One thing I don't see many others talk about is how physically wide their glyphs can be. This is also coupled with having to make the fonts a larger size for legibility reasons. See the example of 鬱 above as to why.
Because of this CJK can easily break layouts. Here's what the Japanese translation did to two of my buttons when plopping in the initial translation:

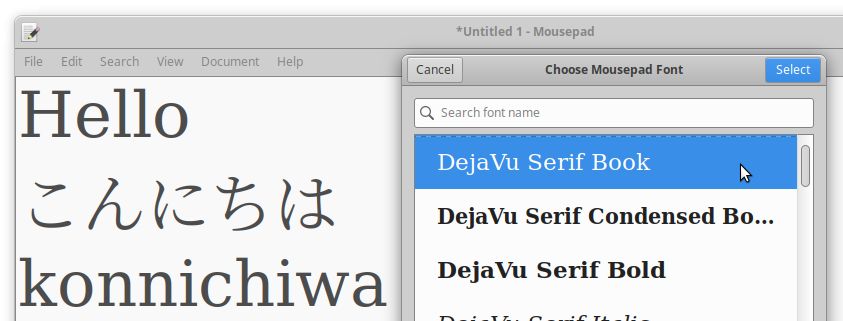
That first button's text doesn't have enough padding/margin on the left and right. And the button below has gone off into ellipsis land... Even at the same font size, the CJK glyphs are sometimes nearly twice as wide as a Latin character. Take a look at this example of writing "Hello" in Japanese. こんにちは (konnichiwa) uses the same amount of glyphs but it is significantly wider.
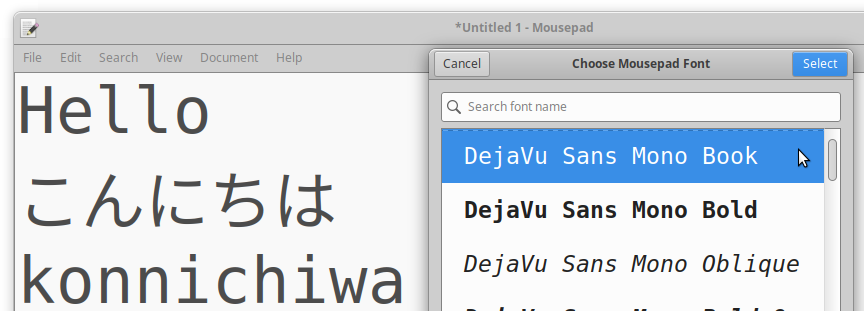
Going to a non-monospace font, it's just as bad.
Prepare for CJK.
You could also lump Cyrillic based alphabets into this group too, since their characters are more "blocky" than Latin based scripts. But you can make the glyphs smaller. Not as bad as CJK.
Software Isn't Immune to (Geo)Politics
The vast majority of people who read this article are probably living in developed western countries; which tend to get along better with their neighbors. Other places where software is sold, this isn't always the case. It's likely that you might need to tune your application to fit within the politics of a certain region.
A well known example of this is how Google Maps will redraw the location of borders, depending upon which country you're accessing the service from. On the silly side there was Hans Island between Canada and Greenland (Denmark), chronicled as the Whisky War. Eventually resolved this very year (2022). But on the more serious side there are active (somewhat hot) territorial disputes between India and Pakistan. If you had to make a map, who would you show this belonged to?
Another example of changing software for different locales: censorship. When Team Fortress 2 launched in Germany, Valve had to censor out the blood and gore from the game despite its highly cartoonish nature. Mega Man Zero, a beloved game from my childhood, was toned down for the International (non-Japanese) release.
If you're also thinking about translating a specific piece of software to one language because it's a lingua franca across multiple markets, that might not always be the case. This BBC article covers it pretty well, but German (and Latin) used to be one of the languages that scientific papers were published in. There were even scientists and engineers who attend German night school so they could better understand what their peers in Germany & Austria were doing. Welp, two world wars changed that. In the U.S. we were instructed to not speak the enemy's language. Scientists from Germany and Austria were boycotted from conferences and journals. I fully expect similar things to happen in the near future once again.
The quick and skinny guideline here is:
- Some countries don't have the same laws as us
- Some countries don't have the same ethics as us
- Some countries don't recognize other countries. Flags, languages, ethnicities, borders etc.
- Some countries are actively (and passively) at war with others
- What is acceptable can change over time due to politics
You're Going To Find Weird Things
This can be true of anything in the sciences. Maybe I'm biased and I feel like this comes up more in the software realm. Or at least we question these occurrences a lot more since we know (or hope) that these systems were built by other rational human beings. Not some freak manifestation from the universe.
When I was working on the Japanese localization of PSRayTracing, I had the resource system use a modified qtquickcontrosl2.conf if Japanese was detected (see in the above section "Localization of Resources"). This was in order to make sure that all of the text was nice and easily readable. Everything was working fine on Android & Linux. But testing it out on macOS and an iPad, it wasn't working; i.e. the default qtquickcontrols2.conf was being loaded despite setting my system's language to be Japanese. I was seeing Japanese strings show up in the app, but with a smaller font size.
I filed a bug report (to Qt) for it. And after about two hours of making a small repro project, I found the culprit. Qt was reporting my system's locale as ja_US. Yup, that's something I didn't expect. A locale of "Japanese (American)". I have never seen this locale ever in my life. I've seen things like de_CH for "German (Switzerland)" or de_AT for "German (Austrian). But never ja_US.
A Google search for "ja_us locale" only turned up one a single relevant result; another person asking "Have you ever seen this before?" Well, it turns out that this sort of thing does actually exist, and with a significant amount of users. Unfortunately, this is something that does break the app. The language can be loaded, but not the locale specific files, where this is only hhappening on Apple platforms. I don't think this is the fault of the folks at Qt, but it's something that they (now) need to accommodate for. Such is the life of people who make cross platform stuff.
¯\_(ツ)_/¯
Ensure Your UI Layouts are Flexible and Adaptive
I'm talking about from the get go when you first plan out your UI. It will save you a lot of pain and frustration in the long run. It will be hard (but not impossible) to go back and fix poorly constructed UIs. Remember that design is one half, implementation is the other.
When I first worked on the "Render Settings Form" for PSRayTracing, I envisioned that its layout would always work well as two columns.
labels on the left
[____ forms on the right____ ]
This worked well on all the platforms. Until Japanese & German strings broke the layout, partially making it unusable. To fix this, I deployed a layout pattern I've seen in other places:
labels on the top
[___ forms underneath ___]
This is something I initially wanted to do for the initial release of the GUI, but I was way too exhausted and wanted to work on other tasks. And now that was coming to bite me back in the butt a bit. But alas, it actually was a quite simple change. The real meat of it being about 3 lines:
The full change is closer to 20-ish lines, but that's to make sure everything looks and feels nice:
Feels Great.
And as a last bit for this section: avoid using "fixed sizing" and "absolute positioning" for UI elements/layouts as much as possible. These will burden you later on since you might tailor the look and feel of something for a string in English, But when that string is now 2.3x larger, things will go bust. I've been on projects where absolute/fixed UI elements were so baked in, we couldn't change them out. We had to keep on running back and forth with the translator to get shorter words.
Put Your User Facing Messages in One File
Alright, it actually might be two files. One for C++, the other for QML. Or if these files start to get super large, feel free to break them string down into categories and put those into more files. The idea is here to make sure strings aren't spread across too many spots. I've worked on projects where user strings were all over the place. Lots of duplicates. It was a pain to coordinate and make sure everything was correct.
If you want to see an example of this, check out the full Messages.qml file from the PSRayTracing repo. The idea is that you have every user facing string be its own read-only variable that lives in your Messages.qml/Messages.cpp file.:
Excerpt from Messages.qml:
Benefits of this:
- Everything is in a single place (or only a few)
- Makes message/string reuse much nicer
- Refactoring is a breeze; renaming a variable is much easier with tools than changing a string in 12+ locations
- Don't need to re-enter the same translation 12+ times over
- Changing a translation is quick
The big-sad from doing this is that you lose context of where a user message is located. I'm talking about in Linguist. The .ts files contain annotations of where in the source code the string is located. And in Linguist, that source will be brought up to show you the surrounding code for that message. But IMO, the benefits far outweigh the downsides.
Testing Will Be A Pain
All done with running a smoke test on your application? Ready to approve it for release? Good, now make sure it works the same in German. The same in French. Perfect in Japanese. Do Polish. Latvian.
Be ready to iterate n amount of times. Where n is how many languages you wish to support. This is going to be QA's problem.
Oh, did QA find a problem for one language? Good, now fix it.
Oh no, this means you, the developer, now needs to fix the UI for that language. But now you need to run through n - 1 languages to make sure nothing else is busted.
Ah, you've verified that it's working well for m different languages (where m < n). What's that? For language m + 1, now something adjacent is busted. Fix that too. And re-verify all n languages.
I think you can get the picture here. You will have to iterate a bunch of times, over and over, and repeat yourself, over and over, just to make sure things are good, over and over.
Which brings me to my next point...
Users Will Break it in the Wild
This is another one of those things for software in general, but I feel the need to give it some spotlight here.
Right after I published the most recent release of PSRayTracing on Google Play, I actually did not expect anyone in Germany or Japan to download the app and take it for a spin in their native tongue. Lo and behold, sooner than 12 hours after pressing "Release" someone in Japan downloaded the app, then posted a screenshot where I could see the layout was broken. In fact, they posted two screenshots!
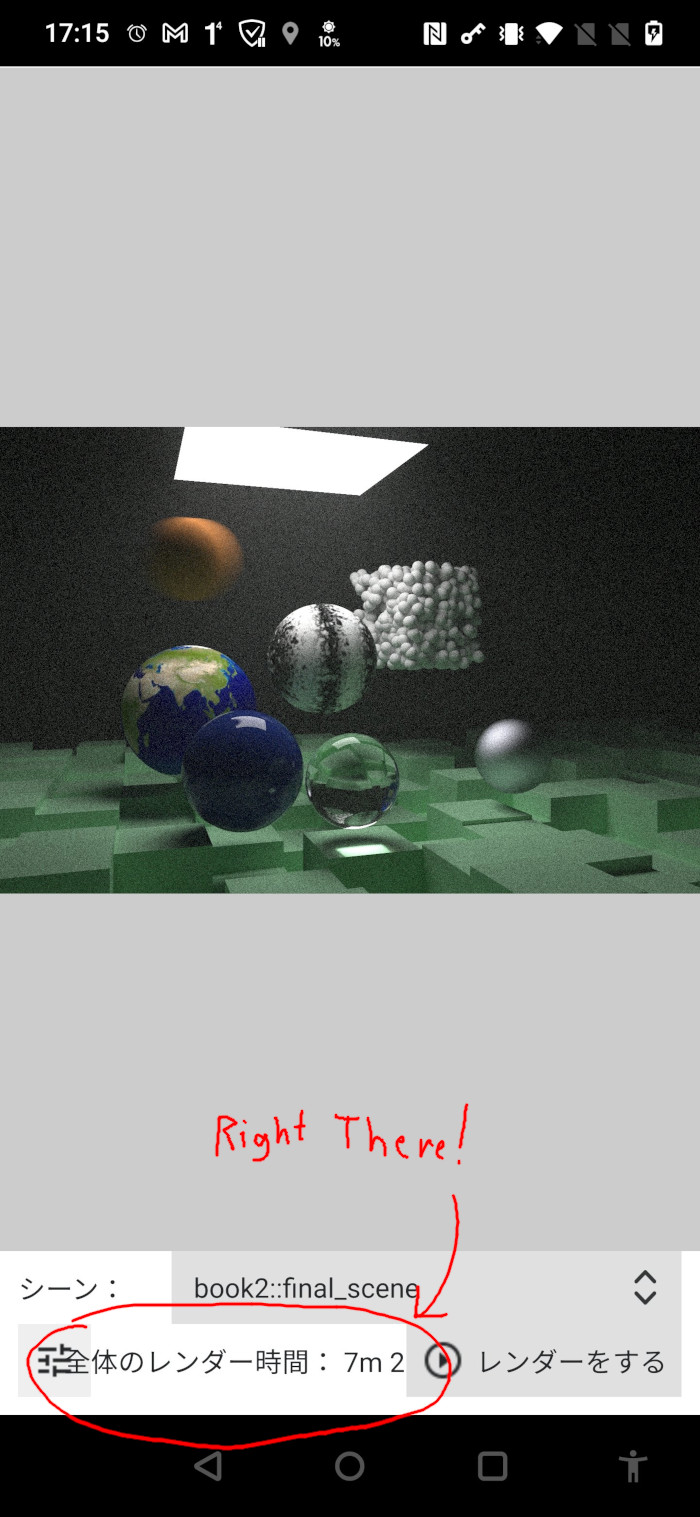
After the weeks I spent making sure that this layout worked on different devices in different languages. Someone just goes and borks it up in a short amount of time.
ಥ∀ಥ
In all seriousness, I thank them for posting this so I can go and fix it.
Don't Use Any Machine Translation
I hope this is an obvious one. Do not do it for any UI controls/messages.
Okay... I actually did for the "About" pages in PSRayTracing, but I at least added a notice that was. The rest of the UI was translated by hand and I verified this by checking other (translated) apps that exist in the CG realm. In my defense, my German and Japanese language skills aren't up to par to translate a technical block of text like that. Just please don't do this if you have an actual commercial project.
I did break my own rule here and I am sorry...
The Worst Translation Project I Ever Worked On
Oh boy. It's time for "Developer Blog Post Rant Therapy Time". Gather round now boys and girls and let me tell you a scary story. It is Halloween season after all. There is nothing of technical importance in the words below. You can spend your time reading this if you like a good cautionary tale. If not, feel free to skip this section.
At a previous job, we were developing a product that had a fixed display size. When I first got onto the project, it was already well behind schedule. The code was also an absolute mess. If I had to give an estimate, I believe that about 90%+ of it was written by people who had never worked in Qt before, and these people were no longer at the company. Unfortunately, it was my responsibility to fix this.
Bad things were done. Such as never marking any strings as tr(), using fixed size UI elements, layering dialogs on top of dialogs (that stole focus but were not closable), absolute positioning, copy-n-pasted code, no documentation/comments... This was violating nearly all of my guidelines listed above. While working on fixing bugs, I made sure to spend a little time making things more solid, flexible, clean, etc. The big one for me was marking those user facing strings as tr() so this product could be sold in places other than the English speaking world.
During this initial time there, I remember once chatting with upper management briefly, "Yeah, this product can actually handle multiple languages with ease. Including ones such as Japanese. It's going to take some work though to get it done. I'll send you a screenshot as proof." Which I did later. They responded in kind with a "Thank you. This is very valuable information for us and the future of this product."
A few days later during the weekly team meeting, the project manager wanted to talk about one more thing before ending; he seemed a little irked about this too. For this story, I'm going to refer to him as "Mr. A".
While looking at me, kinda upset, Mr. A said:
"Someone talked to upper management, saying that it's possible to translate this into multiple languages for release! Now they want to know how feasible this is to do!!"
I replied:
"Yes, this is fully possible. About a month and a half ago I started to go through and mark all of the strings that we need to translate. I would say that I've gotten a good 90% of them so far. The last 10% might be a bit more tricky since they show up less often. We also need to put in some localization infrastructure, but that should be simple and I've done this before."
My boss (not the same person as Mr. A) concurred that this was taking place and he thought my assessment and general outline was correct. Also stating he thought I should be the one leading this undertaking. I continued to explain a little bit more about the process of translating Qt based software. Some questions were asked of me.
Right before the end of the meeting, Mr. A snapped in:
"Alright, I'll tell management we're going to work on this. And Ben, if you refuse to do it, then I'll find someone else who will!!"
Me:
Umm, I said I want to do it, and I already have been working on it."
After that exchange I was a little bewildered. I huddled up with my coworkers, asking, "Did Mr. A threaten to replace/fire me? For thinking I was going to refuse to work on a project, which I've already started to work on?" My coworkers were quite confused too at Mr. A. You can probably guess what kind of person he was like to work for.
Later that day, Mr. A came up to me at my desk. Very nicely, like a begging puppy dog, asking me if I'd be willing to take the lead on the translation project. I said "Yes". It was something I wanted to do. He said that we would be targeting five more languages, all western European.
A few days later he sent me an email asking me about a time estimate for this project. I quoted him that it could be 6 months. He was quite upset in his response. It honestly wasn't an overly complex product. I really thought if I was given pure laser focus and all of the tools/resources required, this could be done in less than 2 months. I gave him this absurd estimate for a few reasons:
- We still haven't identified all of the strings
- We still need to add in plumbing for translation to work
- We need to have people translate the software and give it back to us
- Non English input it something we need to design for
- The UI layout is very English specific; other languages are going to break things and we'll have to fix the layout for all six languages
- There is going to be much iteration for development and testing
- We are going to discover problems we did not know we had
Another trick that I've learned is if you tell someone it's going to take 8 days, but then get it done in only 3 to 5, they'll think you're amazing. But if it takes you closer to 8 or 9 days (i.e. unforeseen issues), you're good at giving estimates.
But there is one other key reason I gave him the half a year estimate (and I didn't tell him this):
I knew at some point Mr. A was going to tell me to put the translation project on hold, but blame me if it wasn't done in 2 months. Irregardless of him telling me what to work on, and when. The extra 4 months of padding wasn't there for anything actually related to translation. I added it in because I knew the (sad) state of this product and how he liked to manage.
The next week I formally started on the translation project. Put in the support for switching languages, tracked down about 98% of all strings, adding in country flags, gave Mr. A the .ts file to hand to translators, etc. Things were going well. About 3 weeks into it he told me to fully stop working on it as we had other bugs that required more attention for an upcoming release.
-_-
And well, the translation project then languished for the next 4 months. The only thing I could do is mark strings as tr() in preparation for when he wanted to pick this back up again.
After a long while, during the weekly meeting, out of nowhere Mr. A asked me:
"Ben, what's the status of the translation project?"
I replied:
"We haven't done anything with it. I sent you those .ts files three months ago. Did you give them to the translation firm? I never heard back from you."
He spat back:
"WHAT?! We're already horribly delayed with this product as it already is!! This is a core selling point!
After this, I did remind him that he told me to stop working on this portion of the product months ago; I don't think that he liked that I brought it up. He asked me what we needed to do. The difficulty of getting this done had also increased since more features were added to the product. He didn't like this, but he told me that adding those extra five languages would now be my 100% full focus. It became 80% of my focus.
Then he demanded I do something I dread: "Ben, translate the UI to French using Google and plug those strings in". Oh my, do I hate this:
- Those strings are not going to be accurate at all
- Because they are not accurate, we won't have correct sizing for the UI Elements
- It's a waste of time because of the two above points
- It would be better to just wait for the real (correct) French strings to be in
- My biggest fear was someone in upper management saying, "Let's just ship the product with the machine translated French; it's good enough"
I tried to push back on this, but he was adamant that I must do this. He thought it was vital to the success of the project. The rationale: "We'll be better prepared when we get the real French in". When the actual translation came in from the outside firm, this was not the case. I had to spend another week re-fixing the UI for the correct French.
(╯°□°)╯︵ ┻━┻
There was one other thing that felt really odd to be about this translation process too: the firm that was doing our translations would only accept the strings in an Excel sheet. Now, this is a perfectly valid way of doing translation. But, as mentioned way above, there are industry standards such as .ts and .po which are used specifically for the realm of software. Mr. A had told me he worked with the firm before on other projects elsewhere. That they would give us a "Certificate of Translation" to prove that our software was properly localized. I asked Mr. A if I could lookup the firm's name online and their website to see what they accepted, as I found it quite odd we couldn't give them the .ts file directly.
Mr. A. refused to tell me (quite defensively) and told me just to send him the Excel file. He did inform me that this firm would first take the Excel sheet and run it through a machine translator then have a human look it over. He also reiterated that the "Certificate of Translation" was highly important. Coupled with not accepting .ts and .po files something about this did not seem right to me. But alas, I was at his mercy, so I had to comply.
We eventually received the German translation from this firm. In short, it was an absolute mess. Let me tell you about the most egregious one...
Remember my example above of the word "no" in German? Let me repeat myself: The word "no" doesn't always translate to "nein" in German. For some cases where there is a zero quantity you need to use a separate word. "Kein". For example, in English we might say:
I have no apples.
In German, the correct translation is:
Ich habe keine Äpfel.
I think you might be able to guess what word this "certified" translation was using. They were using nein and only nein. EVERYWHERE. Where kein should have been used, nein was there sitting in its place.
This was crap. I was able to find other problems with it too. I even sent it off to our distributor in Europe. As he was more experienced with the technical/scientific German that was needed; I was not. He said that about 40% of the translation was incorrect. Even pointing out examples of other localized software that had correct German translations. I very much agreed with him.
Our distributor (separate from the translator) corrected a lot of the poor German. This should have never had to be done. I eventually gave this corrected German back to the translation firm. They weren't happy about receiving this news and pushed back with how they were in fact, actually correct. Something about this firm and Mr A.'s obsession with the "certificate of translation" seemed incredibly odd to me. But there was nothing that I could do. I had no power to make decisions where I worked.
After German and French, I had to add in the rest of the other western European languages. I mostly ran into the same issue over and over again: a word being too large for a UI element, thus breaking the software. Rather than actually fixing the UI's layout and positing code, Mr A.'s instinct was to ask if we could just abbreviate the word. Unfortunately, this is what ended up being the solution so many times over. Thus littering our software with way too many acronyms and periods than I felt comfortable with. I also had to run back and forth with the translators a lot when something didn't fit.
Once I was on the last language, I got word form Mr. A. that upper management wanted to sell the device in eastern Europe as well. This was not too much of a problem for languages that used a Latin based alphabet. Once again, it was more layout tweaking and "abbreviation abuse". But oh boy, the Russian translation horribly broke the layout. I made a brief mention above of how Cyrillic scripts are quite "blocky". It's because their glyphs can be quite wider than Latin characters. There were places where abbreviations were a no-go, so I actually got to properly fix the layout code in some sections.
At the end of this arduous process. I was proud to parade that this product could be sold all over Europe in many different locales. Remember when I told Mr. A that my time estimate for the project was half a year? From the initial work of collecting strings through plugging up the last glitches from Russian; it took about six and a half months.
For those of you who spent the time to go through and read my story above, I thank you. I hope you take it away as a cautionary tale of how not to do a localization.
Final Words
There is one last statement I'd like to leave you with. It can apply to any project:
Good developers don't just ignore these things and only listen to management; they raise issues before things get out of hand. Likewise, good managers give their developers the time, space, and trust to fix these problems before they become bigger troubles. This is not limited to code and layout, but should also take in account UI, UX, and different cultures. We are making things for human beings; other people who might be very different from us.
Lastly, I'd like to thank the folks at Qt who keep working on all of the bugs I file. I like to make a special mention for Joereg Bornemann who helped me with a false alarm report I made. Credit to the rest of you too.
Please take great care in everything you build, for everyone else.